

CHASERS & GRAPNELS
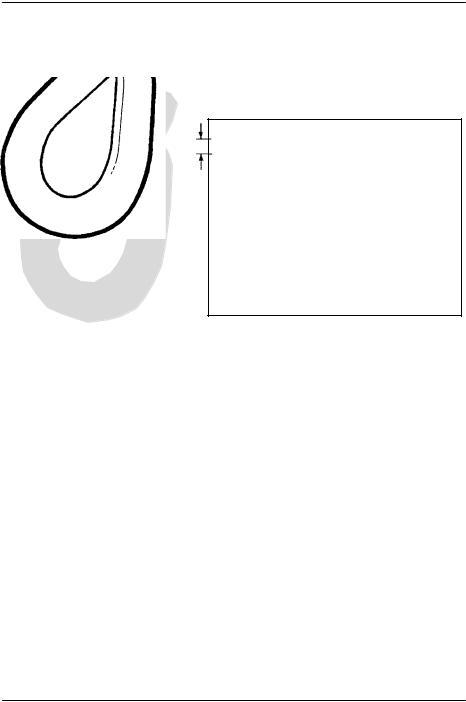
PERMANENT CHASERS
BEL 102 - 106 - 110
G
Hø
A
|
C |
|
D |
F |
|
E |
||
B |
Type |
S.W.L. |
Proof |
|
|
|
|
|
|
|
|
|
Test |
|
A |
B |
C |
D |
E |
F |
G |
H |
||
BEL |
100 |
250 |
in |
65.25 |
45.00 |
39.00 |
30.00 |
12.00 |
7.50 |
4.88 |
3.38 |
102 |
Tonnes |
Tonnes |
mm |
1657 |
1143 |
991 |
762 |
305 |
191 |
124 |
86 |
BEL |
130 |
250 |
in |
67.00 |
46.00 |
39.00 |
30.00 |
15.00 |
8.00 |
5.13 |
3.88 |
106 |
Tonnes |
Tonnes |
mm |
1702 |
1168 |
991 |
762 |
381 |
203 |
130 |
99 |
BEL |
130 |
250 |
in |
73.50 |
49.00 |
44.50 |
33.00 |
13.00 |
8.00 |
5.13 |
3.88 |
110 |
Tonnes |
Tonnes |
mm |
1867 |
1245 |
1130 |
838 |
330 |
203 |
130 |
99 |
Weight: BEL 102 1088 Kg
BEL 106 1451 Kg
BEL 110 1433 Kg
Lifting eye dimensions shown are standard for each type. Specials can be made to suit customer requirements.
3.5
CHASERS & GRAPNELS
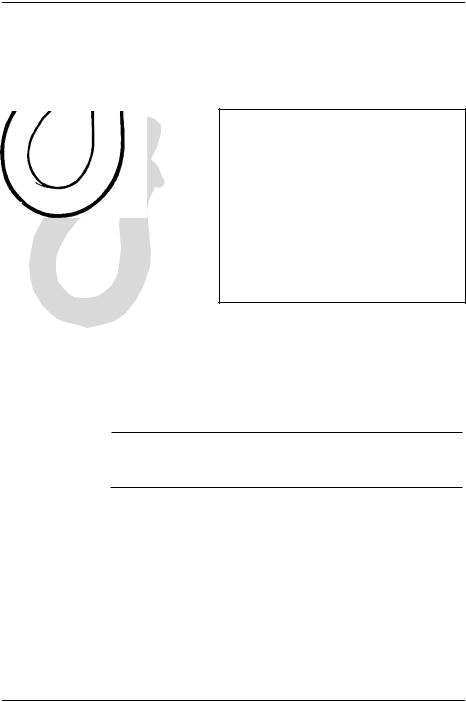
DETACHABLE PERMANENT CHAIN CHASERS
BEL 107 - 108 - 111
G
Hø
A
|
C |
|
F |
D |
E |
B |
Type |
S.W.L. |
Proof |
|
|
|
|
|
|
|
|
|
Test |
|
A |
B |
C |
D |
E |
F |
G |
H |
||
BEL |
100 |
250 |
in |
74.25 |
45.00 |
42.50 |
30.00 |
12.00 |
7.50 |
4.88 |
3.38 |
107 |
Tonnes |
Tonnes |
mm |
1886 |
1143 |
1080 |
762 |
305 |
191 |
124 |
86 |
BEL |
130 |
250 |
in |
76.00 |
46.00 |
42.00 |
30.00 |
15.00 |
8.00 |
5.13 |
3.88 |
108 |
Tonnes |
Tonnes |
mm |
1931 |
1168 |
1067 |
762 |
381 |
203 |
130 |
99 |
BEL |
130 |
250 |
in |
78.50 |
49.00 |
44.50 |
33.00 |
13.00 |
8.00 |
5.13 |
3.88 |
111 |
Tonnes |
Tonnes |
mm |
1994 |
1245 |
1130 |
838 |
330 |
203 |
130 |
99 |
Weight: BEL 107 1238 Kg
BEL 108 1656 Kg
BEL 111 1742 Kg
Lifting eye dimensions shown are standard for each type. Specials can be made to suit customer requirements.
3.6
CHASERS & GRAPNELS
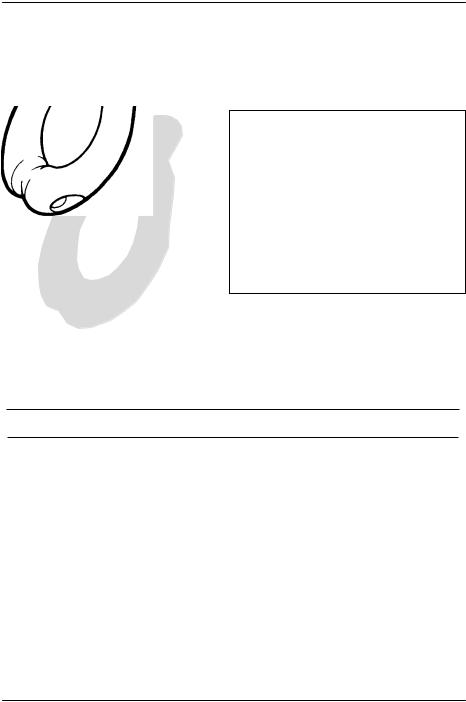
PERMANENT WIRE CHASERS
BEL 210 - 213 - 214 - 215
G E
A
D F
B
Hø
C
|
|
Proof |
|
|
|
|
|
|
|
|
|
|
S.W.L. |
Test |
|
|
|
|
|
|
|
|
|
Type |
Tonnes |
Tonnes |
|
A |
B |
C |
D |
E |
F |
G |
H |
BEL 210 |
130 |
250 |
mm |
2073 |
1245 |
1203 |
838 |
330 |
432 |
130 |
99 |
BEL 213 |
130 |
250 |
mm |
1962 |
1099 |
1086 |
692 |
330 |
445 |
130 |
99 |
BEL 214 |
130 |
250 |
mm |
2318 |
1308 |
1397 |
902 |
330 |
508 |
130 |
99 |
BEL 215 |
250 |
400 |
mm |
2051 |
1168 |
1060 |
711 |
356 |
445 |
178 |
127 |
Weight: BEL 210 1959 kg
BEL 213 1846 kg
BEL 214 2530 kg
BEL 215 2495 kg
Lifting eye dimensions shown are standard for each type. Specials can be made to suit customer requirements.
3.7
CHASERS & GRAPNELS
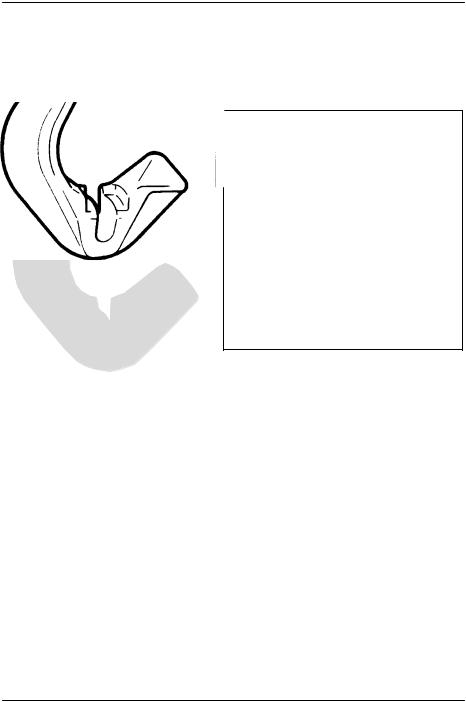
‘J’ LOCK CHAIN CHASERS
BEL 115
82.00 |
2083 |
12.00 |
4.88 |
|||
305 |
124 |
|||
|
|
|
|
|
3.38 |
86 |
|
||
ø28.00 711
21.00 |
58.50 |
533 |
1486 |
BEL 115/35 for chain 21/2 inch to 31/2 inch.
BEL 115/45 for chain 33/4 inch to 41/2 inch.
Safe Working Load: |
100 Tonnes |
Proof Test Load: |
250 Tonnes |
Weight: |
1778 Kg |
3.8
 MTC
MTC
Anchor Handling Course
Breaking the anchor off the bottom:
Breaking out anchors takes its time mainly because:
Breaking out forces is caused by the volume of the soil on the fluke and the sucking or under pressure below it. Pulling up the anchor increases the soil resistance due to the dilatant behaviour of the soil. This resistance decreases with time, reducing the negative pressure and thus easing the break out.
For most anchors the following guide is useful:
1.In sandy soil the break out force will be between 12 and 17% of the anchor's test load.
2.In clay soil the break out force will be about 60% of the anchor’s test load.
3.In sticky soft soil the break out force can exceed 100% of the anchor’s test load.
As the typical test tension of the anchor is around 1/3 break strain of the chain or wire in use, the following table is a summary of the forces:
Chain type |
1/3 Break load |
Sandy 17% |
Clay 60% Soft Soil 100% |
|
76 mm U3 |
143 |
24 |
86 |
143+ |
76 mm ORQ |
154 |
26 |
93 |
154+ |
76 mm K4 |
200 |
34 |
120 |
200+ |
Breaking the anchor off the bottom is very likely the operation where there has been most loss of time and equipment.
It is a very time-consuming and hard job to get the anchor up, when the connection between the anchor and the vessel is broken.
Wrong use of equipment and wrong technique gives many possibilities of damaging the work and or the pennant wire, other anchor handling equipment i.e. the swivel and especially maybe also the winch.
One of these possibilities must here be mentioned:
The mentioned possibility of damaging the wire is overload on the wire during the work with breaking the anchor loose from the bottom.
A very common but inappropriate method is to shorten up on the work wire - heave in on the winch – and keep on going until the stern roller is above the anchor position and the anchor will break loose or the wire / equipment will break. See fig 1, page 2, chapter 11.
Shorten up on the work wire might help breaking loose the anchor in many situations, but on the other hand there is a high risk for overloading your equipment.
The tension, which during the above mentioned method is used on the wire, is depended on following circumstances:
1.Winch pull force
2.Vessel’s displacement
3.Nature of the sea / sea state
M:\ANCHOR HANDLING\Course Material\Training Manual New\Chapter 11\Breaking the anchor off the bottom.doc
Chapter 11 |
Page 1 |
 MTC
MTC
Anchor Handling Course
Pt. 1 is depending on the size of the winch and which layer you are working on. If you are using one of the bigger winch sizes you are able to exceed the breaking load of the wire.
Pt. 2 and pt. 3 can easily by many times exceed the breaking load of the wire regardless the size of winch – small or large.
|
|
D |
|
B |
B |
|
|
|
|
|
A |
C |
|
A |
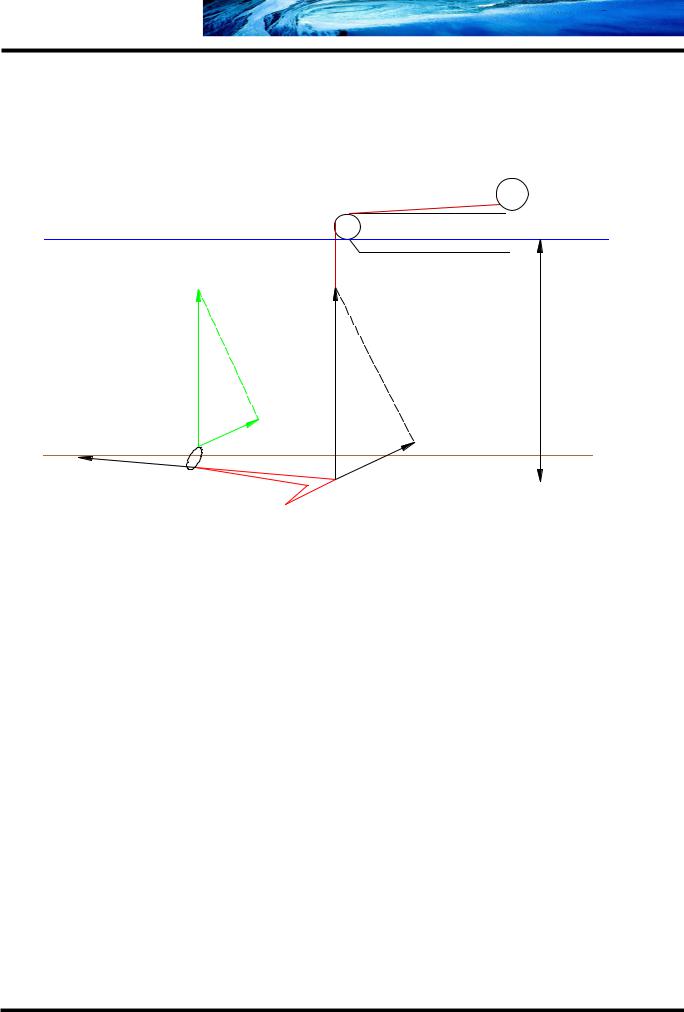
Fig 1
•“A” is the break loose force, indicating the best direction and size of tension to be used for breaking loose the anchor.
•“B” will be the tension you will get in your work wire in order to obtain the required force “A”, if position of the stern roller is above the anchor,
•“D” is water depth plus penetration of anchor.
Anchors in very soft clay can be buried very deep. A penetration of 60 meters is mentioned.
Another fact is that the soil aft of the anchor is disturbed due to the penetration of the anchor.
While the soil above the anchor might be intact and has probably been it for several thousand years.
The forces illustrated on fig 1 are the same if position of chaser collar is on top of the anchor shank as e.g. on a Stevpris. (Illustrated with green arrows on fig 1)
M:\ANCHOR HANDLING\Course Material\Training Manual New\Chapter 11\Breaking the anchor off the bottom.doc
Chapter 11 |
Page 2 |