

СУБД Oracle / Литература / PowerDesigner 9 / GeneralFeatures
.pdf&KDSWHU 8VLQJ WKH 3RZHU'HVLJQHU ,QWHUIDFH
♦([WHUQDO, when the links exist between models. These dependencies are created during intermodel generation or external shortcut creation, they appear in the Dependencies page if the related model is opened in the workspace. If the related model is not available, you can use the repository to retrieve external dependencies
For more information on how to retrieve external links using the
repository, see section Auditing repository activities in chapter Managing Repository Documents in the 5HSRVLWRU\ 8VHU V *XLGH.
PowerDesigner lists these links in the Dependency page of objects property sheet.
0RGHO GHSHQGHQFLHV
The Dependencies page of a model also lets you check the model origin (Generated From tab) and destination (Generated As tab).
ϖ7R GLVSOD\ REMHFW GHSHQGHQFLHV
1Open the property sheet of an object.
2Click the Dependencies tab. The Dependencies page appears.
General Features Guide |
|

8VLQJ SURSHUW\ VKHHWV
3Click the different tabs to see the depending objects or the uses of the object throughout the opened model of the workspace.
4Click OK.
8VLQJ H[WHQGHG GHSHQGHQFLHV
|
You can specify free collaborations between PowerDesigner objects using |
|
extended dependencies. These links between package or model objects are |
|
not interpreted and checked by PowerDesigner as they are meant to be used |
|
for documentation purposes only. |
|
You can complement these links by creating VWHUHRW\SHV to specify their |
|
meaning. Stereotypes are used to define extended dependencies in all |
|
PowerDesigner modules, and appear in the Extended Dependencies page of |
|
each non-link object property sheet. You can type them directly in the |
|
Stereotype column or select a value from the dropdown listbox if you have |
|
previously defined stereotypes in an extended model definition (.XEM) |
|
applied or embedded to the model. |
|
For more information on creating stereotypes in an extended model |
|
definition, see section Working with Extended Model Definitions in chapter |
|
Managing Objects. |
Example |
The following example illustrate how extended dependencies can help you |
|
document relations between package or model objects. |
|
PowerDesigner |
&KDSWHU 8VLQJ WKH 3RZHU'HVLJQHU ,QWHUIDFH
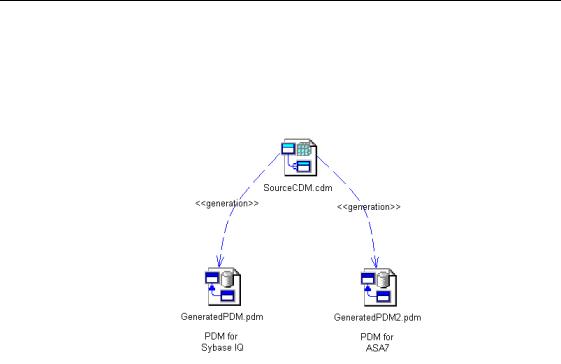
This example about generation from a CDM to two PDMs generated with different DBMS shows that the file object SourceCDM.cdm has extended dependencies with the file objects GeneratedPDM.pdm (for Sybase IQ) and GeneratedPDM2.pdm (for ASA7). These extended dependencies are defined by the <<generation>> stereotype to explain that the two PDM come from the same CDM.
For more Information on file object, see section Using file objects in chapter Managing Objects.
&UHDWLQJ DQ H[WHQGHG GHSHQGHQF\ E\ LQVHUWLQJ D V\PERO LQ WKH GLDJUDP
You can create an extended dependency directly in the diagram using the Link/Extended Dependency tool to attach model objects together. The object
from which you drag the Link/Extended Dependency tool is called GHSHQGHQW REMHFW and the object towards which you drag the Link/Extended Dependency tool is called LQIOXHQW REMHFW.
ϖ7R FUHDWH DQ H[WHQGHG GHSHQGHQF\ E\ LQVHUWLQJ D V\PERO LQ WKH GLDJUDP
1 Select the Link/Extended Dependency tool in the Palette.
2 Click inside the dependent object and while continuing to hold down the mouse button, drag the cursor to the influent object.
General Features Guide |
|
8VLQJ SURSHUW\ VKHHWV
3Release the mouse button.
An extended dependency symbol appears between the two objects in the diagram. The created extended dependency is viewable in both the Dependencies tab of the influent object property sheet and in the Extended Dependencies tab of the dependent object property sheet.
4Double-click the extended dependency link symbol to open the property sheet of the dependent object.
The list of available extended dependencies appears.
5Click the Stereotype column for the extended dependency you have just
created and type a stereotype.
RU
Click the Stereotype column for the extended dependency you have just created and select a stereotype from the dropdown listbox if available.
6Click OK.
0RYLQJ H[WHQGHG GHSHQGHQFLHV
Extended dependencies behave like oriented links. When you move the dependent object, you also move the extended dependency attached to it. And when you move the influent object, it is replaced with a shortcut to preserve the extended dependency definition.
&UHDWLQJ DQ H[WHQGHG GHSHQGHQF\ IURP DQ REMHFW SURSHUW\ VKHHW
You can create an extended dependency between two model objects from the property sheet of one of them.
The object from which property sheet you create the extended dependency is called GHSHQGHQW REMHFW, and the object you add in the selection dialog box is called LQIOXHQW REMHFW.
To create an extended dependency you can select any object in the model or workspace using the Add Objects selection dialog box. If you select an object that belongs to another package, a shortcut for that object will be created.
ϖ7R FUHDWH DQ H[WHQGHG GHSHQGHQF\ IURP DQ REMHFW SURSHUW\ VKHHW
1 Double-click a non-link object to open its property sheet.
2 Click the Extended Dependencies tab to display the corresponding page. 3 Click the Add Objects tool to open the Add Objects dialog box.
4 Select a model from the Model box.
|
PowerDesigner |

&KDSWHU 8VLQJ WKH 3RZHU'HVLJQHU ,QWHUIDFH
5Select a package from the dropdown listbox.
6Select an object from one of the different tabbed pages.
7Click OK.
The extended dependency you have created appear simultaneously in the list of extended dependencies but also in the diagram if objects at both extremities are already displayed.
8Click the Stereotype column for an extended dependency and type a
stereotype.
RU
Click the Stereotype column for an extended dependency and select a stereotype from the dropdown listbox if available.
9Click OK.
You can create several extended dependencies at once. The created extended dependencies are viewable in both the Dependencies tab of the influent object property sheet and in the Extended Dependencies tab of the dependent object property sheet.
'LVSOD\LQJ YHUVLRQ LQIRUPDWLRQ
PowerDesigner automatically manages version information about objects in the model. All objects with property sheets have a Version Info tab.
General Features Guide |
|
8VLQJ SURSHUW\ VKHHWV
When you click the Version Info tab, you can see the following information about the object:
9HUVLRQ ,QIR |
'HVFULSWLRQ |
|
Creation User |
Name of the User who created the object. The user is the |
|
|
person who logged in the current Windows NT session or |
|
|
the profile typed to log in the Windows 95/98 session. |
|
Creation Date |
Date of creation of the object |
|
Last Modification |
Name of the User who made the last modification to the |
|
User |
object. The user is the person who logged in the current |
|
|
Windows NT session or the profile typed to log in the |
|
|
Windows 95/98 session |
|
Last Modification |
Date of the last modification of the object |
|
Date |
|
|
Generated From |
Name of the origin object. This box appears when the |
|
Origin Object |
current object has been generated from another object. You |
|
|
can click the Origin Object Properties button to open the |
|
|
origin object property sheet |
|
|
|
The fields in the Version Info page are read-only, they are automatically filled by PowerDesigner and you cannot modify them.
9DOLGDWLQJ FKDQJHV LQ D SURSHUW\ VKHHW
The changes you make in the property sheet of an object have to be validated.
By default, you have to use the Apply button to commit property changes and the OK button to save the property sheet contents and close it.
$XWR FRPPLW PRGH
You can modify the property sheet validation mode in the Options dialog box. If you select the Auto commit mode, any change is committed as soon as you change field in the property sheet. You have to use the Undo feature to cancel a change.
For more details on the validation mode options, see section Defining dialog box behavior.
|
PowerDesigner |

&KDSWHU 8VLQJ WKH 3RZHU'HVLJQHU ,QWHUIDFH
ϖ7R YDOLGDWH FKDQJHV LQ D SURSHUW\ VKHHW
♦Click Apply if you are not in Auto Commit mode.
RU
Change field in the property sheet if you are in Auto Commit mode.
&ORVLQJ D SURSHUW\ VKHHW
ϖ7R FORVH D SURSHUW\ VKHHW
♦Click OK or Cancel if you are not in Auto Commit mode.
RU
Click the Close button if you are in Auto Commit mode.
)LQGLQJ WH[W XVLQJ UHJXODU H[SUHVVLRQV
You can find script text used in the Edit/Run Script editor, in the Preview or script page of a table property sheet or in the Resource Editor for example using regular expressions.
A regular expression is a pattern of text that consists of ordinary characters
(for example, letters A through Z) and special characters named PHWDFKDUDFWHUV. The pattern describes one or more strings to match when
searching for text. The regular expression serves as a template for matching a character pattern to the string being searched.
In order to be able to search for text using regular expressions, you must select the Regular Expression check box in the Find dialog box (or Replace in Items dialog box in the Resource Editor) and type regular expressions in the Find What box.
You can use the following metacharacters:
0HWDFKDUDFWHUV |
'HVFULSWLRQ |
|
\ |
Matches a special |
|
|
character |
|
^ |
Matches the position at |
|
|
the beginning of the input |
|
|
string |
|
$ |
Matches the position at |
|
|
the end of the input string |
|
|
|
([DPSOH
"n" matches "n". "\n" matches a newline character. "\\" matches "\" and "\(" matches "("
"^Win" matches strings beginning with "Win
"then$" matches strings ending with "then"
General Features Guide |
|
8VLQJ SURSHUW\ VKHHWV
0HWDFKDUDFWHUV |
'HVFULSWLRQ |
([DPSOH |
|
* |
Matches the preceding |
"zo*" matches "z" and "zoo" |
|
|
character zero or more |
|
|
|
times |
|
|
+ |
Matches the preceding |
"zo+" matches "zo" and |
|
|
character one or more |
"zoo", but not "z" |
|
|
times |
|
|
? |
Matches the preceding |
"to?" matches either "t" or |
|
|
character zero or one time |
"to" |
|
. |
Matches any single |
".ork" matches "Work", |
|
|
character except the |
"Fork" etc. |
|
|
newline \n |
|
|
[ ] |
Matches any one of the |
"[abc]" matches "a", "b", or |
|
|
enclosed character |
"c" |
|
|
|
A range of character can be |
|
|
|
indicated with a dash "[a-z]" |
|
|
|
|
For a complete list of metacharacters and their behavior in regular expressions, see the 9LVXDO %DVLF 'RFXPHQWDWLRQ.
|
PowerDesigner |
&KDSWHU 8VLQJ WKH 3RZHU'HVLJQHU ,QWHUIDFH
8VLQJ OLVWV
Lists show objects of the same type belonging to the current package or model. The properties of the listed objects are organized in columns. Depending on the properties of the listed objects, lists can be ordered or not. For example, a list of tables is not ordered, whereas a list of columns has an order that must be preserved.
The title bar of the list identifies the object type, for example, List of
Columns.
'LVSOD\LQJ D OLVW IURP WKH 0RGHO PHQX
When you open a list, you display all objects belonging to the current package or model, not only those displayed in the current diagram.
'LVSOD\LQJ D OLVW XVLQJ FRQWH[WXDO PHQX
You can also display a list by right-clicking the model node in the Browser and select List of from the contextual menu, then select a type of list.
ϖ7R GLVSOD\ D OLVW IURP WKH 0RGHO PHQX
♦Select Model→,WHP.
The corresponding list appears.
General Features Guide |
|
8VLQJ OLVWV
'LVSOD\LQJ VKRUWFXWV LQ DQ REMHFW W\SH OLVW
You can enable or disable the display of shortcuts in the lists of object types by clicking the Include shortcuts tool. When you enable the display, the shortcuts of the object type you have selected in the current package appear. They are grayed out in the selected list as they cannot be modified in the current model or package.
When you include shortcuts whose target model is closed, some information such as comment or description for example are unavailable.
If both the Include Shortcuts and Include Sub-packages tools are enabled in the selected list, all the objects shortcuts of the current package and those of the sub-packages appear.
'LVSOD\LQJ D OLVW IURP D SURSHUW\ VKHHW
You can also find lists in the property sheets of objects. These lists show the objects related to the selected item.
For example, when you select the Attributes tab in a class property sheet you display the list of attributes of the selected class.
ϖ7R GLVSOD\ D OLVW IURP D SURSHUW\ VKHHW
1Double-click an object symbol in the diagram to display its property sheet.
2Select a tab corresponding to objects related to the selected object.
|
PowerDesigner |