

СУБД Oracle / Литература / PowerDesigner 9 / GeneralFeatures
.pdf&KDSWHU 0DQDJLQJ 0RGHOV
8VLQJ WKH )UHH 0RGHO
|
The Free Model (FEM) allows a user to create any kind of chart, diagram, in |
|
a context-free environment. You can use the Free Model to create different |
|
graphics for your specifications, to explain the architecture of your system |
|
and applications, the use-case scenarii of the applications, the flowcharts, or |
|
to define your own method. |
|
If there is something you want to graphically represent, but there is no easy |
|
way to build a model using a standard BPM, CDM, PDM, or OOM, you can |
|
use the Free Model to create it. |
|
By taking advantage of advanced features like the Generic Generator, |
|
Extended Attributes, and Custom Symbols you can create very specific |
|
diagrams tailored to your specific use. |
|
You can enrich the diagrams in the Free Model by selecting different bitmaps |
|
for each symbol and add extended attributes to collect specific metadata. |
|
VBScript and the Generic Generator make it possible to program your own |
|
semantics into this model and create specific generated code or other output |
|
particular to your own interpretation. |
|
The Free Model makes you free to explore representations beyond the |
|
standards set by the other, more specific models in PowerDesigner. |
What to represent |
♦ A model representing how your models and documents relate to each |
with a Free Model? |
other |
|
♦ A model representing the organizations in your enterprise and how they |
|
interrelate |
|
♦ A model representing a flowchart |
|
♦ A model representing a hierarchy diagram |
|
♦ A model representing the graphics you use in PowerPoint presentations |
|
and link them to the presentations they are used in |
|
♦ A model representing the users in your Enterprise Repository and link |
|
them to symbols representing the groups they belong to |
|
♦ A model representing an ORM model using ORM specific extended |
|
model definitions |
|
There are many more ways you can use this model. You are free to explore |
|
easy or complex implementations. |
General Features Guide |
|
'HILQLQJ QDPLQJ FRQYHQWLRQV
'HILQLQJ QDPLQJ FRQYHQWLRQV
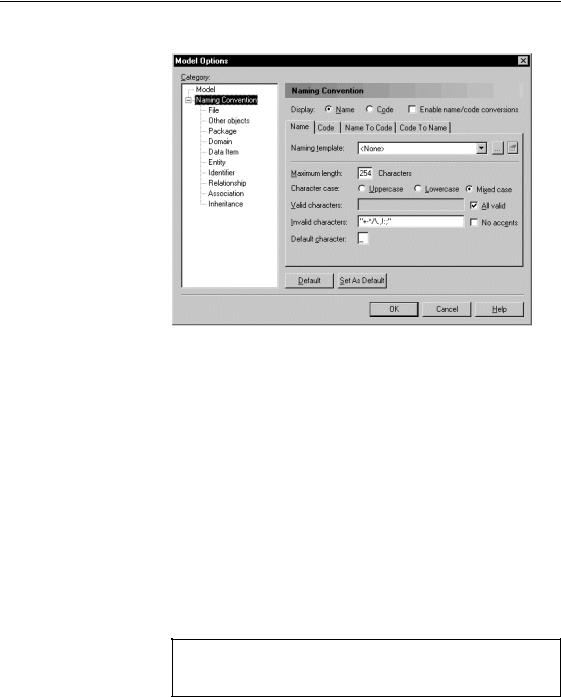
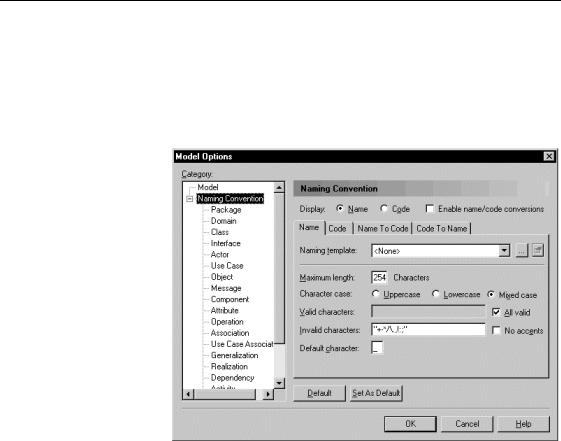
1DPLQJ FRQYHQWLRQV are common model options that you can define in the Model Options dialog box.
The naming conventions allow the user to:
♦Set rules in order to enforce predefined name and code formats for all the objects within a model. When you type a name or a code that does not respect the conventions, PowerDesigner applies checks and systematically adapts them to the required format. When you define name and code formats in a model, these options are saved in the model or can be used as default parameters for new models of the same type
For more information on name and code format, see section Defining name/code format.
♦Set conversion scripts in order to generate objects name from their code or objects code from their name using specific macros and conversion tables. This feature is only available when you select the Enable name/code conversion option.
For more information on name and code conversions, see section Defining name/code conversions.
1DPH LQWR FRGH FRQYHUVLRQ GXULQJ LQWHUPRGHO JHQHUDWLRQ
The name into code conversion is particularly useful for intermodel generation, as it allows you to define how you want the codes of your model objects to be generated. For more information on the name into code conversion during the intermodel generation, see section on intermodel generation options in the different modules user’s guides.
|
PowerDesigner |

&KDSWHU 0DQDJLQJ 0RGHOV
'HILQLQJ QDPH FRGH IRUPDW
Name and code format encompasses constraints on length, character case and type for the name and the code of objects.
By default, PowerDesigner displays object names, you can modify this option and choose to display the code of objects.
You can set name and code format for:
♦Models and packages
♦Each type of object in a model
♦Reusable templates you can apply to different types of objects in a model
General Features Guide |
|
'HILQLQJ QDPH FRGH IRUPDW
From the Model Options dialog box, you can define the following options for names and codes:
2SWLRQ |
'HVFULSWLRQ |
|
Display Name |
Displays the names of objects in the interface |
|
Display Code |
Displays the codes of objects in the interface |
|
Enable name/code |
Enables or disables the use of conversion scripts and |
|
conversions |
conversion tables to generate a code from a name or a name |
|
|
from a code. For more information, see section Defining |
|
|
name/code conversions |
|
Naming Template |
Allows you to use a template for name and code format for |
|
|
several types of objects within a model |
|
Maximum Length |
Maximum number of characters. In a PDM, this maximum |
|
|
number of characters can come from the Registry (if you |
|
|
defined a Maximum length and clicked the Set As Default |
|
|
button) or from the DBMS definition file. If a maximum |
|
|
length is declared in both the Registry and the DBMS, |
|
|
PowerDesigner uses the length with higher constraint. For |
|
|
example, in the case where the Registry = 128 and the |
|
|
DBMS = 30, PowerDesigner uses 30 characters for |
|
|
maximum length |
|
Character Case |
Indicates authorized character cases: Uppercase, Lowercase, |
|
|
and Mixed Case |
|
Valid Characters |
List of authorized characters, you can type ranges of valid |
|
|
characters |
|
All Valid |
Accept all characters |
|
Invalid Characters |
List of unauthorized characters. You can use this box to |
|
|
type exceptions to the ranges of valid characters |
|
No Accents |
Removes accents from accented characters |
|
Default Character |
Character used to replace the invalid characters in the name |
|
|
or code |
|
|
|
Character selection When you specify valid characters you define which characters will be accepted and then, you indicate in the invalid character box, which characters will be considered as invalid among those.
|
PowerDesigner |

&KDSWHU 0DQDJLQJ 0RGHOV
The following syntax applies to valid and invalid characters.
|
&KDUDFWHU VHW |
6\QWD[ |
([DPSOH |
|
Interval of |
Characters in single quotation |
’a’-’z’ |
|
characters |
marks separated by a dash |
’a’-’z’, ’A’-’Z’, |
|
’0’-’9’ |
||
|
|
|
|
|
Single character |
Character in quotation marks |
"a", |
|
and character |
|
"xyz" |
|
string |
|
|
Default valid |
|
|
|
PowerDesigner allows the following default valid characters for the codes |
|||
characters |
format: |
|
|
’a’-’z’,’A’-’Z’,’0’-’9’,"_"
Default invalid |
PowerDesigner defines the following default invalid characters for the names |
characters |
format: |
|
"+-*/\.,!:;" |
'LVSOD\LQJ WKH QDPH RU WKH FRGH RI REMHFWV
In PowerDesigner, you can define the display of the name or the code of all objects in each model.
ϖ7R GHILQH WKH GLVSOD\ RI REMHFW QDPH RU FRGH
1Select Tools→Model Options.
The Model Options dialog box appears.
General Features Guide |
|
'HILQLQJ QDPH FRGH IRUPDW
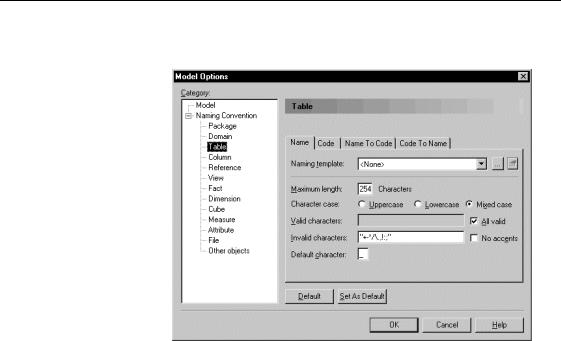
2 Select the Naming Convention node in the Category tree view.
3Select the Name or Code radio button in the upper part of the dialog box.
4Click OK.
'HILQLQJ QDPH DQG FRGH IRUPDW IRU D W\SH RI REMHFW
You can set name and code format for each type of object in a model.
The category Other Objects in the tree view lets you define name and code format for models and all objects that are not visible in the tree view.
ϖ7R GHILQH QDPH DQG FRGH IRUPDW IRU D W\SH RI REMHFW
1Select Tools→Model Options.
The Model Options dialog box appears.
2Select an object type in the Naming Convention node in the Category tree view.
1DPH FRGH IRUPDW IRU PRGHOV
You have to select the Other Objects category to define name and code format for models.
|
PowerDesigner |
&KDSWHU 0DQDJLQJ 0RGHOV
The name format options for the selected type of object open to the
Name page.
3Type a maximum length.
4Select a character case.
5Type valid characters.
RU
Select All Valid.
6Type invalid characters.
Select No Accents if you want to replace accented characters.
7Type a default character.
8Select the Code tab.
9Repeat steps 3 to 7.
10Click OK.
&UHDWLQJ D WHPSODWH IRU QDPH DQG FRGH IRUPDW
You can define a template for name and code format in order to reuse it for several types of objects in a model.
General Features Guide |
|
'HILQLQJ QDPH FRGH IRUPDW
ϖ7R FUHDWH D WHPSODWH IRU QDPH DQG FRGH IRUPDW
1Select Tools→Model Options.
The Model Options dialog box appears.
2Select the Naming Convention node in the Category tree view. You should not select any object type.
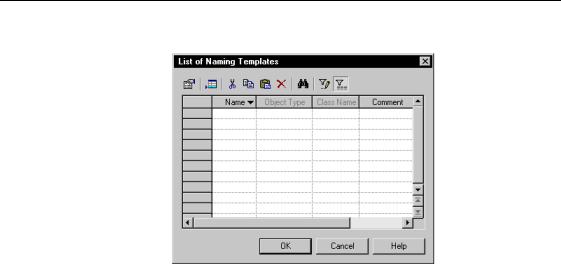
3 Click the Ellipsis button beside the Naming Template box.
|
PowerDesigner |
&KDSWHU 0DQDJLQJ 0RGHOV
The List of Naming Templates appears, this list is empty.
4Click a blank line in the list.
RU
Click the Add a Row button.
An arrow appears at the beginning of a blank line.
5Type a naming template name.
6Click OK.
7Click the Properties tool.
The naming template property sheet opens to the Detail page.
General Features Guide |
|
'HILQLQJ QDPH FRGH IRUPDW
The Detail page allows you to set name and code format for the template.
8Type a maximum length.
9Select a character case.
10Type valid characters.
RU
Select All Valid.
11Type invalid characters.
Select No Accent if you want to replace accented characters.
12Type a default character.
13Click OK in each of the dialog boxes.
1DPLQJ WHPSODWH PRGLILFDWLRQ
You can modify name and code format for a template by selecting it from the Naming template dropdown listbox and clicking the Properties tool beside the Naming template box.
$SSO\LQJ D QDPLQJ WHPSODWH WR D W\SH RI REMHFW
You can apply a naming template to several types of objects that must share the same name and code format.
|
PowerDesigner |