

СУБД Oracle / Литература / PowerDesigner 9 / GeneralFeatures
.pdf&KDSWHU 0DQDJLQJ 0RGHOV
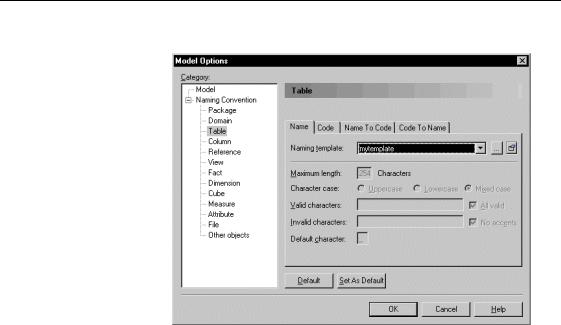
ϖ7R DSSO\ D QDPLQJ WHPSODWH WR D W\SH RI REMHFW
1Select Tools→Model Options.
The Model Options dialog box appears.
2Select an object type in the Naming Convention node in the Category tree.
The name format options for the selected type of object open to the Name page.
3 Select a template in the Naming Template dropdown listbox.
General Features Guide |
|
'HILQLQJ QDPH FRGH IRUPDW
The values of the selected template appear in the name format boxes.
4Select the Code Tab.
5Select a template in the Naming Template dropdown listbox.
The values of the selected template appear in the code format boxes.
6Click OK.
|
PowerDesigner |

&KDSWHU 0DQDJLQJ 0RGHOV
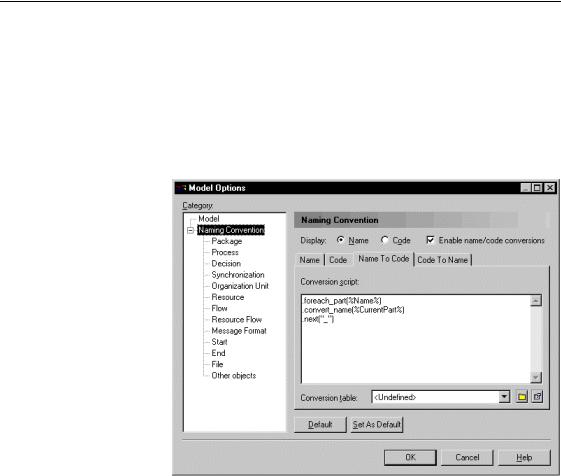
'HILQLQJ QDPH FRGH FRQYHUVLRQV
You can set conversion scripts in order to generate the name of an object from its code or the code of an object from its name using specific macros and conversion tables. You must select the Enable name/code conversions check box in the upper part of the Naming Convention page of the Model Options dialog box for this feature to be available. Name/code conversions can be applied to all named objects in a model or for each type of object individually.
The category Other Objects in the tree view lets you define name and code conversions for models and all objects that are not visible in the tree view.
|
(QDEOH QDPH FRGH FRQYHUVLRQ |
|
|
||
|
RSWLRQ |
|
|
1DPH FRGH EHKDYLRU |
|
|
Selected |
|
|
Use of conversion scripts and |
|
|
|
|
|
conversion tables to generate a code |
|
|
|
|
|
from a name or a name from a code |
|
|
|
|
|
together with the application of naming |
|
|
|
|
|
conventions |
|
|
Unselected |
|
|
Names are copied from codes or codes |
|
|
|
|
|||
|
|
|
|
are copied from names together with the |
|
|
|
|
|
application of naming conventions |
|
Name to Code |
|
|
|
|
|
When you create an object in PowerDesigner, you may have to type a name |
|||||
mirroring mode |
and click the Equal button after the Code box to set the code equal to the |
||||
|
name because the Name to Code mirroring mode may not be selected in the |
||||
|
General Options dialog box. |
||||
|
You can select this operating mode to automatically set the code equal to the |
||||
|
name and thereby apply the conversion scripts you defined to both names and |
||||
|
codes. |
|
|
|
|
|
For more information on the Name to Code mirroring option, see |
||||
|
section Defining dialog box operating mode in chapter using the |
||||
|
PowerDesigner interface |
||||
|
Conversion scripts allow you to alternatively generate a code from a name |
||||
|
and a name from a code. You define conversion scripts from the |
||||
|
corresponding tabs in the Naming Convention page of the Model Options |
||||
|
dialog box. Usually name into code conversion is the most commonly used: |
||||
|
7DE |
|
'HVFULSWLRQ |
|
|
|
|
||||
|
Name To Code |
|
You use it when you want to generate a code from a name |
||
|
Code To Name |
|
You use it when you want to generate a name from a code |
||
|
|
||||
General Features Guide |
|
|
|
|
|
|
|
|
|||
'HILQLQJ QDPH FRGH FRQYHUVLRQV
Each tab allows you to:
♦Define a conversion script in the Script conversion edit box to generate the name from the code or the code from the name using macros
♦Select a conversion table from the Conversion table dropdown listbox. This allows you to convert an expression to another, when using the
.convert_name or .convert_code macros. For more information on macros, see section Using a conversion script. The use of conversion tables is optional
8VLQJ D FRQYHUVLRQ VFULSW
Default conversion scripts allow you to generate names from codes and codes from names using macros. These are macros used in the Generation Template Language (GTL) and recommended for the name/code conversions.
Conversion scripts are used when you click the Equal button after a Name or a Code box in the object property sheet or when you have selected the Name to code mirroring option in the Dialog page of the General Options.
|
PowerDesigner |

&KDSWHU 0DQDJLQJ 0RGHOV
You can customize the default conversion scripts using any of the following macros:
♦.foreach_part
♦.convert_name & .convert_code
♦.lowercase
♦.uppercase
♦.replace
♦.delete
For more information on the syntax of macro keywords used in the
Generation Template Language (GTL), see section Using macros in chapter Generation Reference Guide in the $GYDQFHG 8VHU 'RFXPHQWDWLRQ.
IRUHDFKBSDUW PDFUR
|
The .IRUHDFKBSDUW macro allows an iteration on each part of an expression. |
|
The part separators will be specified into a pattern expression. |
|
This macro is very uselful when dealing with intermodel generation, as |
|
models can have very different naming conventions. For example a Java class |
|
attribute code may be "customerName" whereas a PDM table column code |
|
may be "CUSTOMER_NAME". |
Syntax |
. foreach_part (<Expression> [, <PartSeparatorPattern>[,<Head> [, |
|
<Tail>]]]) |
|
[<Block>] |
|
.next[(<Separator>)] |
|
<Expression> designates the expression scanned by the part iterator. This |
|
part iterator will stop on each character specified into the |
|
<PartSeparatorPattern>. |
|
<PartSeparatorPattern> is defined into a double quoted string. Any character |
|
specified into the pattern will be used as a part separator. |
There is two types of separator:
♦A character separator that must be defined into an additional simple quote and writes as follows: (%Name,"’<char>’")
♦A range separator that must be used with a conversion table and writes as follows: (%Name,"[<c1>-<c2>]")
Both can also be combined: (%Name,"’<char>’,[<c1>-<c2>]").
General Features Guide |
|

'HILQLQJ QDPH FRGH FRQYHUVLRQV
’<char>’ can be any character specified into the pattern for example: a, b , c, 0, 9.
[<c1> - <c2>] specifies a character taken into the range defined between the two characters <c1> and <c2>. For example, [A-Z], [a-z] or [0-9]” can be used as part separators.
By default, the <PartSeparatorPattern> is initialized by the pattern “ -_,\t”. If the specified pattern is empty the pattern is initialized using the default value.
The <Block> scope encompasses the following variables:
♦ %CurrentPart%: Current part value
♦ %IsFirst%: Determines if the current part is the first part of the expression
♦ %IsLast%: Determines if the current part is the last part of the
|
expression |
|
A <separator> can be concatenated between each part. If you defined a |
|
character separator in the <PartSeparatorPattern>, the value of the |
|
<separator> will replace the character separator. If you defined a range |
|
separator in the <PartSeparatorPattern>, the table conversion you selected |
|
will return the corresponding value to replace the range separator. |
|
A <Head> or a <Tail> expression can be added respectively at the beginning |
|
or at the end of the generated expression. |
Examples |
♦ Script 1: Convert a name into a class code (JAVA naming convention) |
|
.foreach_part(%Name%, "' _-'") |
|
%.FU:CurrentPart% |
|
.next |
|
The conversion script will output: |
|
Name = Employee shareholder => Code = EmployeeShareholder |
|
♦ Script 2: Convert a name into a class attribute code (JAVA naming |
|
convention) |
|
.set_value(_First, true, new) |
|
.foreach_part(%Name%, "' _-'") |
|
.if (%_First%) |
|
%.L:CurrentPart% |
|
.set_value(_First, false, update) |
|
PowerDesigner |

&KDSWHU 0DQDJLQJ 0RGHOV
.else
%.FU:CurrentPart%
.endif
.next
The conversion script will output:
Name = Employee shareholder => Code = employeeShareholder
FRQYHUWBQDPH FRQYHUWBFRGH PDFURV
The FRQYHUWBQDPH & FRQYHUWBFRGH macros use a conversion table to get the corresponding code from a name or the corresponding name from a code .
The .convert_name macro uses the conversion table of a name into a code and the .convert_code macro uses the conversion table of a code into a name.
When no occurrence is found in the table, the name or the code is returned.
You can use these macros together with a user-defined conversion table that you select in the Conversion Table dropdown listbox.
Conversion tables are not case sensitive. You can indifferently use lower-or- uppercases in tables.
For more information on conversion tables, see section Using a conversion table.
Syntax
Example
.convert_name (<Expression>)
.convert_code (<Expression>)
The expression <Expression> is the name or code to be converted in the corresponding conversion table.
.convert_name(%Name%, false)
If %Name% = "customer". "customer" will be converted into "CUST" if the conversion table of the name into the code contains a name "Customer" with a code "CUST", disregarding the case.
8VLQJ D FRQYHUVLRQ WDEOH
Conversion tables provide a way to define a correspondence between the name and the code of an object or the code and the name of an object.
Conversion tables are stored into separate CSV (Comma-Separated Values) files and are shared by all models.
General Features Guide |
|
'HILQLQJ QDPH FRGH FRQYHUVLRQV
PowerDesigner provides CSV file samples which are stored in the Resource
Files\Conversion tables folder of the PowerDesigner installation directory.
You can also store the conversion tables you create in that directory.
Conversion tables are not case sensitive. You can indifferently use lower-or- uppercases in tables.
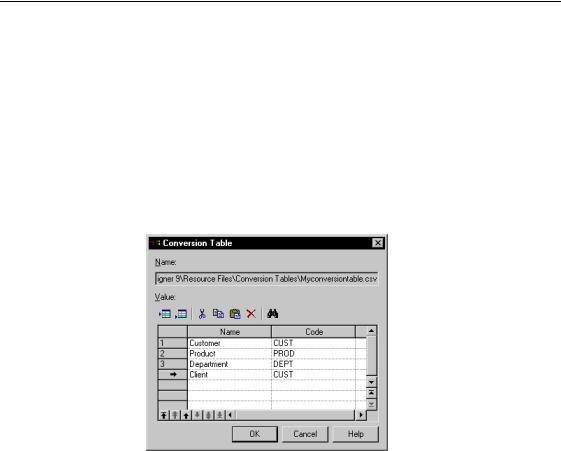
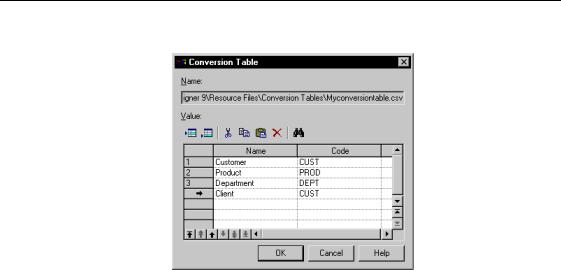
A conversion table encompasses a 1DPH column and a &RGH column. Depending on the conversion type you use, a name or a code is returned during the generation. However, if several different names have the same code for example, only the first found name is returned.
The following example illustrates a Name To Code conversion where two different names (Customer and Client) have the same code (CUST):
♦When converting the name into code, CUST will appear in the Code box of both Client and Customer property sheet objects
♦When converting the code into name, only the first occurrence (Customer = CUST) will be taken into account to appear in the Name box of the Customer object property sheet
A selected conversion table will be operational only if you simultaneously invoke it using the Convert_name or Convert_code macros in the Conversion script edit box.
For more information on the Convert_name or Convert_code macros, see section Using a conversion script.
ϖ7R XVH D FRQYHUVLRQ WDEOH
♦Select a conversion table from the Conversion table dropdown listbox located in the lower part of the Name To Code or Code to Name pages.
|
PowerDesigner |
&KDSWHU 0DQDJLQJ 0RGHOV
&UHDWLQJ D FRQYHUVLRQ WDEOH
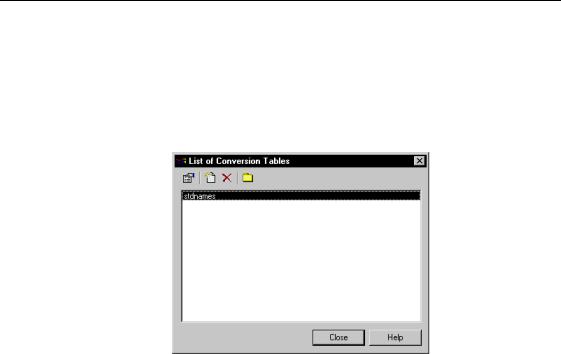
You create a conversion table from the list of conversion tables.
ϖ7R FUHDWH D FRQYHUVLRQ WDEOH
1Select Tools→Resources→Conversion Tables to display the list of available conversion tables.
2Click the New tool.
A standard Save As dialog box appears.
3Type a name for the conversion table and click Save. The Conversion Table dialog box appears.
4Click a blank line in the list.
RU
Click the Add a Row tool.
An arrow appears at the beginning of the line.
5Type a name in the Name column.
General Features Guide |
|
'HILQLQJ QDPH FRGH FRQYHUVLRQV
6 Type a code in the corresponding Code column.
7Repeat steps 4 to 6 if required.
8Click OK.
The conversion table is created and available from the list of conversion tables.
0RGLI\LQJ D FRQYHUVLRQ WDEOH
You modify a conversion table from the List of conversion tables.
ϖ7R PRGLI\ D FRQYHUVLRQ WDEOH
1Select Tools→Resources→Conversion Tables to display the list of available conversion tables.
|
PowerDesigner |