- •IMPORTANT SAFETY INFORMATION
- •How to Use This Manual
- •The Big Picture
- •Knobs, Keys, and Jacks
- •The Front Panel
- •The Back Panel
- •AES/EBU Digital Audio Input/Output (Professional)
- •S/P DIF Digital Audio Input/Output (Consumer)
- •Getting Around and Altering Parameters
- •Adjusting the Brightness and Contrast of the Display
- •The "Areas" of the H8000FW
- •Understanding the Display and SOFT KEYS
- •Using the Cursor Keys, the SELECT key, the NUMERIC KEYPAD, and the KNOB
- •Ganged Parameters
- •Entering or Changing Text
- •QuickStart Or "Nearly Instant Gratification"
- •Hooking Up and Internal Routing
- •Things to Know about Routing
- •Loading Routing Configurations
- •4 Channel series Routings
- •8 Channel series Routings
- •Stereo Dual Machine Routings
- •4 channel Dual Machine Routings
- •4 Channel parallel routings
- •8 Channel parallel routings
- •Complex FireWire Routings
- •Analog & FireWire AB
- •ADAT & AES8 I/O
- •The I/O Identifier
- •Setting Input Levels
- •Effecting Things
- •"Panic" Muting
- •Loading Programs
- •Parameters
- •"Tweaking" and Saving "Tweaks"
- •Wrap Up
- •Mounting and Handling
- •Memory Cards
- •The Comprehensive Input / Output Scheme
- •Routing Configuration
- •Connecting real world inputs to the H8000FW
- •CONFIGURING THE MAIN INPUTS
- •Configuring the DSP input sources
- •Configuring the MAIN Outputs
- •Connecting to the H8000FW’s outputs
- •Configuring the outputs
- •Further Input and Output options
- •DIN 1/2 Allows the Selection of Either AES/EBU or S/P DIF for the First Digital Input Pair.
- •OPTO out – allows use of optical output connector for optical S/P DIF (H8000FW only)
- •Signal Flow Example
- •Storing and Loading Routing Configurations
- •Programs’ Effect on Routing Decisions
- •Controlling Levels
- •The Level Meters
- •Controlling the Level of the Analog and Digital Inputs
- •Input Levels, Wet/Dry Ratios, and Output Levels for Each DSP
- •Controlling the Level of the Analog and Digital Outputs
- •Digital Setup
- •Digital Setup Overview
- •Sampling Rates
- •The System Sampling Rate – A Digital Audio Primer
- •Using the Internal Clock
- •Selecting the Internal Clock’s Rate
- •The Status of The Digital Inputs When Using the Internal Clock
- •Understanding the "System Sampling Rate and External Sync Indicator" When Using the Internal Clock
- •Using an External Clock
- •Selecting the External Clock
- •The Status of the Digital I/Os When Using the External Clock
- •Understanding the "System Sampling Rate and External Sync Indicator" When Using the External Clock
- •Sample Rate Conversion (SRC)
- •Word Clock Termination
- •Word Length (Bits)
- •Input Word Length
- •Output Word Length
- •Bypassing and Muting
- •System Bypass
- •Machine Bypass
- •External Controllers
- •Setting Up the External Controllers
- •Foot Pedals 1 and 2
- •MIDI Setup
- •External Modulation and Trigger Menu Pages
- •"Manually" Selecting an External Controller for Modulation
- •"Manually" Selecting the External Controller for Triggers
- •External Controller Selection
- •Parameters Common to Both External Modulation and External Trigger Menu Pages.
- •MIDI Running Status
- •Automatically" Selecting a MIDI External Controller
- •Scaling the External Controller
- •The Concept Behind "Redirection" - External Assigns 1-8 and Trigs 1 & 2
- •Remote Controlling Parameters
- •Remote Controlling Triggers
- •MIDI Groups
- •Program Load, Save, Delete, Etc.
- •Categorizing Programs
- •Categorized by Effects Type
- •Categorized by Similar Programs (Banks)
- •Loading Programs
- •Loading a Program Remotely
- •Loading a Program Via a MIDI Program Change Message
- •Triggering the Next or Previous Program to Load
- •Saving a Program
- •Copying Programs
- •The "Size" of a Program and Its Ramifications for Storage
- •Updating a Program
- •Renaming a Program
- •Deleting a Program
- •Parameters
- •System Tempo
- •System Timer
- •Taps
- •Textblocks
- •Graphics and Curves
- •Storing and Loading Setups
- •Miscellaneous Setup Options
- •Transmitting and receiving Data
- •Setting Up the Serial Port
- •Dumping Data and Receiving Data Dumps
- •Controlling One H8000FW from Another H8000FW
- •Sending A Program From One the H8000FW to Another
- •Sequencing With MIDI
- •Connecting user-supplied crystals and external clocks
- •Service and Start-Up Options
- •Fixing Internal Memory Problems
- •Fixing PCMCIA SRAM Memory Card Problems
- •Changing the Internal Battery
- •Clear Setup
- •Software Version and Accessories
- •Start-Up Options
- •Making connections between the H8000FW and the computer.
- •Setting the sample rate and buffer size for the system
- •Synchronizing connected audio devices
- •Configuring the H8000FW for Throughput
- •Device Settings
- •Device Description
- •Device nickname
- •Measured Sampling Rate
- •Status
- •Global Settings - Bus Page
- •Master
- •Sample Rate
- •Sync Source
- •Buffer Size
- •Unique ID
- •Operation Mode
- •Global Settings - WDM Page
- •Set WDM Channel Maps
- •Global Settings - DPC Page
- •Global Settings -System Page
- •Global Settings -Info Page
- •PAL, Driver version
- •Viewing the H8000FW’s Configuration
- •Setting Up the H8000FW for Default Audio Output
- •Configuring the H8000FW for Output with Logic Pro
- •Creating an Aggregate Audio Device
- •Routing Audio to the H8000FW
- •Configuring Logic Pro for H8000FW Input and Output
- •An Example of Using Logic Pro with the H8000FW
- •Step-by-Step Descriptions of the Routing Process Flow
- •Sample Rates
- •Frequency Response
- •Digital Inputs/Outputs
- •Analog Input (XLR Balanced Inputs)
- •Analog Output
- •Remote Control Inputs
- •Remote Control Outputs
- •MIDI Connections
- •Memory Card Interface
- •Factory Preset Capabilities (at 48k sampling)
- •Power
- •Size
- •Weight:
C o n f i g u r i n g t h e H 8 0 0 0 F W f o r
M a c i n t o s h O u t p u t
Once all software drivers have been installed, perform the following steps to enable Macintosh audio output via the H8000FW.
Note: Before proceeding, be sure your Firewire connection between the Macintosh and the H8000FW is established, and the H8000FW is configured to pass audio.
Viewing the H8000FW’s Configuration
To view the configuration of the H8000FW, click Show All from the Sounds screen to return to System Preferences. Then click H8000FW from the Other category (below):
The screen at the right displays, which lists the device settings for the H8000FW:
Note: Initially, the Available Devices, Device Nickname, and Master Device will read something cryptic like “MyProduc12345456.” Feel free to rename it to something a little more descriptive.
After the H8000FW is selected as your output device, go ahead and test your connection.
From the Sounds screen, select the Sound Effects tab. Beneath the listing of installed sound files, select Eventide H8000FW from the drop-down list following “Play Alerts and Sound Effects Through.”
Now, click on any listed sound file, and you should see the LEDs on the left side of the front panel light up; this reflects that the signal has been received and is being
178
processed by the H8000FW. Of course, if you have speakers connected, you’ll hear the output as well.
Setting Up the H8000FW for Default Audio Output
Click on the System Preferences icon; when its window displays, select Sound:
The Sound options screen now displays:
179
After selecting the Output tab, Eventide H8000 displays as an output device, along with its port type, Firewire. Highlight it to select it as your output device and to override the default output device on your computer.
Configuring the H8000FW for Output with Logic Pro
If you wish to use Logic Pro as your audio editing and authoring platform in tandem with the H8000FW, do the following:
Open Logic Pro, and from the Audio drop-down menu, select Audio Hardware and Drivers:
The following screen displays:
180
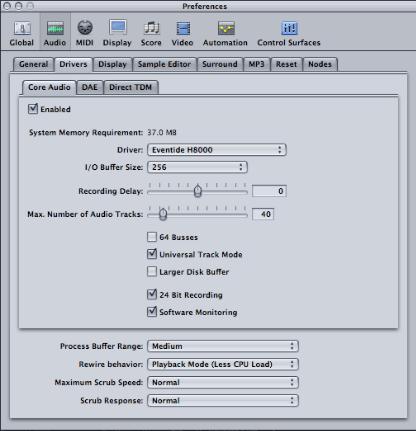
From the Core Audio tab, be sure the Enabled checkbox is selected, and Eventide H8000FW is selected as your driver.
You now will be prompted to restart your computer for the new settings to take effect.
181