

Basic Security on Cisco Routers 179
Example 4-23 Changing a Password and Setting the Configuration Registry Commands
hostname#copy startup-config running-config
Destination filename [running-config]?
2818 bytes copied in 1.475 secs (2818 bytes/sec) R1#config terminal
R1(config)#enable password cisco R1(config)#config-register 0x2102
R1(config)#exit
R1#reload
|
You complete password recovery by changing the configuration register back to the default |
|
value (0x2102). |
|
|
NOTE |
If a secret password is also configured, you must use the enable secret password IOS command |
|
because the secret password overrides the enable password. Example 4-23 includes no secret |
|
password, so you can use the enable password command. |
|
|
|
When the Cisco IOS router reloads, it will load the new configuration file with the password set |
|
to cisco. |
Basic Security on Cisco Routers
You can access a Cisco router in a number of ways. You can physically access a router through the console port, or you can access a router remotely through a modem via the auxiliary port. You can also access a router through a network or virtual terminal ports (VTY lines), which allow remote Telnet access.
If you do not have physical access to a router—either through a console port or an auxiliary port via dialup—you can access a router through the software interface, called the virtual terminal (also referred to as a VTY port). When you telnet to a router, you might be required to enter the VTY password set by the network administrator. For example, on Router R1, the administrator types R2’s remote address and tries to telnet to one of the VTY lines.
Example 4-24 provides the session dialog when a user telnets to the router with the IP address 131.108.1.2.
Example 4-24 Using a VTY Port to Establish a Telnet Connection
R1#Telnet 131.108.1.2
Trying 131.108.1.2 ... Open
User Access Verification
Password: xxxxx
R2>

180 Chapter 4: Cisco IOS Specifics and Security
Cisco routers can have passwords set on all operation modes, including the console port, privilege mode, and virtual terminal access. To set a console password to prevent unauthorized console access to the router, issue the commands shown in Example 4-25.
NOTE All passwords are case-sensitive.
Example 4-25 Setting a Console Password
R1(config)#line con 0
R1(config-line)#password cisco
!You can also set a password on the auxiliary port R1(config)#line aux 0
R1(config-line)#password cisco
To set the privilege mode password, you have two options: the enable and secret password. To set these passwords, use the respective commands listed in Example 4-26.
Example 4-26 Setting Enable and Secret Password
R1(config)#enable password cisco
R1(config)#enable secret ccie
The command to set an enable password is enable password password.You can also set a more secure password, called a secret password, which is encrypted when viewing the configuration with the enable secret password command.
The secret password IOS command overrides the enable password. Cisco IOS does not permit you to configure the same password if you apply both commands.
In Example 4-26, the secret password will always be used. Now, issue the show running-config command to display the configuration after entering the enable and secret passwords in Example 4-26.
Example 4-27 displays the output from the show running-config IOS command after entering enable and secret passwords.
Example 4-27 show running-config Command on R1
R1#show running-config
Building configuration Current configuration:
!
version 12.2

Basic Security on Cisco Routers 181
Example 4-27 show running-config Command on R1 (Continued)
!
hostname R1
!
enable secret 5 $1$Aiy2$GGSCYdG57PdRiNg/.D.XI. enable password cisco
Example 4-27 shows that the secret password is encrypted (using Cisco’s proprietary algorithm), while the enable password is readable. This setup enables you to hide secret passwords when the configuration is viewed. If you want, you can also encrypt the enable password by issuing the service password-encryption command, as displayed in Example 4-28. Cisco uses the MD5 algorithm to hash the secret password. You cannot reverse engineer the hashed password (for example, $1$Aiy2$GGSCYdG57PdRiNg/.D.XI.).
Example 4-28 service password-encryption Command
R1(config)#service password-encryption
The service password-encryption command encrypts all passwords issued to the router using the MD5 encryption algorithm. Example 4-29 shows an example of how these passwords appear when the configuration is viewed after all passwords have been encrypted.
Example 4-29 displays the show running-config command output after encrypting all passwords.
Example 4-29 show running-config Command on R1 After Encrypting All Passwords
R1#show running-config
Building configuration...
Current configuration:
!
service password-encryption version 11.2
hostname R1
!
enable secret 5 $1$Aiy2$GGSCYdG57PdRiNg/.D.XI. enable password 7 0822455D0A16
NOTE |
Note the digits, 5 and 7, before the encrypted passwords. The number 5 signifies that MD5 Hash |
|
algorithm is used for encryption, whereas the number 7 signifies a weaker algorithm. You are |
|
not expected to know this for the written exam, but it is valuable knowledge for troubleshooting |
|
complex networks. In fact, a great network engineer is measured by his well-defined trouble- |
|
shooting techniques, and not by how many CCIE lab exams he has passed. |
|
|
182 Chapter 4: Cisco IOS Specifics and Security
Notice in Example 4-29 that both the secret and enable passwords are encrypted. If you enable the service password-encryption command in global configuration mode, all passwords will be encrypted and will not be viewable when displaying the configuration on the Cisco router.
The final Cisco password you can set is the virtual terminal password. This password verifies remote Telnet sessions to a router. Example 4-30 displays the commands necessary to set the virtual terminal password on a Cisco router.
Example 4-30 password Command to Set a Virtual Terminal Password to ccie
R4(config)#line vty 0 4
R4(config-line)#password ccie
If you issue the no login command below the virtual terminal command (line vty 0 4), remote Telnet users will not be asked to supply a password and will automatically enter EXEC mode. Example 4-31 displays the Telnet session dialogue when the no login command is entered.
Example 4-31 Dialogue Display When No Login Is Enabled
R1#telnet 1.1.1.1
Trying 1.1.1.1 ... Open
R2>
Keep in mind that the preceding setup is not a secure access method for a router network.
IP Access Lists
Standard and extended access lists filter IP traffic. An access list is basically a set of permit or deny statements. Standard access lists control IP traffic based on the source address only. Extended access lists can filter on source and destination addresses. Extended access lists can also filter on specific protocols and port numbers. This section covers how a Cisco router handles access lists.
Access Lists on Cisco Routers
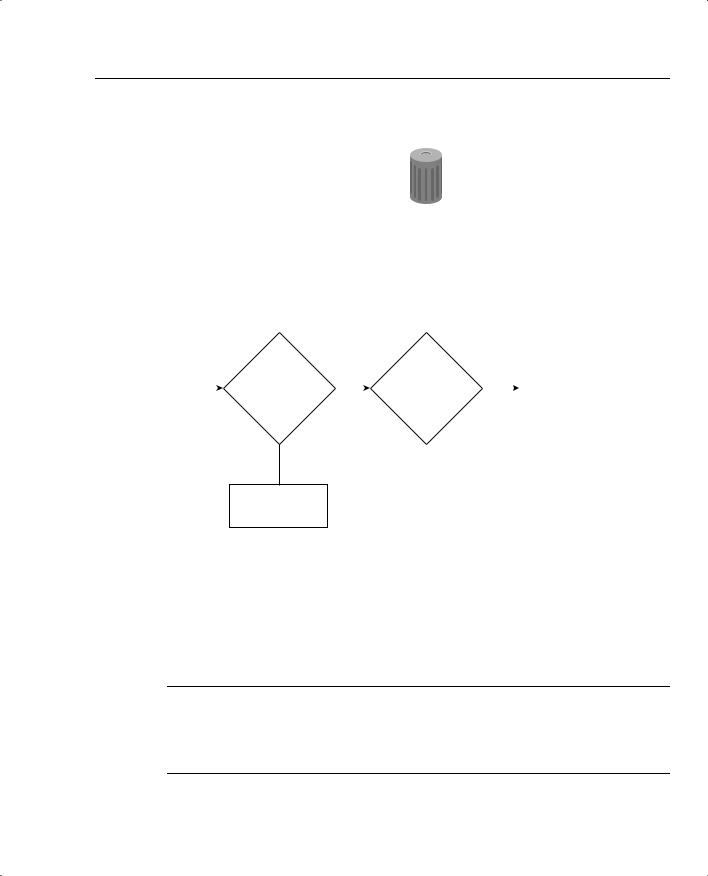
By default, a Cisco router permits all IP and TCP traffic unless an access list is defined and applied to the appropriate interface. Figure 4-4 illustrates the steps taken if an access list is configured on a Cisco router.
IP Access Lists 183
Figure 4-4 Access List Decision Taken by a Cisco Router
Bit Bucket
|
|
|
|
|
|
|
|
|
|
|
|
|
|
Drop |
|
|
|
|
|
|
|
|
|
Packet |
|
|
|
|
|
|
|
|
|
|
|
|
|
|
|
|
|
|
|
|
No |
|
|
|
|
Incoming |
|
|
|
|
|
|
|
|
|
Access |
|
|
Is |
|
|
|
|
||
IP Packet |
Yes |
|
Yes |
Process |
|||||
list |
packet |
|
|||||||
|
|
|
|
|
|
||||
|
configured? |
|
|
permitted? |
|
|
|
IP Packet |
|
|
|
|
|
|
|
|
|||
|
|
|
|
|
|
|
|
|
|
No
Process
IP Packet
If an incoming IP packet is received on a router and no access list is defined, the packet is forwarded to the IP routing software. If an access list is defined and applied, the packet is checked against the access list, and the appropriate permit or deny action is taken. The default action taken by any access list is to permit any explicitly defined statements and explicitly deny everything else. You will not see the explicitly deny statement when you issue the show ip access-lists because that is the default behavior.
NOTE If the keyword out or in is not applied by the administrator when defining an IP filter on an interface, the default action is to apply the filter on the outbound traffic.
Standard IP access lists range from 1 through 99 and 1300 through 1999.
Extended IP access lists range from 100 through 199 and 2000 through 2699.

184 Chapter 4: Cisco IOS Specifics and Security
Standard IP access lists filter on the source address only. The Cisco IOS syntax is as follows:
access-list access-list-number {deny | permit} [source-address] [source-wildcard]
Table 4-6 describes the purpose of each field.
Table 4-6 |
Standard IP access-list Command Syntax Description |
|
|
|
|
|
Command Field |
Description |
|
|
|
|
access-list-number |
A number from 1 through 99 that defines a standard access list number. |
|
|
Versions of IOS 12.0 or later also have standard access lists ranging |
|
|
from 1300-1999. |
|
|
|
|
deny |
IP packet is denied if a match is found. |
|
|
|
|
permit |
IP packet is permitted if it matches the criteria, as defined by the |
|
|
administrator. |
|
|
|
|
source-address |
Source IP address or network. Any source address can be applied by |
|
|
using the keyword any. |
|
|
|
|
source-wildcard (optional) |
Wildcard mask that is to be applied to the source address. This is an |
|
|
inverse mask, which is further explained with a few examples later in |
|
|
this section. The default is 0.0.0.0, which specifies an exact match. |
|
|
|
After creating the access list as described in Table 4-6, you must apply the access list to the required interface using the following command:
ip access-group {access-list-number | name} {in | out}
Table 4-7 describes the purpose of each field.
Table 4-7 |
ip access-group Command Syntax Description |
|
|
|
|
|
Command Field |
Description |
|
|
|
|
access-list-number |
A number in the range from 1 through 99 and 1300 through 1999 that defines a |
|
|
standard access list number. |
|
|
|
|
name |
If you are using named access lists, that name will be referenced here. |
|
|
|
|
in |
Keyword that designates the access list as an inbound packet filter. |
|
|
|
|
out |
Keyword that designates the access list as an outbound packet filter. This is the |
|
|
default action. |
|
|
|
The wildcard mask previously mentioned in the access-list command matches the source address. When the wildcard mask is set to binary 0, the corresponding bit field must match; if it is set to binary 1, the router does not care to match any bit or it is an insignificant bit. For example, the mask 0.0.255.255 means that the first two octets must match, but the last two octets do not need to match—hence, the commonly used phrases care bits (0s) and don’t care bits (1s).

IP Access Lists 185
For further clarification, look at some examples of using access lists.
Suppose you have found a faulty NIC card with the address 141.108.1.99/24. You have been asked to stop packets from being sent out Serial 0 on your router but to permit everyone else. In this situation, you need to deny the host address 141.108.1.99 and permit all other host devices. Example 4-32 displays the access list that fulfills this requirement.
Example 4-32 Access List Configuration
access-list 1 deny 141.108.1.99 0.0.0.0 access-list 1 permit 141.108.1.0 0.0.0.255
Next, you would apply the access list to filter outbound (the keyword out is supplied) IP packets on the Serial 0 interface. Example 4-33 applies the access list number 1 to the Serial interface (outbound packets). You can be a little wiser and filter the incoming packets on the Ethernet interface. This ensures that the packet is immediately dropped before it is processed by the CPU for delivery over the serial interface. Both examples are displayed in Example 4-33.
Example 4-33 Applying the Access-list
Interface Ethernet0 ip access-group 1 in interface Serial 0
ip access-group 1 out
Now look at a more complex example of using a standard access list. Suppose you have 16 networks ranging from 141.108.1.0 to 141.108.16.0, as shown in Figure 4-5.
You have assigned even subnets (2, 4, 6, 8, 10, 12, 14, and 16) to the Accounting department and odd subnets (1, 3, 5, 7, 9, 11, 13, and 15) to the Sales department. You do not want the Sales department to access the Internet, as shown in Figure 4-5. To solve this issue, you configure a standard access list. Figure 4-5 displays a simple requirement to block all odd networks from accessing the Internet.
You could configure the router to deny all the odd networks, but that would require many configuration lines.
NOTE Access lists are CPU-process-intensive because the router has to go through every entry in the access list for each packet until a match is made. If you want to determine the actual effect an access list has on your router, compare the CPU processes before and after activating an access list. Remember to check on a regular basis to see the big picture.

186 Chapter 4: Cisco IOS Specifics and Security
Figure 4-5 Standard Access List Example
Sales
Department
|
|
|
|
141.108.1.0 |
Ethernet |
|
|
|
|
|
segment |
||
|
|
|
|
141.108.3.0 |
||
|
|
|
|
|
|
|
Block |
|
|
141.108.5.0 |
|
|
|
|
Odd |
141.108.7.0 |
|
|
||
Access to |
|
|
|
|
||
|
Networks |
141.108.9.0 |
|
|
||
Internet |
|
|
||||
|
|
141.108.11.0 |
|
|
||
|
|
|
|
|
|
|
|
|
|
|
141.108.13.0 |
|
|
|
|
|
|
141.108.15.0 |
|
Serial0/0 |
|
|
|
|
|
|
|
|
|
|
|
|
|
|
Internet
141.108.2.0
141.108.4.0
141.108.6.0
Even 141.108.8.0
Networks 141.108.10.0 141.108.12.0 141.108.14.0 141.108.16.0
Accounting
Department
access-list permit 141.108.2.0 0.0.254.255
Instead, permit only even networks (2, 4, 6, 8, 10, 12, 14, and 16) with one IOS configuration line. To accomplish this, convert all networks to binary to see if there is any pattern that you can use in the wildcard mask.
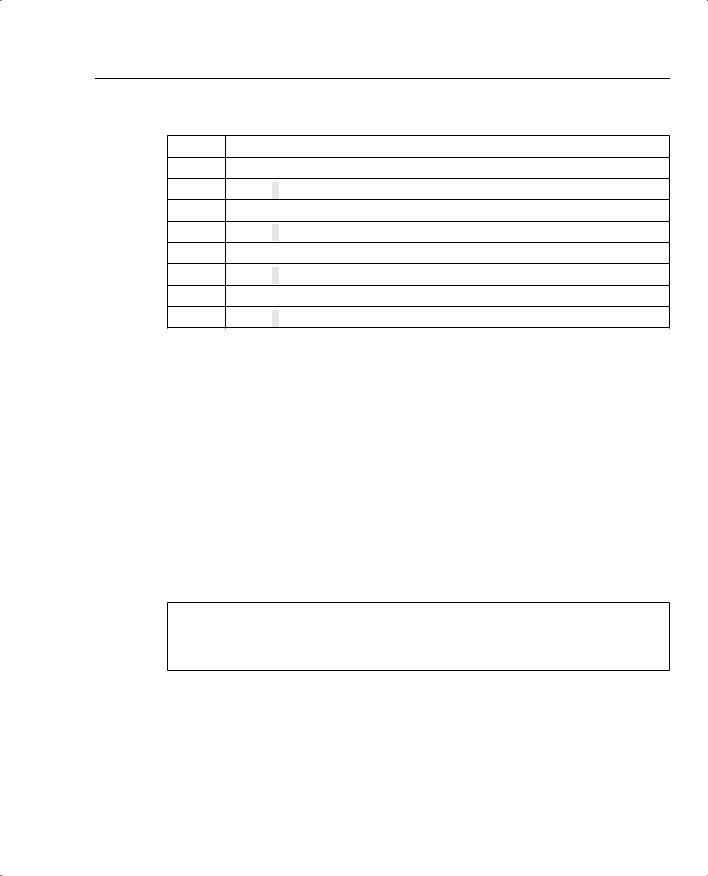
Table 4-8 displays numbers 1 through 16 in both decimal and binary format.
Table 4-8 Example Calculation of Numbers in Binary
Decimal Binary
100000001
200000010
300000011
400000100
500000101
600000110
700000111
800001000
IP Access Lists 187
Table 4-8 Example Calculation of Numbers in Binary (Continued)
Decimal Binary
900001001
1000001010
1100001011
1200001100
1300001101
1400001110
1500001111
1600010000
Notice that odd networks always end in the binary value of 1, and even networks end with 0. Therefore, you can apply your access lists to match on the even network and implicitly deny everything else. Even numbers will always end in binary 0. You do not care about the first seven bits, but you must have the last bit set to 0. The wildcard mask that applies this condition is 111111110 (1 is don’t care and 0 is must match; the first 7 bits are set to 1, and the last bit is set to 0).
This converts to a decimal value of 254. The following access list will permit only even networks:
access-list 1 permit 141.108.2.0 0.0.254.255
The preceding access list will match networks 2, 4, 6, 8, 10, 12, 14, and 16 in the third octet. The default action is to deny everything else, so only even networks will be allowed, and odd networks are blocked by default. Next, you would apply the access list to the outbound interface. Example 4-34 describes the full configuration.
Example 4-34 Applying the Access List
Hostname R1 interface Serial0/0
ip access-group 1 out
access-list 1 permit 141.108.2.0 0.0.254.255
Extended Access Lists
Extended access lists range from 100 through 199 and 2000 through 2699. Alternatively, you can use a named access list with IOS release 12.0 or later. As mentioned earlier in this chapter, extended access lists can be applied to both source and destination addresses, as well as filter protocol types and port numbers. Look at some examples of extended access lists that allow you to filter several different types of traffic.
188 Chapter 4: Cisco IOS Specifics and Security
For Internet Control Message Protocol (ICMP), use the syntax shown in Example 4-35.
Example 4-35 Access List Syntax for ICMP Traffic
access-list access-list-number [dynamic dynamic-name
[timeout minutes]] {deny | permit} icmp source source-wildcard destination destination-wildcard [icmp-type [icmp-code] [icmp-message] [precedence precedence] [tos tos] [log]
For Internet Group Management Protocol (IGMP), use the syntax shown in Example 4-36.
Example 4-36 Access List Syntax for IGMP Traffic
access-list access-list-number [dynamic dynamic-name
[timeout minutes]] {deny | permit} igmp source source-wildcard destination destination-wildcard [igmp-type]
[precedence precedence] [tos tos] [log]
For TCP, use the syntax shown in Example 4-37.
Example 4-37 Access List Syntax for TCP Traffic
access-list access-list-number [dynamic dynamic-name [timeout minutes]] {deny | permit} tcp source source-wildcard [operator port [port]] destination destination-wildcard [operator port [port]] [established] [precedence precedence] [tos tos] [log]
For User Datagram Protocol (UDP), use the syntax shown in Example 4-38.
Example 4-38 Access List Syntax for UDP Traffic
access-list access-list-number [dynamic dynamic-name [timeout minutes]] {deny | permit} udp source source-wildcard [operator port [port]] destination destination-wildcard
[operator port [port]] [precedence precedence] [tos tos] [log]
As you can see, extended access lists have a range of options to suit any requirement. The most often used extended access list options are as follows:
•access-list-number—Provides a number ranging from 100 through 199 that defines an extended access list. Also numbers ranging from 2000 through 2699.
•deny—Denies access if the conditions are matched.
•permit—Permits access if the conditions are matched.

IP Access Lists 189
•protocol—Specifies the protocol you are filtering. Some common options include eigrp, gre, icmp, igmp, igrp, ip, ospf, tcp, and udp.
•source—Specifies the source address.
•source-wildcard—Specifies the wildcard mask.
•destination—Identifies the destination network.
•destination-wildcard—Identifies the destination mask.
You are expected to demonstrate your understanding of standard and extended access lists. You are not expected to memorize the available options in an extended access list. The options are provided in this chapter for your reference only. When constructing access lists, the built-in help feature (?) is extremely useful.
Here are a few more complex examples of access lists.
Example 4-39 permits Domain Naming System (DNS) packets, ICMP echo and echo replies, OSPF, and BGP packets. (BGP runs over TCP using port 179.)
Example 4-39 Extended Access List Example
access-list 100 permit tcp any any eq smtp
!Permits Simple Mail Transfer Protocols access-list 100 permit udp any any eq domain
!Permits DNS queries
access-list 100 permit icmp any any echo ! Permits ICMP ping requests
access-list 100 permit icmp any any echo-reply ! Permits ICMP replies
access 100 permit ospf any any ! Permits OSPF packets
access 100 permit tcp any any eq bgp ! Permits BGP to any device
In Example 4-39, the access list numbered 100 is not concerned with specific host addresses or networks, but rather ranges of networks.
The any keyword is shorthand for 0.0.0.0 255.255.255.255, which means that the device’s address is irrelevant. This address can be entered in shorthand as any. If any IP packet arrives to the router and does not match the specified criteria, the packet is dropped.
The Cisco CD documentation provides additional quality examples of access lists. You should take some time to study Cisco’s examples available on the CD and at www.cisco.com under the technical documents link.
Access lists are difficult to manage because you cannot explicitly delete a specific line; you must first remove the entire access list and re-enter the new access list with the correct order for numbered access lists. For a large access list that might contain over 1000 lines of code, any variations are completed on a TFTP server and copied to the startup configuration. I have

190 Chapter 4: Cisco IOS Specifics and Security
worked with some access lists that were 2500 lines in length and took over 5 minutes to load on Cisco routers. On the other hand, named access-lists lists allow you to determine where in the access list the new line will be placed. For more detail on named access-list, please visit, www.cisco.com/en/US/customer/products/sw/iosswrel/ps1831/products_configuration_guide _chapter09186a00800d9817.html.
It might be a likely scenario for the CCIE security lab exam so please ensure you are fully comfortable with named and numbered access lists for the laboratory exam.