
- •IMPORTANT SAFETY INFORMATION
- •How to Use This Manual
- •The Big Picture
- •Knobs, Keys, and Jacks
- •The Front Panel
- •The Back Panel
- •AES/EBU Digital Audio Input/Output (Professional)
- •S/P DIF Digital Audio Input/Output (Consumer)
- •Getting Around and Altering Parameters
- •Adjusting the Brightness and Contrast of the Display
- •The "Areas" of the H8000FW
- •Understanding the Display and SOFT KEYS
- •Using the Cursor Keys, the SELECT key, the NUMERIC KEYPAD, and the KNOB
- •Ganged Parameters
- •Entering or Changing Text
- •QuickStart Or "Nearly Instant Gratification"
- •Hooking Up and Internal Routing
- •Things to Know about Routing
- •Loading Routing Configurations
- •4 Channel series Routings
- •8 Channel series Routings
- •Stereo Dual Machine Routings
- •4 channel Dual Machine Routings
- •4 Channel parallel routings
- •8 Channel parallel routings
- •Complex FireWire Routings
- •Analog & FireWire AB
- •ADAT & AES8 I/O
- •The I/O Identifier
- •Setting Input Levels
- •Effecting Things
- •"Panic" Muting
- •Loading Programs
- •Parameters
- •"Tweaking" and Saving "Tweaks"
- •Wrap Up
- •Mounting and Handling
- •Memory Cards
- •The Comprehensive Input / Output Scheme
- •Routing Configuration
- •Connecting real world inputs to the H8000FW
- •CONFIGURING THE MAIN INPUTS
- •Configuring the DSP input sources
- •Configuring the MAIN Outputs
- •Connecting to the H8000FW’s outputs
- •Configuring the outputs
- •Further Input and Output options
- •DIN 1/2 Allows the Selection of Either AES/EBU or S/P DIF for the First Digital Input Pair.
- •OPTO out – allows use of optical output connector for optical S/P DIF (H8000FW only)
- •Signal Flow Example
- •Storing and Loading Routing Configurations
- •Programs’ Effect on Routing Decisions
- •Controlling Levels
- •The Level Meters
- •Controlling the Level of the Analog and Digital Inputs
- •Input Levels, Wet/Dry Ratios, and Output Levels for Each DSP
- •Controlling the Level of the Analog and Digital Outputs
- •Digital Setup
- •Digital Setup Overview
- •Sampling Rates
- •The System Sampling Rate – A Digital Audio Primer
- •Using the Internal Clock
- •Selecting the Internal Clock’s Rate
- •The Status of The Digital Inputs When Using the Internal Clock
- •Understanding the "System Sampling Rate and External Sync Indicator" When Using the Internal Clock
- •Using an External Clock
- •Selecting the External Clock
- •The Status of the Digital I/Os When Using the External Clock
- •Understanding the "System Sampling Rate and External Sync Indicator" When Using the External Clock
- •Sample Rate Conversion (SRC)
- •Word Clock Termination
- •Word Length (Bits)
- •Input Word Length
- •Output Word Length
- •Bypassing and Muting
- •System Bypass
- •Machine Bypass
- •External Controllers
- •Setting Up the External Controllers
- •Foot Pedals 1 and 2
- •MIDI Setup
- •External Modulation and Trigger Menu Pages
- •"Manually" Selecting an External Controller for Modulation
- •"Manually" Selecting the External Controller for Triggers
- •External Controller Selection
- •Parameters Common to Both External Modulation and External Trigger Menu Pages.
- •MIDI Running Status
- •Automatically" Selecting a MIDI External Controller
- •Scaling the External Controller
- •The Concept Behind "Redirection" - External Assigns 1-8 and Trigs 1 & 2
- •Remote Controlling Parameters
- •Remote Controlling Triggers
- •MIDI Groups
- •Program Load, Save, Delete, Etc.
- •Categorizing Programs
- •Categorized by Effects Type
- •Categorized by Similar Programs (Banks)
- •Loading Programs
- •Loading a Program Remotely
- •Loading a Program Via a MIDI Program Change Message
- •Triggering the Next or Previous Program to Load
- •Saving a Program
- •Copying Programs
- •The "Size" of a Program and Its Ramifications for Storage
- •Updating a Program
- •Renaming a Program
- •Deleting a Program
- •Parameters
- •System Tempo
- •System Timer
- •Taps
- •Textblocks
- •Graphics and Curves
- •Storing and Loading Setups
- •Miscellaneous Setup Options
- •Transmitting and receiving Data
- •Setting Up the Serial Port
- •Dumping Data and Receiving Data Dumps
- •Controlling One H8000FW from Another H8000FW
- •Sending A Program From One the H8000FW to Another
- •Sequencing With MIDI
- •Connecting user-supplied crystals and external clocks
- •Service and Start-Up Options
- •Fixing Internal Memory Problems
- •Fixing PCMCIA SRAM Memory Card Problems
- •Changing the Internal Battery
- •Clear Setup
- •Software Version and Accessories
- •Start-Up Options
- •Making connections between the H8000FW and the computer.
- •Setting the sample rate and buffer size for the system
- •Synchronizing connected audio devices
- •Configuring the H8000FW for Throughput
- •Device Settings
- •Device Description
- •Device nickname
- •Measured Sampling Rate
- •Status
- •Global Settings - Bus Page
- •Master
- •Sample Rate
- •Sync Source
- •Buffer Size
- •Unique ID
- •Operation Mode
- •Global Settings - WDM Page
- •Set WDM Channel Maps
- •Global Settings - DPC Page
- •Global Settings -System Page
- •Global Settings -Info Page
- •PAL, Driver version
- •Viewing the H8000FW’s Configuration
- •Setting Up the H8000FW for Default Audio Output
- •Configuring the H8000FW for Output with Logic Pro
- •Creating an Aggregate Audio Device
- •Routing Audio to the H8000FW
- •Configuring Logic Pro for H8000FW Input and Output
- •An Example of Using Logic Pro with the H8000FW
- •Step-by-Step Descriptions of the Routing Process Flow
- •Sample Rates
- •Frequency Response
- •Digital Inputs/Outputs
- •Analog Input (XLR Balanced Inputs)
- •Analog Output
- •Remote Control Inputs
- •Remote Control Outputs
- •MIDI Connections
- •Memory Card Interface
- •Factory Preset Capabilities (at 48k sampling)
- •Power
- •Size
- •Weight:

Copying Programs
To copy a program, simply load it and then use Save to save it where you would like the program copied to. You can copy a program from one place in internal memory to another, from one place on a Memory Card to another, from internal memory to a Memory Card, or from a Memory Card to internal memory.
The "Size" of a Program and Its Ramifications for Storage
Finite things overrun the world we inhabit. There is a limit to the space available in the H8000FW for the storage of programs. Not everything is perfect. Roughly 460 kilobytes of space is available for storing your programs internally. A program typically requires between 1 kilobyte and 20 kilobytes of space for storage. In the worst case that means you can store 30 programs in internal memory. A more realistic number might be 100. If that’s not enough for you, don’t despair! You can save programs on Memory Cards that can contain as much as 256,000 kilobytes of space! And if you fill up one Memory Card, you can always get another.
See Memory Cards on page 47.
Updating a Program
Like Save, when you press the <update> SOFT KEY, you are updating the program running on the currently displayed DSP. (If you want to update the program running on the DSP not currently displayed, press the DSP A/B key.)
Updating saves any new parameter tweaks that you’ve made to a user program. Press the <update> SOFT KEY. If a program with the same number exists in User Memory, a
confirmation page comes up. The U shows you that you are updating the version in User Memory – a C would indicate it is on a Memory Card.
This feature is particularly useful if you want to "tweak" a factory program - just one key press will save your tweak with the same name and number, and it will always be displayed together
with the factory program. This is possible because the H8000FW allows up to three programs for each number - one factory, one user, and one on a card. Strictly speaking, you can have four, as both monolithic and non-monolithic versions of Factory programs may have the same number.
129

Renaming a Program
To rename a program, simply load it and then press the Save SOFT KEY in the PROGRAM area. Place the CURSOR over the rename field
and press SELECT. Change the name and select the Enter button to exit the typewriter. Here you changed "Robot Voice" to "new
Voice."
Back at the Save menu page, make sure the old program name is present in the correct "slot" - 269 in User Memory in this case. Since that’s where the same program is with the old name, you’re going to overwrite it!
Place the CURSOR over save and press SELECT. The H8000FW asks if what you’re about to do is ok... select Yes.
Now the program has the new name, new
Voice.
Deleting a Program
Because there is a finite amount of storage space in the H8000FW or on a given Memory Card, you may want to delete some of your stored programs to free up "room" from time to time. To delete a program, go to the PROGRAM area and place the cursor over the program you would like to delete. The program you wish to delete does not need to be loaded on either DSP.
On the screen to the right, if you were to press the <remove> SOFT KEY, you would be deleting the program "Robot Voice." (It doesn’t matter that it’s not currently loaded!)
Actually pressing the <remove> SOFT KEY would result in the screen to the right. To remove or not to remove?
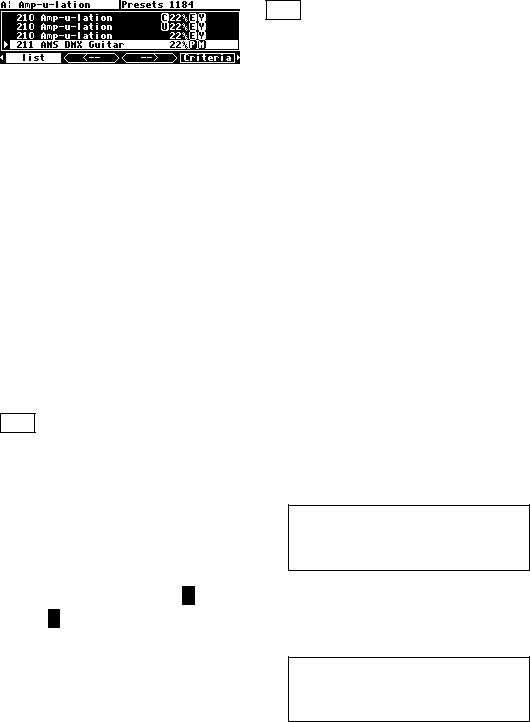
Factory presets are distinguished from your saved presets by the lack of a "U" at the righthand side of the screen. You can’t delete any of the factory presets. That’s why <remove> is scratched out when a factory program is highlighted on the list menu page.
130