

C# ПІДРУЧНИКИ / c# / MS Press - Oop With MS Vb Net And C# Step By Step (2002)
.pdfA Little Bit About Properties
We can use the word properties, in a general object-oriented sense, to mean the descriptive information about an object. We can also use properties to mean the particular syntactic construct provided by Visual Basic and C#. The particular meaning of the word can be determined by context. Use properties to validate class data and hide class implementation. You have to make a strong case for using public fields in a class. The addition of a property to a class to control access to the underlying data requires minimal effort. The benefit of this practice is that you can easily add validation or change the implementation if you need to without affecting clients already using your objects.
Add the GetPage method
§Add the GetPage method to the class definition after the field declarations.
‘Visual Basic
Public Function GetPage(ByVal pageNumber As Integer) As String Dim start As Integer = (pageNumber -1) * PageLength
If (start < Text.Length) And (start >= 0) Then
If (start + PageLength) < Text.Length Then
Return Text.Substring(start, PageLength)
Else
Return Text.Substring(start, Text.Length - start)
End If
Else
Return ""
End IfEnd Function // Visual C#
public string GetPage(int pageNumber) {
int start = (pageNumber - 1) * PageLength; if ((start < Text.Length) && (start >= 0)) {
if ((start + PageLength) < Text.Length) { return Text.Substring(start, PageLength);
}
else {
return Text.Substring(start, Text.Length - start);
}
}
else { return "";
}}
In Chapter 3, “Fields and Properties,” you’ll see how we can replace the GetPage method with a construct known as an indexer in Visual C# or with a default Item method in Visual Basic.
The complete class definitions for our project are shown here: ‘ Visual Basic
Public Class Book
Public Text As String = ""
Public PageLength As Integer = 10
Private m_title As String
Public Property Title() As String
Get
Return m_title
End Get
Set(ByVal Value As String)
m_title = Value
End Set
End Property
Public Function GetPage(ByVal pageNumber As Integer) As String Dim start As Integer = (pageNumber - 1) * PageLength
If (start < Text.Length) And (start >= 0) Then
If (start + PageLength) < Text.Length Then
Return Text.Substring(start, PageLength)
Else
Return Text.Substring(start, Text.Length - start)
End If
Else
Return ""
End If
End FunctionEnd Class
//Visual C#using System;namespace ReadBooks{
///<summary>
///Summary description for Book.
///</summary>
public class Book { public string Text = "";
public int PageLength = 10; private string m_title;
public Book() {
//
// TODO: Add constructor logic here
//
}

public string Title
{
get {
return m_title;
}
set {
m_title = value;
}
}
public string GetPage(int pageNumber) {
int start = (pageNumber - 1) * PageLength;
if ((start < Text.Length) && (start >= 0)) {
if ((start + PageLength) < Text.Length) {
return Text.Substring(start, PageLength);
}else {
return Text.Substring(start,
Text.Length - start);
}
}
else {
return "";
}
}
}}
Fields, properties, methods, and constructors can appear in any order in a class definition. Good organization benefits future readers of your code. Here’s a common organization and, in fact, the one I used in this book:
§Field declarations
§Constructors
§Properties
§Methods
Using the Book Class in an Application
You’ve just finished implementing the Book class. The class definition is just a template for an object. To put data in the fields and properties, you have to create an instance of the class in memory; this action is known as instantiation. When you create an instance, a section of memory is set aside to hold the fields of the object. If you create another instance of the class, another section of memory is set aside for its fields.
You aren’t going to implement the full solution yet. First you need to write some code to test your class. You’ll create two instances of the Book class in the ReadBooks project, and you’ll display the fourth page of each book. (These will be very short books.) You’ll create a cookbook and a book of fairy tales, so you’ll need to create two separate instances of the Book class. Instead of creating a fancy interface, you’ll write just enough code to see whether your class is working as you expected.
Test Drivers

A short program to test a class is called a driver. It’s a good idea to exercise your class a bit with a driver before adding the class to a larger program. Use the driver to test your class without the interference of other code in the program.
Create an instance of Book
1.In the Solution Explorer, double-click Form1 to open it in the Windows form designer. If Form1 is opened in the code editor, select View, Designer.
2.Drag a button from the Toolbox onto Form1. If the Toolbox isn’t visible, select View, Toolbox.
3.Right -click the button, and click Properties on the shortcut menu. In the Properties window, set the Name property of the button to showPage and set the Text property to Show Page.
The button on the Windows form is created from the Button class. Name and Text are properties of the Button class. So we can talk about getting and setting these properties. Form1 is a class as well, and the button you just created is a field of the Form1 class.
4.Double-click the button to create the Click event method.
5.Add the following code in boldface to the Click event to create a book of fairy tales.
6.‘ Visual Basic
7.Private Sub showPage_Click(ByVal sender As System.Object, _
8.ByVal e As System.EventArgs) Handles showPage.Click
9.Dim fairyTales As Book
10.fairyTales = New Book()
11.End Sub
12.// Visual C#
13.private void showPage_Click(object sender, System.EventArgs e)
{
14.Book fairyTales;
15.fairyTales = new Book();
}
16.Add the following code to set the Text, PageLength, and Title properties immediately after the code you entered in step 5:
17.‘ Visual Basic
18.fairyTales.Text = "Once upon a time there was a bear."
19.fairyTales.PageLength = 8fairyTales.Title = "Fairy Tales"
20.// Visual C#
21.fairyTales.Text = "Once upon a time there was a bear.";
22.fairyTales.PageLength = 8;
fairyTales.Title = "Fairy Tales";
When the instance of Book is created, its fields contain the values specified in the class definition. The Text field is an empty string, the page length is 10, and the title is blank. Notice that it makes no difference in the client code whether you use a field or a property.
23.Add the following code after the fairyTales code to create another instance of the Book class. (This instance will be a recipe book.)
24.‘ Visual Basic
25.Dim cookies As Book = New Book()
26.cookies.Text = "Chocolate chip cookies are the most delicious co okies."
27.cookies.PageLength = 8
28.cookies.Title = "Cookie Recipes"
29.// Visual C#
30.Book cookies = new Book();
31.cookies.Text = "Chocolate chip cookies are the most delicious co okies.";
32.cookies.PageLength = 8;
cookies.Title = "Cookie Recipes";
In this case, you used a different syntax for declaring and initializing a variable of the Book class. Visual Basic and Visual C# allow declaration and initialization in the same statement. Declaring and initializing in the same statement has the following advantages:
§Programmers are less likely to forget to initialize the variable.
§When a class defines a constructor with parameters, the fields can be initialized at the same time. (You’ll create constructors with parameters in Chapter 3.)
Use an instance of the Book class
1.Add the following code after the cookies code to display some of the text of the two books. In later chapters, you’ll learn other ways to return the text of a particular page in the book.
2.‘ Visual Basic
3.Dim page As Integer = 3
4.Dim report As String
5.report = "Page " & page.ToString() & ControlChars.CrLf _
6.& fairyTales.Title & ": " & fairyTales.GetPage(page) _
7.& ControlChars.CrLf _
8.& "Cookies: " & cookies.GetPage(page)
9.MessageBox.Show(report)
10.report = "Titles: " + fairyTales.Title & " and " & cookies.Title
11.MessageBox.Show(report)
12.// Visual C#
13.int page = 3;
14.string report;
15.report = "Page " + page.ToString() + "\n"
16.+ fairyTales.Title + ": " + fairyTales.GetPage(page) + "\n"
17.+ cookies.Title + ": " + cookies.GetPage(page);
18.MessageBox.Show(report);
19.report = "Titles: " + fairyTales.Title + " and " + cookies.Title; MessageBox.Show(report);
This bit of code demonstrates that there are two separate instances of the Book class. We can refer to these instances using the variables fairyTales and cookies. The object-oriented concept that permits each instance to be referred to separately is known as identity. You’ll see in later chapters that the identity principle doesn’t mean that you have to create a variable for each instance. Creating so many variables is unwieldy if you need hundreds of instances of a class. Identity does mean that you can refer to each instance separately when you need to.
Notice that when you created an instance of Book, the fields of fairyTales were changed and the GetPage method was called. Later on we retrieved the value of the Title property. The value of Title was unchanged after the GetPage method was called. The fact that the value was unchanged demonstrates the concept of object state, the idea that the fields retain their values between method calls. Compare the way the GetPage method works
with a method that has variable declarations. After the GetPage method ends, the variables go out of scope and their values are lost to the application.
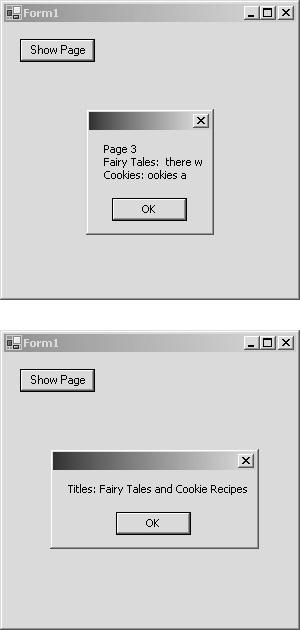
20.Press F5 to run the code. Click the Show Page button. The results are shown here:
Click OK, and the book titles are displayed in a message box as shown here:
Click OK, and then close the application.
You’ve now created a class, Book, and two instances of it. Your code sent a message to the Book class through the GetPage method to ask for the third page of the text. In the next sections, you’ll implement another class, Library. This time, however, you’ll let some of the IDE tools do some of the syntactic work for you.
Using the Class View
The IDE provides a Class View that displays a tree view of the class structure of the project, namespaces, and classes. The Class View can share the same window as the Solution Explorer. On the View menu, click Class View to open the Class View. The expanded Class View is shown below for Visual Basic and Visual C#, respectively.
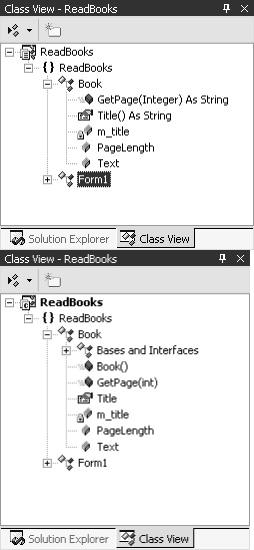
The highest-level node represents the project, ReadBooks. The next level of nodes represents the namespaces in the project. A project can contain several namespaces; in this case, there’s only one. The project namespace contains two classes: the class that we created, Book, and the class for the Windows form, Form1. The Book class contains two public fields, PageLength and Text, represented by blue blocks, and one private field, m_title, represented by a blue block with a lock. The class contains one property, Title, represented by a graphical hand holding a letter. The class contains a method, GetPage, with one integer parameter that returns a string. The method is represented by a purple block.
In the case of Visual C#, the tree indicates the base classes and interfaces (which I’ll cover in Chapters 5 and 9). If we were to expand the Bases And Interfaces node, we’d find that Book has Object as its base class. All classes in Visual Basic and Visual C# implicitly have Object as a base class. Base classes are covered in Chapter 5, “Using Inheritance to Create Specialized Classes.”
Creating the Library Class
By means of the Class View, C# provides additional tools for creating class definitions. We’ll use these tools to create the Library class. This class will have two methods: CheckIn, which adds an instance of Book to the Library class, and CheckOut, which removes a particular book from the Library class and returns a reference to that book.
The following wizards are available only in Visual C#. The code for Visual Basic is shown at the end of the section so that it can be added to the Visual Basic project.
Create the Library class
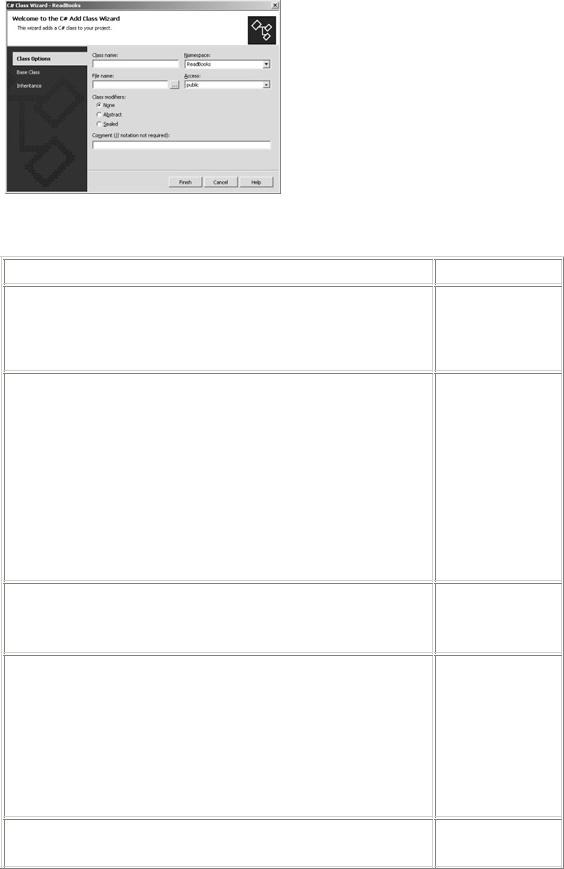
1.In the Class View, right-click the Visual C# project ReadBooks, point to Add, and then click Add Class on the shortcut menu.
2.The C# Class Wizard appears as shown here:
3.Enter Library in the Class Name box, select ReadBooks in the Namespace list and public in the Access list, click the None Class Modifiers option, and then click Finish.
4.The fields and tabs of the wizard are described in the following table.
Field or tab
Class Name
Namespace
File Name
Access
Class Modifiers
Description
The name of the new class. In this case, Library.
The namespace controls the packaging of the types in the assembly and the qualified names used to
refer to the class.
By default, this is the name of the class.
This controls the ability to create references in other parts of the application and in other applications.
The abstract and sealed classes

Field or tab
Comment
Base Class tab
Inheritance tab
Add a field to the Library class
Description
control use of the class in inheritance
relationships
. These will be discussed in Chapter 6, “Designing Base Classes
and Abstract Classes.”
Use this field to add a comment to the class.
Allows you to choose a base class for your class. Classes from your project, from the .NET Framework, and other assemblies are available in drop-down lists.
Allows you to pick the interfaces you want to implement in your class.
To store the collection of books, you’ll add an instance of the SortedList class to your project. The SortedList class is a data structure class provided by the .NET Framework. It can store data in the same way that you might use an array. The SortedList class has two additional features: you can look up a particular piece of data based on a string key, and you can add or remove data as you like.
1. Add the following statement to the top of the Library.cs file. using System.Collections;
Adding this statement allows you to use the SortedCollection class without having to use the fully qualified name, System.Collections.SortedList.
2.In the Class View, right-click the Library class and point to Add.
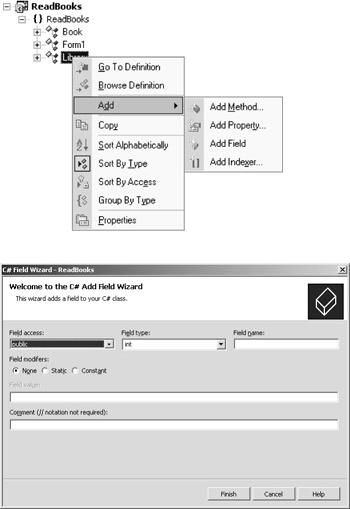
The IDE provides wizards for adding fields, properties, methods, and indexers, as shown here:
7.Click Add Field.
8.The C# Add Field Wizard appears, as you see here:
9.Click private in the Field Access list, enter SortedList in the Field Type box, and enter m_shelf in the Field Name box. Leave None for the Field Modifiers option. I’ll talk about the Static modifier in Chapter 11, “Creating Static Members,” and I’ll cover the Const modifier in Chapter 7, “Responding to Changes with Events and Exceptions.”
10.Click Finish.
11.Modify the declaration of m_shelf in the Library class to instantiate it. SortedList is a class, so it must be instantiated just as you instantiated the Book class.
private SortedList m_shelf = new SortedList();
Add the methods to the Library class
At the beginning of this chapter, you designed the Library class with a CheckIn method. In the last section, “Add a field to the Library class,” you created a SortedList class for the instances of Book. The Library’s CheckIn method calls the SortedList’s Add method to store the instances of Book.
Add the CheckIn method to the Library class
1.In the Class View, right-click the Library class, point to Add, and click Add Method. The C# Add Method Wizard appears as shown here: