C# ПІДРУЧНИКИ / c# / MS Press - Oop With MS Vb Net And C# Step By Step (2002)
.pdf9.private void Form1_Load(object sender, System.EventArgs e) {
10.this.memory1.Play();
}
11.In the designer, double-click the Memory control to create the GameOver event handler. Add the following code to tell the user how many clicks it took to win the game, and to ask if the user would like to play again.
12.‘ Visual Basic
13.Private Sub Memory1_GameOver(ByVal sender As System.Obje ct, ByVal e _
14.As LotsOfFun.Games.GameOverEventArgs) Handles Memory1. GameOver
15.Dim result As DialogResult
16.result = MessageBox.Show("You win in " & e.Clicks & _
17." turns." & ControlChars.CrLf & "Play again?", _
18."Game over", MessageBoxButtons.YesNo)
19.If (result = DialogResult.Yes) Then
20.Me.Memory1.Play()
21.End If
22.End Sub
23.
24.// Visual C#
25.private void memory1_GameOver(object sender,
26.LotsOfFun.Games.GameOverEventArgs e) {
27.DialogResult result;
28.result = MessageBox.Show("You win in " + e.Clicks +
29." turns.\nPlay again?", "Game over", MessageBoxButtons.Y esNo);
30.if (result == DialogResult.Yes) {
31.this.memory1.Play();
32.}
}
33.In the Solution Explorer, right-click the Memory project and click Set As Startup Project on the shortcut menu.
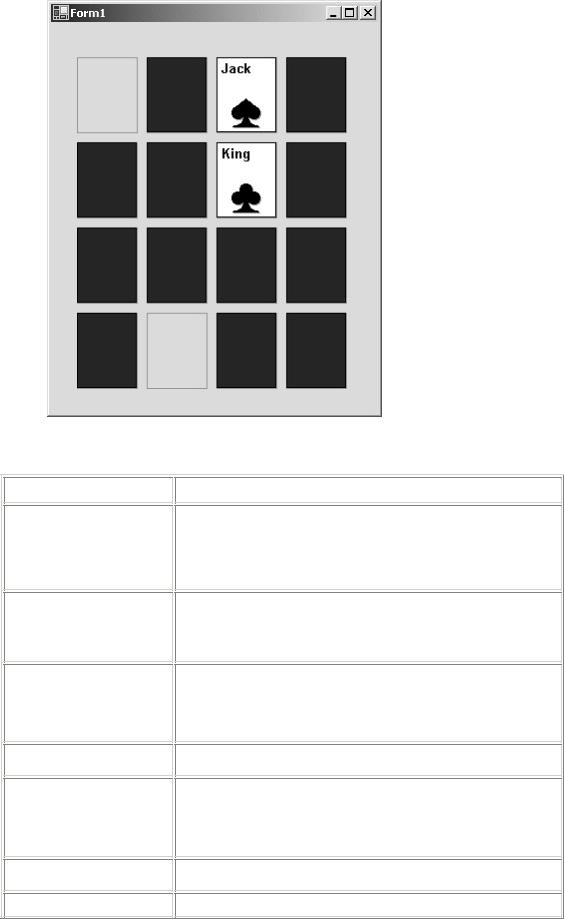
34.Press F5 to run the program and play the game, shown here:

Quick Reference
To
Create a component
Assign a Toolbox bitmap to a component or control
Assign a Properties window
category to a property
Assign a Properties window
description to a property
Create a class
Do this
Right -click the GamesLibrary project in the Solution Explorer, point to Add, and
then click Add Component on the shortcut menu. The Add New Item dialog box appears.
Add a 16-by-16-pixel bitmap to the project that has the same name as the control. Set the Build Action property of the bitmap to EmbeddedResource.
Add the Category attribute to the property declaration. In Visual Basic, this must be on the same line.
‘ Visual Basic <Category("Game")>
// Visual C# [Category("Game")]
Add the Description attribute to the property declaration. In Visual Basic, this must be on the same line.
‘ Visual Basic <Description("Face value")>
// Visual C# [Description("Face value")]
Select the Class Library template when

|
|
|
|
|
|
To |
|
Do this |
|
|
|
|
|
|
|
library |
|
creating a new project. |
|
|
|
|
|
|
|
Add a control or |
|
Right -click the Toolbox and click |
|
|
component to |
|
|
|
|
the Toolbox |
|
|
|
|
|
|
|
|
|
|
|
Customize Toolbox in the shortcut menu. |
|
|
|
|
|
|
|
|
|
Click the .NET Framework |
|
|
|
|
Components tab. |
|
|
|
|
|
|
|
|
|
Click Browse, navigate to and select the |
|
|
|
|
class library, and then click Open. |
|
|
|
|
|
|
|
|
|
On the .NET Framework |
|
|
|
|
Components tab, select the items |
|
|
|
|
you want to add to the Toolbox and |
|
|
|
|
click OK. |
|
|
|
|
|
|
Chapter 9: Providing Services Using
Interfaces
Overview
ESTIMATED |
2 hr. 45 min. |
TIME |
|
|
|
In this chapter, you’ll learn how to
§Create an interface.
§Implement an interface that you created.
§Implement the IComparable interface.
§Implement the IEnumerable and IEnumerator interfaces.
§Implement the IFormattable interface.
§Use an inner class.
In Chapters 5 and 6, you used inheritance to make new classes out of existing classes. When classes are related by inheritance, you can refer to a derived instance through a base reference value. This polymorphic behavior isn’t limited to derived classes. Visual Basic .NET and Visual C# provide another construct, the interface, that also behaves polymorphically. In the Microsoft .NET Framework, interfaces are commonly used to provide services for a class. The interface can support something your object can do, but that service doesn’t fall into the is-a relationship found in inheritance.
An IMoveable Interface
An interface is like an abstract class with all abstract members. The interface serves as a contract that defines what methods, properties, and events a class must implement. In this chapter, you’ll create an interface, implement it in a class, and use the class polymorphically through an interface reference.

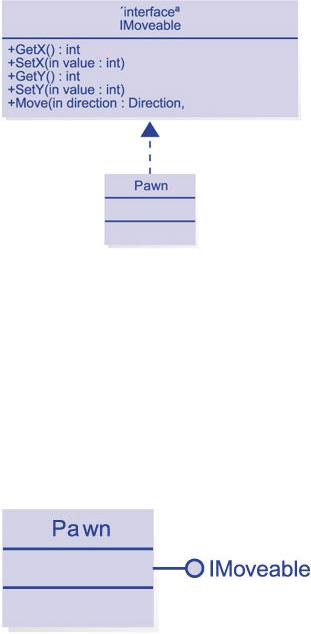
Your first task is to create an IMoveable interface and implement it in a Pawn class. This interface might be useful if you were moving objects around as part of a game. The classes in the the project can be so different that they aren’t related by inheritance, but they do share the ability to be moved around. The IMoveable interface provides a standard interface for relocating objects. This interface is described in the following UML diagram:
This diagram introduces a new UML element for an interface. Technically, the property, as the construct that contains a get and a set method, isn’t supported by UML. In earlier exercises, I’ve used the upper section of the class diagram, called the attributes section, to specify the properties. The attributes section contains the data members of a case, which often have a one-to-one correspondence with the properties. Other languages don’t have the property construct and thus list the private data members in the attributes section, while the get and set methods are shown in the methods section. The property construct fits nicely with the attributes section in a class element, but this correspondence breaks down in the case of an interface element because the interface element, as defined by the UML, doesn’t have an attribute section. Because interfaces carry no implementation, they don’t have instance data, only methods. So to fit the property concept into the UML interface, the getters and setters are shown as Get and Set methods. The IMoveable interface contains two properties, X and Y, and a Move method that takes two parameters for direction (up, down, left, right) and distance.
The following diagram is a shorthand style of representing interfaces in UML. This style is used more commonly than the extended version shown previously.
Define the IMoveable interface
This short example is a console application rather than a Windows application. The output of the program appears in the command prompt window. The interface defines the location of the object as X and Y properties and includes a Move method for moving the object around.
1.On the File menu, point to New, and then click Project.
2.Click Visual Basic or Visual C# in the Project Types tree.
3.In the Templates list, click Console Application.
4.Name the application MoveIt, and click OK.
5.On the Project menu, click Add New Item.
6.In the Add New Item dialog box, click Code File in the Templates list, name the new file IMoveable.vb or IMoveable.cs, and click Open.
7.Add the following code to declare the IMoveable interface. If you’re using Visual C#, add a namespace declaration so that the IMoveable interface is in the same namespace as the other classes in the project.
8.‘ Visual Basic
9.Public Interface IMoveable
10.End Interface
11.
12.// Visual C#
13.namespace MoveIt {
14.public interface IMoveable {
15.}
}
16.Add an enumeration to indicate which direction the object is to move. Add this enumeration immediately before the interface. Although Visual Basic allows the definition of nonpublic enumerations inside the interface, Visual C# does not.
17.‘ Visual Basic
18.Public Enum Direction
19.Up
20.Down
21.Left
22.Right
23.End Enum
24.
25.// Visual C#
26.public enum Direction { Up, Down, Left, Right };
27.Add the two property declarations to the interface definition. The public keyword isn’t allowed in interface definitions. The purpose of the interface is to define what methods, properties, and events a class will support. Private members don’t make sense in this context. The Visual Basic definition allows the Readonly and Writeonly modifiers of properties. In the case of Visual C#, you need to show which of the accessors need to be implemented.
28.‘ Visual Basic
29.Property X() As Integer
30.Property Y() As Integer
31.
32.// Visual C#
33.int X {
34.get;
35.set;
36.}
37.
38.int Y {
39.get;
40.set;

}
41.Add the Move declaration to the interface:
42.‘ Visual Basic
43.Sub Move(ByVal aDirection As Direction, ByVal howFar As Integ er)
44.
45. // Visual C#
void Move(Direction direction, int howFar);
The interface is complete. To make it usable, you need to implement the interface in a class.
Implement the IMoveable interface in the Pawn class
In the Pawn class, you implement the X and Y properties and the Move method.
1.On the Project menu, click Add Class. Name the new class Pawn.
2.Modify the class to indicate that it will implement the IMoveable interface.
3.‘ Visual Basic
4.Public Class Pawn
5.Implements IMoveable
6.End Class
7.
8.// Visual C#
9.public class Pawn : IMoveable {
10.}
Visual C# uses the same syntax for declaring base classes and interfaces. Visual Basic uses the Implements keyword to indicate the interfaces of a class. Notice that after you type the Implements keyword, IntelliSense displays a list of interfaces. The icon next to the interface name is similar to the UML symbol.
13.If you’re using Visual Basic, click IMoveable in the Class Name list. In the Method Name list, click Move. The declaration for the Move
method is added to the class. Repeat this procedure for the X and Y properties of IMoveable.
If you’re using Visual C#, in the Class View, expand the Pawn class and Bases And Interfaces. Right-click the IMoveable interface in the Class View, point to Add, and then click Implement Interface on the shortcut menu. The declarations for all the members are added to the class. In addition, the code is enclosed in region statements that make that section of code collapsible.
14.Add a field for the X property, and implement the X property:
15.‘ Visual Basic
16.Private m_x As Integer = 0
17.Public Property X() As Integer Implements MoveIt.IMoveable.X
18.Get
19.Return m_x
20.End Get
21.Set(ByVal Value As Integer)
22.m_x = Value
23.End Set
24.End Property
25.
26.// Visual C#
27.private int m_x;
28.public int X {
29.get { return m_x; }
30.set { m_x = value; }
}
Notice that Visual Basic uses the Implements keyword again to specify which interface member is being implemented. The Implements keyword is followed by the qualified name of the method. The fully qualified name takes the form
Namespace.ClassName.MemberName. Unless you have added a namespace declaration or changed the default project properties, the namespace is the same as the project name. The Visual C# compiler makes the determination without the special keyword by using the signature.
You don’t use the Overrides or override keyword when you’re implementing the interface member. The code isn’t overriding a base class member. The interface is strictly a contract about what will be found in the class interface.
31.Add a field for the Y property, and implement the Y property. For Visual Basic, you add the keyword Implements and the qualified name of the member implemented. In Visual C#, the compiler matches the class method to the interface method.
32.‘ Visual Basic
33.Private m_y As Integer = 0
34.Public Property Y() As Integer Implements MoveIt.IMoveable.Y
35.Get
36.Return m_y
37.End Get
38.Set(ByVal Value As Integer)
39.m_y = Value
40.End Set
41.End Property
42.
43.// Visual C#
44.private int m_y;
45.public int Y {
46.get { return m_y; }
47.set { m_y = value; }
}
48. Add code for the Move method:
49.‘ Visual Basic
50.Public Sub Move(ByVal aDirection As MoveIt.Direction, ByVal ho wFar _
51.As Integer) Implements MoveIt.IMoveable.Move
52.Select Case aDirection
53.Case Direction.Up
54.m_y += howFar
55.Case Direction.Down
56.m_y -= howFar
57.Case Direction.Left
58.m_x -= howFar
59.Case Direction.Right
60.m_x += howFar
61.End Select
62.End Sub
63.
64.// Visual C#
65.public void Move(Direction direction, int howFar) {
66.switch (direction) {
67.case Direction.Up :
68.m_y += howFar;
69.break;
70.case Direction.Down :
71.m_y -= howFar;
72.break;
73.case Direction.Left :
74.m_x -= howFar;
75.break;
76.case Direction.Right :
77.m_x += howFar;
78.break;
79.}
}
80.Add one method to the Pawn class that’s not part of the IMoveable interface:
81.‘ Visual Basic
82.Private m_captured As Boolean = False
83.Public Property Captured() As Boolean
84.Get
85.Return m_captured
86.End Get
87.Set(ByVal Value As Boolean)
88.m_captured = Value
89.End Set
90.End Property
92.// Visual C#
93.private bool m_captured = false;
94.public bool Captured {
95.get { return m_captured; }
96.set { m_captured = value; }
}
That completes the implementation of the IMoveable interface in the Pawn class.
Test the IMoveable interface
When you created the project as a console application, Visual Studio .NET created a start-up method. Now you add code to that method to test the Pawn class.
1.If you’re using Visual Basic, double-click Module1.vb in the Solution
Explorer to open the file in the code editor.
If you’re using Visual C#, double-click Class1.cs in the Solution Explorer to open the file in the code editor.
2.Add code to the Main method. Note that mover is declared as IMoveable yet instantiated as Pawn. You can’t instantiate an interface; it does not have implementation.
3.‘ Visual Basic
4.Sub Main()
5.Dim mover As IMoveable = New Pawn()
6.mover.X= 10
7.mover.Y = 10
8.Console.WriteLine("X:{0} Y:{1}", mover.X, mover.Y)
9.Console.WriteLine("Moving up 5 spaces.")
10.mover.Move(Direction.Up, 5)
11.Console.WriteLine("X:{0} Y:{1}", mover.X, mover.Y)
12.
13.Dim aPawn As Pawn = CType(mover, Pawn)
14.Console.WriteLine("Is the pawn captured? {0}", aPawn.Capture
d)
15.End Sub
16.
17.// Visual C#
18.static void Main(string[] args)
19.IMoveable mover = new Pawn();
20.mover.X= 10;
21.mover.Y = 10;
22.Console.WriteLine("X:{0} Y:{1}", mover.X, mover.Y);
23.Console.WriteLine("Moving up 5 spaces.");
24.mover.Move(Direction.Up, 5);
25.Console.WriteLine("X:{0} Y:{1}", mover.X, mover.Y);

26.
27.Pawn pawn = (Pawn)mover;
28.Console.WriteLine("Is the pawn captured? {0}", pawn.Captured
);
29.}
Using a reference to an interface is similar to using a reference to a base class. The reference variable mover has access only to the members of IMoveable, though you can set it to refer to an instance of Pawn. To access the Pawn members of the mover reference, you must cast the reference to Pawn. In a larger application, the mover reference could be pointing to some other game piece, such as a King or a Queen. As you type the code, look closely at the IntelliSense lists to see these differences.
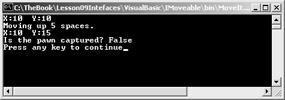
30.Press Ctrl+F5 to run the program. If you press F5, the output flashes briefly. Running the program with Ctrl+F5 gives you a chance to examime the output. Here’s the output:
.NET Framework Interfaces
The .NET Framework defines several interfaces from which you can choose to implement your classes. These interfaces usually buy you some extra functionality for your object. Most of the interfaces contain only a few members, and many contain only one. Others are more complex. For the complex interfaces, you’re often able to inherit from a .NET Framework class that implements the interface. Some of the interfaces are described in the following table:
|
|
|
|
|
|
Interface |
|
Benefits |
|
|
|
|
|
|
|
IComparable |
|
Defines sorting |
|
|
|
of class |
|
|
|
|
|
|
|
|
|
|
instances. It’s |
|
|
|
|
useful if you |
|
|
|
|
want |
|
|
|
|
to use the |
|
|
|
|
class as a key |
|
|
|
|
value in |
|
|
|
|
SortedList or |
|
|
|
|
support |
|
|
|
|
the Sort |
|
|
|
|
method of the |
|
|
|
|
ArrayList. |
|
|
|
|
|
|
|
IEnumerable and |
|
These two |
|
|
|
classes work |
|
|
|
IEnumerator |
|
|
|
|
|
together to |
|
|
|
|
|
|
|
|
|
|
support using |
|
|
|
|
For |
|
|
|
|
Each or |
|
|
|
|
foreach with |
|
|
|
|
your class. |
|
|
|
|
|
|
|
IFormattable |
|
Allows you to |
|
|
|
|
define custom |
|
|
|
|
formatting |
|
|
|
|
|
|
