

C# ПІДРУЧНИКИ / c# / MS Press - Oop With MS Vb Net And C# Step By Step (2002)
.pdfIn Chapter 4, “Working with Methods,” you created three classes for card games: Card, Hand, and Deck. You instantiated the Hand and Deck classes in code, and then used those classes to manipulate a set of Card instances, which you also instantiated in code. To create the Deck you wanted, you used a constructor that used arrays of Suit and FaceValue enumeration values for the cards in the deck. This time around, you again want to create a Deck, but you want to do so by dragging a Deck component from the Toolbox to the form and then setting the suits and face values by using the Properties window. In addition to instantiating the Deck in a constructor, the form class contained a lot of code for manipulating the Card instances. In a more object-oriented program, that manipulation might be better handled in a class that represents a game.
Designing the Game
You’ll use two projects to build the Memory game. The first is a control library, GamesLibrary, which contains the controls and components needed to implement the Memory game. The second project is the game project, which uses the controls in the library to implement the game. The following UML diagram describes the game:
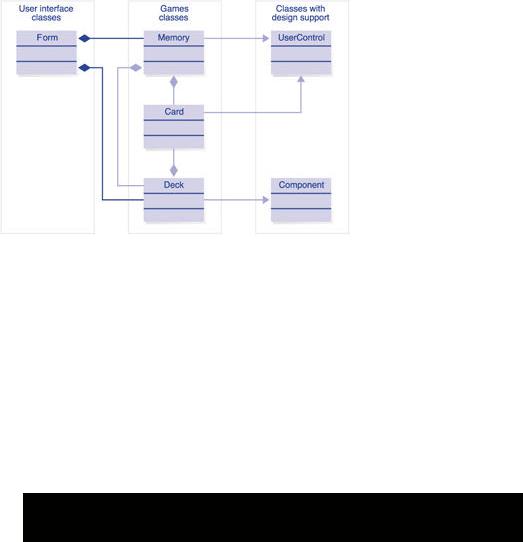
This diagram divides the primary classes of the design into three categories. The user interface class is the familiar System.Windows.Forms class. This class contains the visual elements that the game player can interact with. The games classes should be familiar to you from the exercises in Chapter 4.
The classes with design support provide functionality that you can take advantage of at design time. For example, the Memory class, which represents the Memory game, derives from the UserControl class. Thus you can add the Memory control to the Toolbox and create an instance by just dragging one onto the form. From that point, you can set the properties of the Memory control in the Properties window.
The Component class is similar to the UserControl class in that you can add the component to the Toolbox and drag an instance onto a form. One difference is that the component instance is added to the component tray, rather than being a visual element of the form. Another difference is that in the Windows Forms Designer generated code, the component instance is added to the form’s components container, rather than to the form’s Controls collection.
Showing Composition and Aggregation in UML
The solid diamond in the UML diagram indicates a relationship called composition in object-oriented terminology. Composition means that one object can’t exist without another object. As an example, a car without an engine isn’t really a car. If the engine stops working, the car stops working—or you at least need to get a new engine to get the car running.
This diagram introduces a new UML element, the open diamond. The open diamond indicates a relationship called aggregation. Aggregation implies that one object can use another object, but can be created without it: a car can have a driver, but even without a driver it’s still a car.
You might not necessarily agree with the assignment of open and closed diamonds in the diagram. Designers often disagree about the distinctions between composition and aggregation.
The Games Class Library
The first project is a class library that contains the Card, Deck, and Game classes. You’ll add this library as a reference to the project that runs the Memory game.
Create the GamesLibrary project
1.On the File menu, point to New, and then click Project.
2.In the Projects Types tree, click Visual Basic Projects or Visual C# Projects.
3.In the Templates list, click Windows Control Library.
4.In the Name box, type GamesLibrary and then click OK.
Changing the Namespace
In the .NET Framework, classes are contained in namespaces. A namespace defines a scope for a class. The projects in this book so far have had one namespace, which is identical to the project name, but this can be changed. In the .NET Framework, namespaces are named in a particular way, by convention: Company.Technology. In this library, your company LotsOfFun has created several games classes. Thus your classes will be contained in the namespace LotsOfFun.Games.
Change the namespace
1.In the Solution Explorer, right-click the GamesLibrary project and click Properties on the shortcut menu. The GamesLibrary Property Pages
dialog box appears.
Notice that the setting for Output Type is Class library. The output of this project will be a .dll file. You can use objects defined in a class library file, but you cannot execute a .dll file.
2.Click General under Common Properties in the list. In the Root Namespace box for Visual Basic or the Default Namespace box for Visual C#, type LotsOfFun.Games, and click OK. Subsequent classes added to the project will be added to this namespace.
3.If you are using Visual C#, right-click UserControl1.cs in the Solution Explorer, and then click View Code on the shortcut menu. Locate the namespace declaration near the top of the file and replace GamesLibrary with LotsOfFun.Games.
Creating the Card Control
The Card control inherits from the UserControl class. In Chapter 4, you used the Button control as the basis for the user interface of the Card. Then you used the Tag property to save the Card class associated with the Button control. That wasn’t the best objectoriented solution, because you had to cast the Tag property to use the Card instance. In this project, you could create the Card control by inheriting from Button, adding Suit and FaceValue properties, and then controlling the Text and Image properties. You’ll get a better result by inheriting from the UserControl class because the Button control has several properties you don’t want the user to have access to, such as Text and Image. You want to control those properties so that they reflect the Suit and FaceValue properties at all times.
In addition to the Suit and FaceValue properties you implemented for Card in Chapter 4, you’ll add the FaceUp property to the Card class. This value determines whether the Card control is displayed face up (suit and value showing) or face down (back of the card showing). Other additions to the class are used for design-time support of the Card control. These additions include help strings for the properties, a Property window category for the properties, and a Toolbox icon. Finally, you will use the control’s Paint event to dynamically update the control’s appearance when the Suit and FaceValue are set in the designer.
Add the Card control to the project
1.Right -click UserControl1 in the Solution Explorer, and then click Rename on the shortcut menu. Rename the file Card.vb or Card.cs, depending on the language you’re using.
2.Right -click Card in the Solution Explorer, and then click View Code on the shortcut menu.
3.Rename the class Card. If you’re using Visual C#, locate the constructor and change its name to Card, too.
4.Right -click Card in the Solution Explorer, and then click View Designer on the shortcut menu.
5.Right -click the control in the designer and click Properties on the shortcut menu.
6.In the Properties window, expand Size and set the Width to 60 and the Height to 75.
Define the Toolbox icon for the Card control
1.Create a 16-by-16-pixel bitmap for your project, name it Card.bmp, and save it in the project directory. An icon is available on the companion CD in the \Chapter08 folder. The file must be named Card.bmp, so that Visual Studio will use it as the Toolbox icon for the Card class.
2.In the Solution Explorer, right-click the GamesLibrary project, point to Add, and then click Add Existing Item on the shortcut menu.
3.In the Add Existing Item dialog box, click Image Files in the Files Of Type list.
4.Select Card.bmp and click Open.
5.In the Solution Explorer, right-click the Card.bmp file and click Properties on the shortcut menu.
6.In the Properties window, set the Build Action property of the bitmap file to Embedded Resource. When the project is built, the bitmap will be added to the assembly file, which is the file created when you compile the program. The bitmap’s name, Card, will cause it to be used as the Toolbox icon of the Card control.
Add the Suit and FaceValue enumerations
1.Add the Suit enumeration to the LotsOfFun.Games namespace. In the Solution Explorer, right-click Card and click View Code on the shortcut menu to see the class code in the code editor. In Visual Basic, add this code just above the Card class. In Visual C#, this code goes inside the namespace block, but outside the Card class.
2.‘ Visual Basic
3.Public Enum Suit
4.Hearts
5.Diamonds
6.Clubs
7.Spades
8.End Enum
9.
10.// Visual C#
11.public enum Suit {
12.Clubs, Spades, Diamonds, Hearts
13.};
14.Add the FaceValue enumeration after the Suit enumeration.
15.‘ Visual Basic
16.Public Enum FaceValue
17.Ace
18.Two
19.Three
20.Four
21.Five
22.Six
23.Seven
24.Eight
25.Nine
26.Ten
27.Jack
28.Queen
29.King
30.End Enum
32.// Visual C#
33.public enum FaceValue {
34.Ace, Two, Three, Four, Five, Six, Seven, Eight, Nine, Ten,
35.Jack, Queen, King
};
Add the Suit, FaceValue, and FaceUp properties
The Suit, FaceValue, and FaceUp properties all use attributes to customize their appearance in the Properties window. These attributes come from the
System.ComponentModel namespace. An Imports or using statement for the namespace allows you to use the attributes without the qualified name.
1.If you’re using Visual Basic, right-click the GamesLibrary project in the Solution Explorer, and click Properties on the shortcut menu. Click Imports under Common Properties and type System.ComponentModel into the Namespace box. Click Add Import, and then click OK. If you’re using Visual C#, the corresponding using statement is added to each source file.
2.// Visual C#
using System.ComponentModel;
3.Add the following code for the FaceValue property to the Card class:
4.‘ Visual Basic
5.Private m_faceValue As FaceValue = FaceValue.Ace
6.<Category("Game"), Description("Face value of the card.")> _
7.Public Property FaceValue() As FaceValue
8.Get
9.Return m_facevalue
10.End Get
11.Set(ByVal Value As FaceValue)
12.m_facevalue = Value
13.Me.Refresh()
14.End Set
15.End Property
16.
17.// Visual C#
18.private FaceValue m_faceValue = FaceValue.Ace;
19.[Category("Game")]
20.[Description("Face value of the card.")]
21.public FaceValue FaceValue {
22.get { return m_faceValue; }
23.set {
24.m_faceValue = value;
25.this.Refresh();
26.}
}
This is the same code you wrote in Chapter 4, with additions to support the fact that the Card is also a UserControl. The call to Refresh uses the Paint event to redraw the card whenever the Suit changes. You’ll write the Paint event handler in the next section. The property also has two attributes, Category and Description. Visual Studio .NET uses these attributes when the properties are displayed in the Properties window.
27.Add the following code for the Suit property:
28.‘ Visual Basic
29.Private m_suit As Suit = Suit.Hearts
30.<Category("Game"), Description("Suit (Hearts, Spades, Diamond s, Clubs)")> _
31.Public Property Suit() As Suit
32.Get
33.Return m_suit
34.End Get
35.Set(ByVal Value As Suit)
36.m_suit = Value
37.Me.Refresh()
38.End Set
39.End Property
40.
41.// Visual C#
42.private Suit m_suit = Suit.Hearts;
43.[Category("Game")]
44.[Description("Suit (Hearts, Spades, Diamonds, Clubs)")]
45.public Suit Suit {
46.get { return m_suit; }
47.set {
48.m_suit = value;
49.this.Refresh();
50.}
}
51.Add the following code for the FaceUp property:
52.‘ Visual Basic
53.Private m_faceUp As Boolean = True
54.<Category("Game"), Description("Is the card face up?")> _
55.Public Property FaceUp() As Boolean
56.Get
57.Return m_faceUp
58.End Get
59.Set(ByVal Value As Boolean)
60.m_faceUp = Value
61.Me.Refresh()
62.End Set
63.End Property
65.// Visual C#
66.private bool m_faceUp = true;
67.[Category("Game")]
68.[Description("Is the card face up?")]
69.public bool FaceUp {
70.get { return m_faceUp; }
71.set {
72.m_faceUp = value;
73.this.Refresh();
74.}
}
Add the constructors and the Paint method
1.The Chapter08 folder on the companion CD has four icons for the four possible suits in a deck. Copy the icons to the GamesLibrary project folder.
2.Add the following code shown in boldface to the parameterless constructor and a field to the class to hold the suit images. If you’re using Visual Basic, you’ll have to expand the Windows Forms Designer Generated Code region to find the parameterless constructor. The constructor loads the images for the suits into an ArrayList. This loads a set of images for each Card instance. Don’t delete the call to InitializeComponent in the constructor. This call is necessary to initialize the control. You’ll need to replace PATH in the code with the path to the folder where you have stored the icons on your system.
3.‘ Visual Basic
4.Dim m_images As New SortedList()
5.Public Sub New()
6.MyBase.New()
7.‘ This call is required by the Windows.Forms Form Designer.
8.InitializeComponent()
9.
10.m_images.Add(Suit.Clubs, New Icon("PATH\clubs.ico"))
11.m_images.Add(Suit.Diamonds, New Icon("PATH\diamonds
.ico"))
12.m_images.Add(Suit.Hearts, New Icon("PATH\hearts.ico"))
13.m_images.Add(Suit.Spades, New Icon("PATH\spades.ico")
)
14.End Sub
15.
16.// Visual C#
17.SortedList m_images = new SortedList();
18.public Card()
19.{
20.// This call is required by the Windows.Forms Form Designer.
21.InitializeComponent();
22.
23.m_images.Add(Suit.Clubs, new Icon("PATH\\clubs.ico"));
24.m_images.Add(Suit.Diamonds, new Icon("PATH\\diamond s.ico"));
25.m_images.Add(Suit.Hearts, new Icon("PATH\\hearts.ico"));
26.m_images.Add(Suit.Spades, new Icon("PATH\\spades.ico"
));
}
27.Add the constructor that takes a Suit and a FaceValue as parameters. Note that this constructor calls the base constructor to set up the image fields.
28.‘ Visual Basic
29.Public Sub New(ByVal newSuit As Suit, ByVal newValue As Face Value)
30.Me.New()
31.m_suit = newsuit
32.m_faceValue = newvalue
33.End Sub
34.
35.// Visual C#
36.public Card(Suit suit, FaceValue faceValue) : this() {
37.m_suit = suit;
38.m_faceValue = faceValue;
}
39.If you’re using Visual Basic, click Base Class Events in the Class Name list of the code editor. Then click Paint in the Method Name list to create the declaration for the Paint event handler.
If you’re using Visual C#, double-click Card.cs in the Solution Explorer to open the control in the designer. In the designer, right-click the control and then click Properties on the shortcut menu. Click the Events toolbar button in the Properties window, and then double-click the Paint event. A Paint event handler is added to the Card class.
40.Add code to the Paint event handler to draw the card either face down or face up.
41.‘ Visual Basic
42.Private Sub Card_Paint(ByVal sender As Object, ByVal e As _
43.System.Windows.Forms.PaintEventArgs) Handles MyBase.Paint
44.Dim g As Graphics = Me.CreateGraphics()
45.g.DrawRectangle(System.Drawing.Pens.Black, 0, 0, _
46.Me.ClientRectangle.Width - 1, Me.ClientRectangle.Height -
1)
47.If Me.FaceUp Then
48.Me.BackColor = Color.White
49.g.DrawString(Me.m_faceValue.ToString(), New _
50.System.Drawing.Font("Arial", 10, _
51.System.Drawing.FontStyle.Bold), _
52.System.Drawing.Brushes.Black, 3, 3)
53.g.DrawIcon(CType(Me.m_images(m_suit), Icon), 14, 40)
54.Else
55.Me.BackColor = Color.Blue
56.End If
57.End Sub
58.
59.// Visual C#
60.private void Card_Paint(object sender,
61.System.Windows.Forms.PaintEventArgs e)
62.{
63.Graphics g = this.CreateGraphics();
64.g.DrawRectangle(System.Drawing.Pens.Black,0,0,
65.this.ClientRectangle.Width-1, this.ClientRectangle.Height-1);
66.if (this.m_faceUp) {
67.this.BackColor = Color.White;
68.g.DrawString(this.m_faceValue.ToString(),
69.new System.Drawing.Font("Arial",10,System.Drawing.FontSt yle.Bold),
70.System.Drawing.Brushes.Black,3,3);
71.g.DrawIcon((Icon)(this.m_images[m_suit]),14,40);
72.}
73.else {
74.this.BackColor = Color.Blue;
75.}
}
Write the SizeChanged event handler
You can respond to the SizeChanged event to prevent the user from changing the size of the control. You’ll want to do this, because drawing code you wrote in the Paint event handler depends on the control maintaining a constant size.
1.If you’re using Visual Basic, click Base Class Events in the Class Name list, and then click SizeChanged in the Method Name list in the code editor. This creates the declaration for the SizeChanged event
handler.
If you’re using Visual C#, right-click Card.cs in the Solution Explorer, and then click View Designer on the shortcut menu. In the designer, right-click the control and click Properties on the shortcut menu. Click the Events toolbar button in the Properties window. In the Properties window, double-click the SizeChanged property. This creates the declaration for the SizeChanged event handler.
2.Add the following code to prevent the user from changing the size of the control. The constant size of the control is exposed as a public member, because the Memory control will use it to lay out the cards. (In Chapter 11, “Using Shared and Static Members,” you’ll learn how to do this without exposing fields.)
3.‘ Visual Basic
4.Public Const FixedWidth As Integer = 60
5.Public Const FixedHeight As Integer = 75
6.Private Sub Card_SizeChanged(ByVal sender As Object, _
7.ByVal e As System.EventArgs) Handles MyBase.SizeChanged
8.Me.Size = New Size(FixedWidth, FixedHeight)
9.End Sub
10.
11.// Visual C#
12.public const int FixedWidth = 60;
13.public const int FixedHeight = 75;
14.private void Card_SizeChanged(object sender, System.EventArg s e)
15.{
16.this.Size = new Size(FixedWidth, FixedHeight);
}
17. On the Build menu, click Build.
The Card class is now complete and you can test it.
Creating the Memory Game Project
The Card class is contained in a class library, which means it provides classes you can use in other projects. You can’t run a class library assembly, so you will use a Windows Application project for instantiating the display of a Card control.
Add a new project to the solution
By adding a new project to the solution, you can work on the class library and use the objects it contains at the same time.
1.On the File menu, point to Add Project, and then click New Project.
2.In the Projects Types tree, click Visual Basic Projects or Visual C# Projects. In the Templates list, click Windows Application.
3.In the Name box, type Memory and then click OK.
Add a reference to the Games library
Even though the two projects are in the same solution, you can’t use the controls defined in the Games library until you’ve added a reference to the library in the Memory project.
1.Right -click the Memory project in the Solution Explorer and click Add Reference on the shortcut menu. The Add Reference dialog box appears.
2.On the .NET tab, click the Browse button. The Select Component dialog box appears. Browse to the obj\debug folder of the GamesLibrary project.
3.Select GamesLibrary.dll and click Open.
4.In the Add Reference dialog box, click OK to add the reference to the Memory project.
Add the Card control to the Toolbox
When you add the Card control to the Toolbox, you can simply add a Card control by dragging it onto a form. Follow these steps to add the control to the Toolbox:
1.Double-click Form1 of the Memory project in the Solution Explorer.
2.Right -click the Toolbox and click Add Tab on the shortcut menu. A new tab appears at the bottom of the Toolbox.
3.Type Games for the name of the new tab and press Enter.
4.Click the new Games tab.
5.Right -click in the Games tab and click Customize Toolbox on the shortcut menu.
6.Click the .NET Framework Components tab.
7.Click the Browse button and browse to the GamesLibrary.dll file, as you did in the previous section.
8.Select the check box for the Card component in the LotsOfFun.Games namespace.