

C# ПІДРУЧНИКИ / c# / MS Press - Oop With MS Vb Net And C# Step By Step (2002)
.pdf8.
9.// Visual C#
10.public class SavingsAccount : TheBank.BankAccount {
11.public SavingsAccount() {
12.}
13.}
If you’re using Visual Basic, the following message appears in the Task List:
“Cannot implicitly create a constructor for ‘Class SavingsAccount’ because its base class ‘BankAccount’ doesn’t declare a public constructor that has no parameters. Either define a constructor on ‘Class SavingsAccount’ or a parameterless constructor on base ‘Class BankAccount’.”
If you’re using Visual C#, the following message appears in the Task List:
No overload for method ‘BankAccount’ takes ‘0’ arguments
As you create and modify base classes and derived classes, various messages appear in the Task List. These messages help you correctly implement the classes. Although inheritance lets you reuse much of the code in the base class, you will, of course, want to modify and add to the derived class. Getting the behavior you want in the derived classes requires a certain syntactical handshaking between the base class and derived classes. The messages that you receive as you work indicate that this handshaking isn’t yet correctly implemented.
The C# Class Wizard
The C# Class Wizard allows you to specify a base class when you create a new class. In the wizard, click the Base Class tab and click a class in the Base Class list. If the class you want to derive from isn’t part of your project, first find the namespace that contains the class in the Namespace list.
Leaving the constructor work aside for a moment, modify the ID property so that you form the ID by adding -S to the end of the owner’s name. This process has three steps:
§By default, the class inherits the behavior of the base class. To override this behavior, you redefine the property in the derived class and add the override modifier to the property declaration.
§In the base class, you modify the property declaration by adding the virtual keyword to it.
§Because the m_owner field in BankAccount is defined as a private field, it isn’t accessible in the SavingsAccount code. And because the m_owner field is the basis for the ID, the third step is to redefine the scope of the m_owner field in the base class.
The interaction between the virtual base class property and the overridden derived class property becomes apparent when the classes are used polymorphically.
Examine the development environment
Take a moment to examine the changes in the development environment now that you have declared a base class for SavingsAccount.
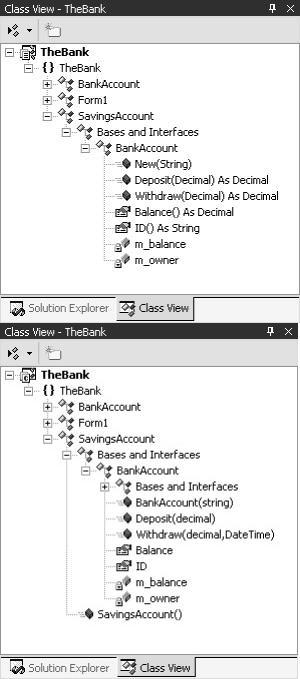
1.Expand the Class View window. The base class and its members are now included as you see in the following screens. Notice the m_balance and m_owner fields have a small lock on the icon, indicating that they’re private fields. A public field wouldn’t have a lock.
17.If you’re using Visual Basic, open the source file for the SavingsAccount class in the code editor. Click the Class Name list. Two new entries appear, (Overrides) and (Base Class Events). Click (Overrides) in the list and then examine the entries in the Method Name list. It’s empty. As you add overridable properties and methods to the BankAccount class, they appear in the Method Name list.
Override the ID property
1.Open the BankAccount class in the code editor and modify the declaration of the m_owner field so that it’s protected:
2.‘ Visual Basic
3.Protected m_owner As String
4.
5. // Visual C# protected string m_owner;
Protected fields are available to derived classes. They’re treated as private in client code. Private fields aren’t available to derived classes or client code. Not all class fields need to be protected. If you examine the class in the Class View, the icon on the m_owner field has a key on it, indicating that the field is protected.
Modify the ID property by adding the Overridable or virtual keyword, as you see here:
‘ Visual Basic
Public Overridable ReadOnly Property ID() As String Get
Return m_owner End Get
End Property
// Visual C#
virtual public string ID { get {
return m_owner;
}
}
6.Open the SavingsAccount source file in the code editor.
7.If you’re using Visual Basic, click (Overrides) in the Class List, and then click ID in the Method Name list. The following empty property definition is added to the class:
8.‘ Visual Basic
9.Public Overrides ReadOnly Property ID() As String
10.Get
11.
12.End Get
13.End Property
If you’re using Visual C#, expand the Bases And Interfaces node of the SavingsAccount class in the Class View. Expand the BankAccount node and right-click the ID property. On the shortcut menu, point to Add and then click Override. The following empty property definition is added to the class:
// Visual C#
public override string ID {
get {
return null;
}
}
14.Modify the property to return the ID. As you type in the code, notice the IntelliSense list as you type Me. or this. (including the period in either case). The list is shown in the screen that follows.
15.‘ Visual Basic
16.Public Overrides ReadOnly Property ID() As String
17.Get

18.Return Me.m_owner & "-S"
19.End Get
20.End Property
21.
22.// Visual C#
23.override public string ID {
24.get {
25.return this.m_owner + "-S";
26.}
}
This code introduces the keywords Me and this. The Me and this keywords refer to the class instance. In this case using Me or this is not required. You could simply type m_owner. You use a keyword in situations in which you might have variable name collisions. Perhaps you have the same field declared in the class and in the method. This keyword indicates which variable to use.
You also use the Me and this keywords if you need to pass a reference to the instance to another method. For example, suppose you had a method that took a Form as a parameter:
‘ Visual Basic
Public Sub MakeFormBlue(aForm As Form)
// Visual C#
public void MakeFormBlue(Form aForm)
You would make this call from within a form’s code, like this:
‘ Visual Basic
MakeFormBlue(Me)
// Visual C#
MakeFormBlue(this);
Adding the Constructor
Constructors aren’t inherited, so you must add them to the derived class. Also, whenever a constructor is defined, it includes an implicit call to the parameterless constructor that belongs to the base class. In the BankAccount class, you created only one public constructor, and that constructor had one parameter for the owner’s name. Because that parameterless constructor doesn’t exist in the base class, you need to make an explicit call to the constructor that does exist.
Add this constructor for the SavingsAccount class. If you’re using Visual C#, you need to delete the constructor without parameters.
‘ Visual Basic
Public Sub New(ByVal owner As String)
MyBase.New(owner)
End Sub
// Visual C#
public SavingsAccount(string owner) : base(owner) {
}
The error message about the constructor is now resolved.
This code introduces the MyBase and base keywords. MyBase and base refer to the base class of a class. In the case of the constructor, there’s no sense in rewriting the code that you wrote in the base class, BankAccount. A call to the base class is sufficient. C# provides a syntax for calling base class members of the same name, : base(). Unlike the Me keyword, MyBase doesn’t refer to any instance, so it can’t be passed to methods that require an instance reference.
Add the Interest property and the AddInterest method
1.Add this code for the Interest property:
2.‘ Visual Basic
3.Private m_interest As Decimal = 0.01D
4.Public Property Interest() As Decimal
5.Get
6.Return m_interest
7.End Get
8.Set(ByVal Value As Decimal)
9.m_interest = Value
10.End Set
11.End Property
12.
13.// Visual C#
14.private decimal m_interest = 0.01M;
15.public decimal Interest {
16.get {
17.return m_interest;
18.}
19.set {
20.m_interest = value;
21.}
}
22.Add this code for the AddInterest method:
23.‘ Visual Basic
24.Public Function AddInterest() As Decimal
25.Me.Deposit(m_interest * Me.Balance)
26.Return Me.Balance
27.End Function
28.
29.// Visual C#
30.public decimal AddInterest() {
31.this.Deposit(m_interest * this.Balance);
32.return this.Balance;
33.}
The m_balance field is private to the base class, BankAccount, and the Balance property is read-only. Therefore the only way to add money to the account is, by design, through the Deposit method.
You have completed the implementation of the SavingsAccount class. You can now write some test code.
Test the SavingsAccount class
1.Open Form1 in the code editor.
2.Delete the code that you added to test the BankAccount class, so that the Form1_Load method is empty.
3.Add this code to test the SavingsAccount class:
4.‘ Visual Basic
5.Private Sub Form1_Load(ByVal sender As System.Object, _
6.ByVal e As System.EventArgs) Handles MyBase.Load
7.Dim savings As SavingsAccount = New SavingsAccount("Your Name")
8.savings.Deposit(150D)
9.savings.Withdraw(50D)
10.savings.Interest = 0.05D
11.savings.AddInterest()
12.MessageBox.Show( _
13.String.Format("{0}: {1:C}", savings.ID, savings.Balance))
14.End Sub
15.
16.// Visual C#
17.private void Form1_Load(object sender, System.EventArgs e) {
18.SavingsAccount savings = new SavingsAccount("Your Name");
19.savings.Deposit(150M);
20.savings.Withdraw(50M);
21.savings.Interest = 0.05M;
22.savings.AddInterest();
23.MessageBox.Show(
24.String.Format("{0}: {1:C}", savings.ID, savings.Balance));
}
As you type in the code, notice the members of the class listed by IntelliSense. The list includes the members of the BankAccount class, plus the members of the SavingsAccount class, shown in the following screen. In C#, the members of the System.Object class also appear on the list.
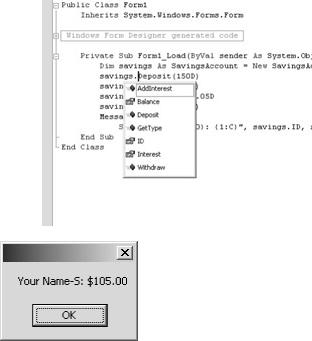
27. Press F5 to run the application. The result is shown here:
Creating the Derived Class CheckingAccount
The second derived class you create is the CheckingAccount class. CheckingAccount is identical to BankAccount except that every withdrawal from CheckingAccount incurs a $0.25 check charge. As in the SavingsAccount example, the ID property indicates the type of account.
Create the CheckingAccount class
1.On the Project menu, click Add Class. The Add New Item dialog box appears.
2.Name the file CheckingAccount.vb or CheckingAccount.cs, depending on the language you’re using.
3.Modify the class declaration to indicate that BankAccount is the base class as you see here:
4.‘ Visual Basic
5.Public Class CheckingAccount
6.Inherits BankAccount
7.End Class
8.
9.// Visual C#
10.public class CheckingAccount : TheBank.BankAccount {
11.public CheckingAccount() {
12.}
13.}
Add the constructor
§Add this code for the CheckingAccount constructor. If you’re using Visual C#, you need to delete the constructor without parameters.
§‘ Visual Basic
§Public Sub New(ByVal owner As String)
§MyBase.New(owner)
§End Sub
§
§// Visual C#
§public CheckingAccount(string owner) : base(owner) {
}
Override the Withdraw method
Overriding a method is similar to overriding a property. You add the Overridable keyword in Visual Basic or the virtual keyword in C# to the base class and redefine the method in the derived class by using the override keyword.
1.Open the source file for BankAccount in the code editor.
2.Modify the declaration of the Withdraw method to include the overridable keyword.
3.‘ Visual Basic
4.Public Overridable Function Withdraw(ByVal amount As Decimal) As Decimal
5.
6.// Visual C#
virtual public decimal Withdraw(decimal amount)
7.Open the source file for CheckingAccount in the code editor.
8.Add this code for the Withdraw method:
9.‘ Visual Basic
10.Public Overrides Function Withdraw(ByVal amount As Decimal) As Decimal
11.MyBase.Withdraw(amount)
12.MyBase.Withdraw(0.25D)
13.Return Me.Balance
14.End Function
15.
16.// Visual C#
17.override public decimal Withdraw(decimal amount) {
18.base.Withdraw(amount);
19.base.Withdraw(0.25M);
20.return this.Balance;
}
In this method, the MyBase or base keyword is required. Without the keyword, the CheckingAccount version of the Withdraw method would be called, which would in turn call the same Withdraw method, over and over again, until a stack overflow error occurred. You would have induced this error because each call to the Withdraw method takes up a little more memory from the stack, which is the memory available for the program. When the stack overflows, an error occurs.
Override the ID property
§Add this code to override the ID property:
§‘ Visual Basic
§Public Overrides ReadOnly Property ID() As String
§Get
§Return Me.m_owner & "-C"
§End Get
§End Property
§
§// Visual C#
§override public string ID {
§get {

§ |
return this.m_owner + "-C"; |
§}
}
Test the CheckingAccount class
1.Open Form1 in the code editor.
2.Delete the code that you added to test the SavingsAccount class, so that the Form1_Load method is empty.
3.Add the following code to test the CheckingAccount class:
4.‘ Visual Basic
5.Private Sub Form1_Load(ByVal sender As System.Object, _
6.ByVal e As System.EventArgs) Handles MyBase.Load
7.Dim checking As CheckingAccount = New CheckingAccount("Your Name")
8.checking.Deposit(50D)
9.checking.Withdraw(5D)
10.MessageBox.Show( _
11.String.Format("{0}: {1: C}", checking.ID, checking.Balance))
12.End Sub
13.
14.// Visual C#
15.private void Form1_Load(object sender, System.EventArgs e) {
16.CheckingAccount checking = new CheckingAccount("Your Name");
17.checking.Deposit(50M);
18.checking.Withdraw(5M);
19.MessageBox.Show(
20.String.Format("{0}: {1:C}", checking.ID, checking.Balance));
}
21. Press F5 to run the application. The result is shown here:
Using the Derived Classes Polymorphically
In the preceding sections, you demonstrated that inheritance allows you to reuse code from a base class. You defined a Deposit method in the base class, BankAccount. You used that method from an instance of SavingsAccount, even though you wrote no code for the Deposit method in the SavingsAccount class.
Not only does inheritance let you reuse code, but it also allows you to use classes polymorphically. This means that you can refer to an instance of the derived class as though it were an instance of the base class, as shown here:
‘ Visual Basic
Dim account as BankAccount
account = New CheckingAccount("Your Name")
account.Deposit(25D)

account.Withdraw(5D)
‘ Balance is 20.
//Visual C# BankAccount account;
account = new CheckingAccount("Your Name"); account.Deposit(25M);
account.Withdraw(5M);
//Balance is 19.75.
Polymorphism also provides that when this code is executed, the runtime determines the actual type of the instance, BankAccount, SavingsAccount, or CheckingAccount. It then calls the Withdraw method defined for the actual type. There are ways to override this behavior, but in the code you’ve written the Withdraw method of the CheckingAccount object would be called in the preceding example.
In the next section, you’ll see how you can use classes polymorphically.
Create the user interface
1.Open Form1 in the designer.
2.Set the Text property of Form1 to The Bank .
3.Drag a Label onto Form1 and set its Text property to Account.
4.Drag a ComboBox control onto Form1 next to the Label and set its Name property to account. Delete the Text property, so that it’s blank.
5.Drag another Label onto Form1 and set its Text property to
Transaction.
6.Drag a ComboBox control onto Form1 and set its Name property to action. Delete the text in the Text property’s box so that it’s blank.
7.In the Properties window, click the ellipsis button (…) next to the Items property of the action ComboBox. Use the String Collection Editor dialog box to enter two strings, Deposit and Withdraw.
8.Drag another Label onto Form1 and set its Text property to Amount.
9.Drag a TextBox onto Form1 and set its Name property to amount. Delete the Text property, so that it is blank.
10.Drag a Button onto Form1. Set its Name property to submit and its Text property to Submit. Here’s the complete user interface:
Create the accounts
1.Double-click Form1 to display the Form1_Load method in the code editor.
2.Delete the test code for the CheckingAccount class.
3.Add these fields to Form1:
4.‘ Visual Basic
5.Private checking As New CheckingAccount("Your Name")
6.Private savings As New SavingsAccount("Your Name")
7.
8.// Visual C#