

C# ПІДРУЧНИКИ / c# / MS Press - Oop With MS Vb Net And C# Step By Step (2002)
.pdfTo
Derive from an abstract class
Implement an abstract member
Prevent a class from becoming a base class
Declare a member in the derived class that doesn’t behave polymorphically
Do this
keyword to the declaration: public abstract string PrintStatement ();
Declare the abstract class as a base class and implement all the abstract class members.
Declare the member with the override keyword and implement the member:‘ Visual BasicPublic Overrides Function PrintStatement () As StringEnd Function
// Visual C# public override string PrintStatement () {
}
Declare the class with the
NotInheritable or sealed keyword:
‘ Visual Basic NotInheritable Class NotABaseClass End Class
// Visual C# sealed class NotABaseClass
{
}
Declare the member with the
Shadows or new keyword:
‘ Visual Basic Public Shadows Sub BaseMethod() End Sub
// Visual C#

|
|
|
|
|
|
To |
|
Do this |
|
|
|
|
|
|
|
|
|
new public |
|
|
|
|
void |
|
|
|
|
BaseMethod() { |
|
|
|
|
} |
|
|
|
|
|
|
Chapter 7: Responding to Changes with Events and Exceptions
Overview
ESTIMATED |
3 hr. |
TIME |
|
|
|
In this chapter, you’ll learn how to
§Add a custom control to the Toolbox.
§Declare an event for your control class.
§Respond to events from your class using event handlers.
§Create a delegate.
§Add and remove event handlers.
§Derive an EventArgs class.
§Derive a custom exception class from the ApplicationException class.
§Throw your custom exception.
The Microsoft Windows user interface is event driven. The control flow of the program is primarily based on events of the Windows Form control. In this chapter, you’ll create a control that appears in the Toolbox. You can drag this control onto a form just as you would any of the built-in Windows controls. The control will have events that you can choose to respond to or ignore in your code. You’ll use exceptions to indicate that something has gone wrong during execution. Exceptions can’t be ignored. Using exception handling, your code can try to repair the problem or it can exit the program.
Fire on the Tracks! An Event-Driven Application
Your task in this chapter is to create a quick diversion for a young relative:
A train runs along a track across the screen. At regular intervals but random locations, the track catches fire. The old fire goes out when the new fire appears so that there’s always one fire on the track at any point in time. You can adjust the speed of the train using a slider control. The object of the game is to get the train to the end of the track without running into a fire.
A cursory textual analysis of the problem leads to the following class design. In this case, the screen object is represented by the Windows Form class, which contains a track, train, and fire objects. The train moves along the track at a speed set by a slider control, and the fire appears at different points on the track at a set frequency.
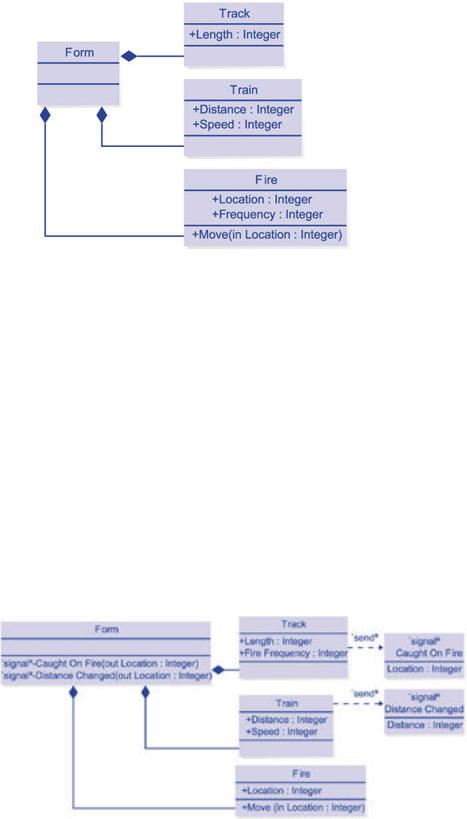
The classes are shown in the following UML diagram, which introduces a new UML element, the solid diamond. The solid diamond indicates a relationship called “composition” in object-oriented terminology. Composition is a relationship where some objects are “parts of” another object. It carries the sense that the one object can’t exist without the others. All the objects are created and destroyed as a unit.
This analysis captures only what’s static in the problem, such as the location of the train on the track at a point in time or the distance the train has traveled. It doesn’t describe how or when the train moves or when the fire will appear and where. It doesn’t describe how the form knows that the train should move or the fire should appear. For that information, you need events, signals from one object to another that something has happened. Here are the events that you need:
§A CaughtOnFire event for the Track class. This event, generated by the track, will be received by the form so that the code in the form can move the fire on the track. The Frequency property will be moved to the Track class to indicate how often the track should raise a CaughtOnFire event.
§A DistanceChanged event for the Train class. This event will be generated periodically to let the form know where the train is on the track. The location of the train depends on the speed of the train and how long it has been running.
Using the CaughtOnFire and DistanceChanged events, the form code can coordinate the behavior of the track, the train, and the fire. In UML, events are modeled as signals, which are similar to classes. In the illustration below, a dashed arrow labeled <<send>> indicates that a particular class, Track, generates a particular event, CaughtOnFire. The event can carry information in parameters. In this case, the CaughtOnFire event carries information about the location of the fire. The UML also provides a syntax for indicating which classes receive the events. The Form class receives both the CaughtOnFire and DistanceChanged events.

Your last design decision is how to implement the user interface, given the object model. You know that you want a track, a train, and a fire to appear as visual elements on the form. The properties of these visual elements are closely tied to the classes. In fact, you can implement the classes as derived classes of the generic Windows control, the UserControl class, which means that the visual display and behavior of an object are all contained in one class. Additionally, the control can be added to the Toolbox, and then dragged onto the form in the form designer. Here’s the complete design:
Implementing the Track Class
The first class you’ll implement is the Track class. This class derives from the UserControl class, and you draw the track yourself, both the rails and the ties. After you implement the Track class, you can implement the Train class that runs on it.
Create the class
1.Create a new Windows Application project and name it TrainGame.
2.On the Project menu, click Add User Control. The Add New Item dialog box appears.
3.Name the file Track.vb or Track.cs, depending on the language you’re
using.
Your new user control is empty. You’ll define the shape and color of your control by overriding the OnPaint method.
Add the properties
1.Right -click the new control and click View Code on the shortcut menu.
2.Add the following code to the Track class for the FireFrequency property. This property determines how often, in seconds, the location of the fire changes.
3.‘ Visual Basic
4.Private m_fireFrequency As Integer = 1
5.Public Property FireFrequency() As Integer
6.Get
7.Return m_fireFrequency
8.End Get
9.Set(ByVal Value As Integer)
10.If Value >= 1 Then
11.m_fireFrequency = Value

12.End If
13.End Set
14.End Property
16.// Visual C#
17.private int m_fireFrequency = 1;
18.public int FireFrequency {
19.get { return m_fireFrequency; }
20.set {
21.if (value >= 1) {
22.m_fireFrequency = value;
23.}
24.}
}
25.You don’t need to add any code for the Length property of the track. Because the Track class inherits from the UserControl class, it already has a Size property, with Height and Width. You’ll see more about how this works out in the section about painting the Track control.
Draw the track
The train travels along the track, as you see in the illustration that follows. Your code needs to draw the rails and railroad ties. You might want to shorten or extend the track, so the code should be able to draw tracks of different lengths. You could also accommodate different heights of the track, but the code you write draws a track with a fixed height. Drawing the track is a two-step process:
§Draw the outline of the track using the GraphicsPath class.
§Fill in the outline using the Graphics class.
You draw the outline of the track as a series of pieces of track. You create the outline as two horizontal bars and one vertical bar. When you fit the pieces end-to-end and fill them in, you have the track:
1.Add constants to the Track class to control the size of the track and
the spacing of the bars. The preceding diagram shows the relevant measurements in pixels.
2. |
‘ Visual Basic |
|
3. |
Private Const TrackHeight As Integer = 15 |
‘ Must be divisible |
|
by 5 |
|
4. Private Const BarWidth As Integer = TrackHeight \ 5 ‘Equal to rai
lwidth
5.Private Const BarSpacing As Integer = BarWidth * 2
7.// Visual C#
8. |
private const int TrackHeight = 15; |
// Must be divisible by 5 |
9. |
private const int BarWidth = TrackHeight / 5; // Equal to rail width |
|
private const int BarSpacing = BarWidth * 2;
This code introduces the Const and const keywords. The constant modifier indicates that the value of the variable can’t be modified. Constant values can be of any type, but the compiler must be able to evaluate the expression to the right of the equal sign. Because the compiler doesn’t allocate memory for class instances, the expression can’t contain a New or new statement. The result is that constant reference values will be Nothing or null, or a string. You use the constant field in this case so that you can change the size and proportions of your track by changing these values. All the drawing commands will use these fields, instead of integer literals, such as “15”. Using the constant modifier will let the compiler help you by preventing you from accidently changing these values in your code.
10.On the View menu, click Designer to view the control in the form designer. Double-click the control to create the Load event method in the code editor. Add this code to fix the Height property of the Track control to 15 pixels.
11.‘ Visual Basic
12.Me.Height = 15
13.
14. // Visual C#
this.Height = 15;
15.Override the OnSizeChanged method to set the Height property of the Track control to 15 pixels and to constrain the width of the control to a multiple of the value assigned to BarSpacing. The height of the control corresponds to the width of the track and the width corresponds to the length of the track. You can type in the code that follows or use the shortcuts provided by Visual Studio. In Visual Basic, click Overrides for the Track class in the Class Name list and OnSizeChanged in the Method Name list. In Visual C#, use the Class View to browse to the Control base class, right-click OnSizeChanged, point to Add, and then click Override. The inheritance tree for the Track class is an amazing eight levels deep. To find the OnSizeChanged method, keep opening the Bases and Interfaces nodes until you reach the Control base class. There you will find the OnSizeChanged method. The code added to this method, which depends on integer division, is shown here:
16.‘ Visual Basic
17.Protected Overrides Sub OnSizeChanged(ByVal e As System.Ev entArgs)
18.Me.Height = TrackHeight
19.‘ Width must be divisible by BarSpacing
20.Dim nBars As Integer = Me.Width \ BarSpacing
21.Me.Width = nBars * BarSpacing
22.End Sub
23.
24.// Visual C#
25.protected override void OnSizeChanged(System.EventArgs e) {
26.this.Height = TrackHeight;
27.// width must be divisible by BarSpacing
28.int nBars = this.Width / BarSpacing;
29.this.Width = nBars * BarSpacing;
}
30.Override the OnPaint method. The code in the OnPaint event method is called each time the control is called to paint itself. Add the following code to the OnPaint method to draw the track outline and then fill it in with the color brown.
31.‘ Visual Basic
32.Protected Overrides Sub OnPaint(ByVal e As _
33.System.Windows.Forms.PaintEventArgs)
34.MyBase.OnPaint(e)
35.Dim gp As New System.Drawing.Drawing2D.GraphicsPath()
36.gp.FillMode = Drawing.Drawing2D.FillMode.Winding
37.Dim height As Integer = TrackHeight \ 5
38.Dim nBars As Integer = Me.Width \ BarSpacing
39.Dim bar As Integer
40.For bar = 0 To nBars - 1
41.gp.AddRectangle(New System.Drawing.Rectangle( _
42.bar * BarSpacing, height, BarSpacing, height))
43.gp.AddRectangle(New System.Drawing.Rectangle( _
44.bar * BarSpacing, height * 3, BarSpacing, height))
45.gp.AddRectangle(New System.Drawing.Rectangle( _
46.bar * BarSpacing, 0, BarWidth, TrackHeight))
47.Next
48.e.Graphics.FillPath(System.Drawing.Brushes.SaddleBrown, gp
)
49.End Sub
50.
51.// Visual C#
52.protected override void OnPaint(System.Windows.Forms.PaintEv entArgs e) {
53.base.OnPaint(e);
54.System.Drawing.Drawing2D.GraphicsPath gp =
55.new System.Drawing.Drawing2D.GraphicsPath();
56.gp.FillMode = System.Drawing.Drawing2D.FillMode.Winding;
57.int height = TrackHeight / 5;
58.int nBars = this.Width / BarSpacing;
59.for (int bar = 0; bar < nBars; bar++) {
60.gp.AddRectangle(new System.Drawing.Rectangle(bar * Bar Spacing,
61.height, BarSpacing, height));
62.gp.AddRectangle(new System.Drawing.Rectangle(bar * Bar Spacing,
63.height * 3, BarSpacing, height));

64.gp.AddRectangle(new System.Drawing.Rectangle(bar * Bar Spacing,
65.0, BarWidth, TrackHeight));
66.}
67.e.Graphics.FillPath(System.Drawing.Brushes.SaddleBrown,gp)
;
}
Test the OnPaint method
1.Press Ctrl+Shift+B to build the project.
2.Open Form1 in the form designer.
3.Drag a Track control from the Windows Forms area of the Toolbox onto Form1. Resize the Track control. You can make it longer, but you can’t change the track height.
Debugging the OnPaint Method
If the track doesn’t draw itself as you expect, here are some hints for debugging.
§Instead of e.Graphics.FillPath, use e.Graphics.DrawPath. This draws only the outline of the shapes.
§Experiment with the GraphicsPath.FillMode property. This property controls how overlapping shapes are drawn.
§Enlarge the control to make sure you aren’t drawing beyond the edge of the control. Remember, the GraphicsPath origin is relative to the control, not the form. Drawing a shape at location (0,0) places the shape at the upper left corner of the control.
§First write the code with hard-coded values, such as 12, and then replace them with calculated values, such as 2 * BarSpacing.
Now you’re ready to add the CaughtOnFire event.
Creating the CaughtOnFire Event
To raise an event in Visual Basic or Visual C#, you must the declare the event as a field of the class. The declaration contains the name and signature (the parameters and their types) of the event. In .NET, event signatures follow these conventions:
§The first parameter is of type System.Object and is the object that raised the event.
§The second parameter is an instance of a class that derives from the EventArgs class. This class carries information about the event that might be useful to the client code. Even though the first parameter is the object that raised the event, the client code might be dependent on information in the EventArgs class. So this extra information carried by the second parameter should be carefully thought out.
§The name of the parameter that derives from the EventArgs class ends in EventArgs.
Create the CaughtOnFireEventArgs class
This class contains information about the location of the fire on the track.
1.Add the CaughtOnFireEventArgs class declaration at the end of the Track class definition. In Visual C#, this would be after the closing brace of the Track class, but before the closing brace of the namespace. This class is derived from System.EventArgs.
2.‘ Visual Basic
3.Public Class CaughtOnFireEventArgs
4.Inherits System.EventArgs
5.End Class
6.
7.// Visual C#
8.public class CaughtOnFireEventArgs : System.EventArgs {
}
9.Add a Location property that indicates how far along the track, in pixels, the new fire is located.
10.‘ Visual Basic
11.Private m_location As Integer = 0
12.Public ReadOnly Property Location() As Integer
13.Get
14.Return m_location
15.End Get
16.End Property
17.
18.// Visual C#
19.private int m_location = 0;
20.public int Location {
21.get {
22.return m_location;
23.}
}
24.Add the constructor. Because the CaughtOnFireEventArgs class is instantiated only when a fire exists, the constructor requires the location parameter.
25.‘ Visual Basic
26.Public Sub New(ByVal location As Integer)
27.m_location = location
28.End Sub
29.
30.// Visual C#
31.public CaughtOnFireEventArgs(int location) {
32.m_location = location;
33.}
Declare the event
1.In Visual Basic, you simply need to declare the event and its parameters. Add this code to the Track class:
2.‘ Visual Basic
3.Public Event CaughtOnFire(ByVal sender As Object, _ ByVal e As CaughtOnFireEventArgs)
The event handler, the method that the client code calls when the event is raised, must have the same signature.

4.In Visual C#, you need to take these two steps to declare an event:
§Declare a delegate. A delegate declares and gives a
name to a method signature. By convention, the name of the delegate ends in EventHandler.
§ Declare an event whose type is that of the delegate declared in the preceding step.
Add this code to the Track class:
// Visual C#
public delegate void CaughtOnFireEventHandler(object sender,
CaughtOnFireEventArgs e);
public event CaughtOnFireEventHandler CaughtOnFire;
5.To make the CaughtOnFire event the default event for the class, add the DefaultEvent attribute code shown in boldface to the Track class.
‘Visual Basic
<System.ComponentModel.DefaultEvent("CaughtOnFire")> Public Class Track
Inherits System.Windows.Forms.UserControl
:
End Class
// Visual C#
[System.ComponentModel.DefaultEvent("CaughtOnFire")]
public class Track : System.Windows.Forms.UserControl {
:
}
§When you double-click the Track control on the form after you have added this attribute, the CaughtOnFire event method is created in the code editor.
Attributes
Attributes allow you to add information to the elements of your code, and you can use them to affect how the code executes at run time and design time. The attribute information is stored in the compiled assembly as part of the metadata. The metadata isn’t the code itself, but information about the code. This metadata can be queried at run time or design time in a process called reflection. In this case, the Visual Studio development environment uses the DefaultEvent attribute to determine which event handler to add to the code when you double-click the Track control in the form designer.
Your Track control now has a CaughtOnFire event. You’ll be able to respond to this event in the form, but first your class has to raise the event in the right circumstances.
Raise the event
The only property you have defined in the Track class is the FireFrequency property. This property indicates how often, in seconds, the track should catch on fire. Each time a fire starts, the CaughtOnFire event should be raised. You’ll use a Timer control to signal the Track class that it needs to start a fire.