

C# ПІДРУЧНИКИ / c# / MS Press - Oop With MS Vb Net And C# Step By Step (2002)
.pdf9.Use the Tag property to associate each button with its Card instance. In Chapter 8, you’ll see a more object-oriented way to handle this association by creating a specialized control through inheritance.
10.Associate a method with the MouseDown event of the button. Because the button doesn’t exist in the form designer, you can’t just click it to create the MouseDown event method. No matter how many cards are created, one method will respond to all the MouseDown events. You’ll use the MouseDown event to start the drag-drop functionality.
Add the MouseDown event method to start the drag
A minimum of three steps is required to implement drag-and-drop behaviors:
1.When the user selects a control to move, usually by a mouse click or MouseDown event, call the control’s DoDragDrop method to start the drag. In this case, the user will be dragging the buttons that represent cards.
2.When the user drags the control over another control, the DragEnter event is raised. In this event, you set the Effect property of the DragEventArgs object to allow dragging. In this case, the user will drag the button controls over the Panel controls.
3.When the user releases the mouse button, the DragDrop event is raised. In this event, perform the result of the drag. In this case, the button will be moved to a different panel.
In the ShowHand method, the MouseDown event of each button was assigned to the ButtonMouseDown method. Now add this method, as shown here:
‘ Visual Basic
Private Sub ButtonMouseDown(ByVal sender As Object, _
ByVal e As System.Windows.Forms.MouseEventArgs)
m_pickedUp = CType(sender, Button)
m_pickedUp.DoDragDrop(sender, DragDropEffects.Move)
End Sub
// Visual C#
private void ButtonMouseDown(object sender,
System.Windows.Forms.MouseEventArgs e) {
m_pickedUp = (Button)sender;
((Button)sender).DoDragDrop(sender,DragDropEffects.Move);
}
Enable dragging with the DragOver event
§Add code to the DragOver events of both panel controls to allow the button being dragged, m_pickedUp, to be dropped on the panels:
§‘ Visual Basic
§Private Sub panel1_DragEnter(ByVal sender As Object, ByVal e
_
§As System.Windows.Forms.DragEventArgs) Handles panel1.Dra gEnter
§e.Effect = DragDropEffects.Move
§End Sub
§
§Private Sub panel2_DragEnter(ByVal sender As Object, ByVal e
_
§As System.Windows.Forms.DragEventArgs) Handles panel2.Dra
gEnter
§e.Effect = DragDropEffects.Move
§End Sub
§
§// Visual C#
§private void panel1_DragEnter(object sender,
§System.Windows.Forms.DragEventArgs e) {
§e.Effect = DragDropEffects.Move;
§}
§
§private void panel2_DragEnter(object sender,
§System.Windows.Forms.DragEventArgs e) {
§e.Effect = DragDropEffects.Move;
}
Enable dropping using the DragDrop event
§Add code to the DragDrop events of the Panel controls to move the dragged control to the new panel. Before moving the button, the code checks that the button is being moved to a different panel.
§‘ Visual Basic
§Private Sub panel1_DragDrop(ByVal sender As Object, ByVal e _
§As System.Windows.Forms.DragEventArgs) Handles panel1.Dra
gDrop
§Dim theCard As Card = CType(m_pickedUp.Tag, Card)
§If (Not m_hand1.Contains(theCard)) Then
§m_hand1.Add(theCard)
§m_hand2.Remove(theCard)
§End If
§ShowHand(panel1, m_hand1)
§ShowHand(panel2, m_hand2)
§m_pickedUp = Nothing
§End Sub
§
§Private Sub panel2_DragDrop(ByVal sender As Object, ByVal e _
§As System.Windows.Forms.DragEventArgs) Handles panel2.Dra gDrop
§Dim theCard As Card = CType(m_pickedUp.Tag, Card)
§If (Not m_hand2.Contains(theCard)) Then
§m_hand2.Add(theCard)
§m_hand1.Remove(theCard)
§End If
§ShowHand(panel1, m_hand1)
§ShowHand(panel2, m_hand2)
§m_pickedUp = Nothing
§End Sub
§
§// Visual C#
§private void panel1_DragDrop(object sender,
§System.Windows.Forms.DragEventArgs e) {
§Card theCard = (Card)m_pickedUp.Tag;
§if (!m_hand1.Contains(theCard)) {
§m_hand1.Add(theCard);
§m_hand2.Remove(theCard);
§}
§ShowHand(panel2, m_hand2);
§ShowHand(panel1, m_hand1);
§m_pickedUp = null;
§}
§
§private void panel2_DragDrop(object sender,
§System.Windows.Forms.DragEventArgs e) {
§Card theCard = (Card) m_pickedUp. Tag;
§if (!m_hand2.Contains(theCard)) {
§m_hand2.Add(theCard);
§m_hand1.Remove(theCard);
§}
§ShowHand(panel2, m_hand2);
§ShowHand(panel1, m_hand1);
§m_pickedUp = null;
}
All that remains now is to program the Remove Pairs button to remove the pairs from the hands and from the form.
Match the cards
§Add code to the Click event of the Remove Pairs button. This code simply calls the RemovePairs method for each Hand object and redisplays the Hand objects.
§‘ Visual Basic
§Private Sub removePairs_Click(ByVal sender As System.Object, ByVal e _
§As System.EventArgs) Handles removePairs.Click
§m_hand1.RemovePairs()
§m_hand2.RemovePairs()
§ShowHand(panel2, m_hand2)
§ShowHand(panel1, m_hand1)
§End Sub
§
§// Visual C#
§private void removePairs_Click(object sender, System.EventArgs
e){
§m_hand1.RemovePairs();
§m_hand2.RemovePairs();
§ShowHand(panel2, m_hand2);
§ShowHand(panel1, m_hand1);
}
Run the application
1.In the Solution Explorer window, right-click the project name and click Properties in the shortcut menu.
2.In the properties tree, expand the Common Properties folder if necessary and select General.
3.In the Startup Object list, click Form1, and click OK.
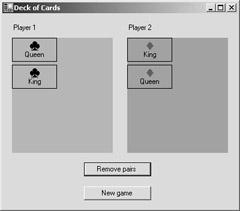
4.Press F5 to run the application. The following screen shot shows the results after the pairs have been matched. You can clear all the cards by dragging them all to one panel and clicking the Remove Pairs button.

Quick Reference
To
Create a public method
Create a private method
Create an overloade d method
Create a
Main method as a
startup object
Create a control at run time
Implement
Do this
Add the Public or public modifier to a class method.
In Visual Basic
Public Sub SomeMethod()
End Sub
In Visual C#
public void SomeMethod() {}
Add the Private or private modifier to a class method.
In Visual Basic
Private Sub SomeMethod()
End Sub
In Visual C#
Private void SomeMethod() {}
Create methods with the same name but with different parameter lists. The methods must differ by more than return type.
In Visual Basic |
|
Public Function Add(I |
as Integer) As Integer |
End Function |
|
Public Function Add(I |
as Integer, J as Integer) As Integer |
End Function |
|
|
|
In Visual C# |
|
public int Add(int i) |
{ } |
public int Add(int i, |
int j) {} |
|
|
|
|
|
|
First create a Main method: |
|
|
|
In Visual Basic
Public Shared Sub Main()End Sub
In Visual C#public static void Main() {}
Open the project’s Property Pages dialog box, and in the Startup Object list on the General page, click the class that contains the Main method.
Declare a new instance of the control and add it to the form’s
Controls collection:
In Visual Basic
Dim aButton As New Button()
Me.Controls.Add(aButton)
In Visual C#
Button aButton = new Button(); this.Controls.Add(aButton);
Respond to the MouseDown or Click event of the control to be dragged, and call the DoDragDrop method.
To
drag and drop
Do this
Set the AllowDrop property to True for the control that will be dropped on to. Respond to the DragEnter and DragDrop events for this control.
Chapter 5: Using Inheritance to Create Specialized Classes
Overview
ESTIMATED |
2 hr.30 min. |
TIME |
|
|
|
In this chapter, you’ll learn how to
§Inherit from a class you develop.
§Use the Me and this keywords.
§Use the MyBase and base keywords.
§Create class fields using the Protected and protected keywords.
§Create Overridable and virtual methods.
§Create Overrides and override methods and properties.
§Create a Windows Forms control using inheritance.
In the previous chapters, you created a new class for each object in your solution. Starting with an empty class, you added fields, properties, constructors, and methods to implement a fully functional class. Using inheritance, you can create a new class by adding to or otherwise modifying an existing class. In this chapter, you’ll create that first class, BankAccount, and then use inheritance to creat e two specialized classes, SavingsAccount and CheckingAccount. Inheritance isn’t limited to classes you create; you can inherit from many of the classes in the Microsoft .NET Framework.
Inheritance: An Overview
In previous chapters, you created classes that contained instances of other classes. These designs model a has -a relationship between an object and its properties. A Deck has-a Card; a Form has-a Button; a SourceFile has-a Class. The has-a relationship is central to object-oriented design. It allows you to build an application by combining already existing objects. The term used for the has-a relationship is composition. Inheritance is the programming method used to implement the is-a relationship of objectoriented design. A Button is-a Control; a Dog is-a Mammal; a SavingsAccount is-a BankAccount. If you’ve already written the code to model an account’s owner, balance, withdrawal and deposit transactions, you’d like to be able to use that code again. You can do that using inheritance; it allows you to create new classes from existing classes. You create new classes from the base class. You create the derived class by adding to or specializing the base class. You could also say that the derived class inherits from or derives from the base class. Another common terminology uses superclass for the base class and subclass for the derived class. This book uses the base and derived terms
because these terms more closely match the keywords used in Visual Basic and C# to implement inheritance.
Polymorphism describes the behavior of classes that derive from a common base class. A savings account isn’t the only type of bank account. There are also checking accounts, money market accounts, and mutual fund accounts. So Checking, Savings, MoneyMarket, and MutualFund all derive from BankAccount. Polymorphic behavior allows a developer to use a BankAccount variable to refer to any of the derived classes of BankAccount. Polymorphism allows each derived class to handle identical method names with different behavior. For example, both Savings and Checking provide a Withdraw method through inheritance, but the Checking class’s Withdraw method deducts a small service charge along with each withdrawal.
This chapter concentrates on the mechanics of inheritance. Even with rudimentary techniques, you can develop sophisticated results by inheriting from .NET Framework classes. Later chapters develop other aspects of inheritance, such as base class design, polymorphism, and component development.
BankAccount: A Simple Example
The simple bank account provides the basis for this exercise in inheritance. You will implement a BankAccount class as a base class with the following members:
|
|
|
|
|
|
Member |
|
Description |
|
|
|
|
|
|
|
Owner |
|
A string |
|
|
|
|
property that |
|
|
|
|
identifies the |
|
|
|
|
owner of the |
|
|
|
|
account. |
|
|
|
|
|
|
|
ID |
|
A read-only |
|
|
|
|
string |
|
|
|
|
property that |
|
|
|
|
identifies the |
|
|
|
|
account. |
|
|
|
|
|
|
|
Balance |
|
A read-only |
|
|
|
|
decimal |
|
|
|
|
property. |
|
|
|
|
The value of |
|
|
|
|
this property |
|
|
|
|
depends on |
|
|
|
|
the deposits |
|
|
|
|
and |
|
|
|
|
withdrawals |
|
|
|
|
made to the |
|
|
|
|
account. |
|
|
|
|
|
|
|
Deposit |
|
This method |
|
|
|
|
|
|
|
|
|
takes one |
|
|
|
|
parameter: |
|
|
|
|
the amount |
|
|
|
|
to deposit. It |
|
|
|
|
returns the |
|
|
|
|
balance |
|
|
|
|
after the |
|
|
|
|
deposit. |
|
|
|
|
|
|
|
Withdraw |
|
This method |
|
|
|
|
|
|
|
|
|
takes one |
|
|
|
|
|
|
|
|
|
|
|
|
Member |
|
Description |
|
|
|
|
|
|
|
|
|
parameter: |
|
|
|
|
the amount |
|
|
|
|
to withdraw. |
|
|
|
|
It returns the |
|
|
|
|
balance |
|
|
|
|
after the |
|
|
|
|
withdrawal. |
|
|
|
|
|
|
|
Constructor |
|
The |
|
|
|
|
constructor |
|
|
|
|
takes one |
|
|
|
|
parameter: |
|
|
|
|
the account |
|
|
|
|
owner’s |
|
|
|
|
name (a |
|
|
|
|
string), to |
|
|
|
|
use for the |
|
|
|
|
ID property. |
|
|
|
|
|
|
Create the base class, BankAccount
1.Create a new project and name it TheBank.
2.On the Project menu, click Add Class. The Add New Item dialog box appears.
3.Name the file BankAccount.vb or BankAccount.cs, depending on the language you’re using.
Add the properties and constructor
The account ID is based on the owner’s name. In the limited world of this exercise, each person can have only one account, and all names are unique. So the ID is the same as the owner’s name.
1.Add this code for the read-only ID property:
2.‘ Visual Basic
3.Private m_owner As String
4.Public ReadOnly Property ID() As String
5.Get
6.Return m_owner
7.End Get
8.End Property
9.
10.// Visual C#
11.private string m_owner;
12.public string ID {
13.get {
14.return m_owner;
15.}
16.}
The next property, Balance, will also be read-only. In the real world, you can’t just tell the bank you have a certain amount of money. To change your balance, you have to make a deposit or a withdrawal. So it will be with this example: the Balance is read-only and can be changed only by means of the
Deposit and Withdraw methods.
The balance is stored in a decimal field. The decimal data type (System.Decimal) is used to store numbers with a particular precision. Thus 2.37 is stored as 2.37, not something extremely close to 2.37, as might happen in using a System.Double variable. The advantage of using the System.Decimal data type is that rounding doesn’t occur, so the System.Decimal type is appropriate for representing currency.
17.Add this code for the read-only Balance property:
18.‘ Visual Basic
19.Private m_balance As Decimal
20.Public ReadOnly Property Balance() As Decimal
21.Get
22.Return m_balance
23.End Get
24.End Property
25.
26.// Visual C#
27.private decimal m_balance;
28.public decimal Balance {
29.get {
30.return m_balance;
31.}
}
32.Add the following code to the BankAccount class to create a constructor. All accounts need to have an owner, so the only constructor provided has one string parameter for the owner’s name. In Visual C#, replace the default constructor with the one below.
33.‘ Visual Basic
34.Public Sub New(ByVal owner As String)
35.m_owner = owner
36.m_balance = 0D
37.End Sub
38.
39.// Visual C#
40.public BankAccount(string owner) {
41.m_owner = owner;
42.m_balance = 0M;
43.}
Add the methods
1.Add the following code to the BankAccount class for the Deposit method. This method adds the indicated amount to the balance and returns the new balance.
2.‘ Visual Basic
3.Public Function Deposit(ByVal amount As Decimal) As Decimal
4.m_balance += amount
5.Return m_balance
6.End Function
7.
8.// Visual C#
9.public decimal Deposit(decimal amount) {
10.m_balance += amount;
11.return m_balance;
}
12.Add the following code to the BankAccount class for the Withdraw method. This method subtracts the indicated amount from the balance and returns the new balance.
13.‘ Visual Basic
14.Public Function Withdraw(ByVal amount As Decimal) As Decimal
15.m_balance -= amount
16.Return m_balance
17.End Function
18.
19.// Visual C#
20.public decimal Withdraw(decimal amount) {
21.// since an assignment returns the assigned value,
22.// only need one line
23.return (m_balance -= amount);
}
Test the BankAccount interface
The base class, BankAccount, is now complete. Before moving on to the first derived class, SavingsAccount, take a look at the public interface of the BankAccount class.
1.Open Form1 in the designer.
2.Double-click on the form to create the Form1_Load method in the code editor.
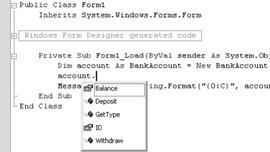
3.Add the following code to the method, and note the members displayed in IntelliSense, shown in the subsequent graphic.
4.‘ Visual Basic
5.Private Sub Form1_Load(ByVal sender As System.Object, _
6.ByVal e As System.EventArgs) Handles MyBase.Load
7.Dim account As BankAccount = New BankAccount("Robin")
8.account.Deposit(25D)
9.MessageBox.Show(String.Format("{0:C}", account.Balance))
10.End Sub
11.
12.// Visual C#
13.private void Form1_Load(object sender, System.EventArgs e) {
14.BankAccount account = new BankAccount("Robin");
15.account.Deposit(25M);
16.MessageBox.Show(String.Format("{0:C}", account.Balance));
}
String.Format
The String.Format method gives you a way to create strings based on variable values without using long string concatenation statements. The String.Format method has several overloads. In each case, the first parameter is a format statement, which is a string that’s interspersed with formatting specifications. For example, {0:C} specifies that a value should be converted to a string using a currency format. The rest of the parameters of the method are used to replace the formatting specifications. Thus the following statements are equivalent and produce You have $1.23 in the bank.
String.Format("You have {0:C} in the bank.", balance)
"You have " + balance.ToString("C") + " in the bank."
The class members contain the public properties and methods of the BankAccount class: Balance, ID, Deposit, and Withdraw. The members list also contains those members inherited from the Object class: GetType, Equals (C# only), GetHashCode (C# only), and ToString (C# only). In the next section, you’ll create a derived class from BankAccount, and it will contain the public interface of Object and BankAccount.
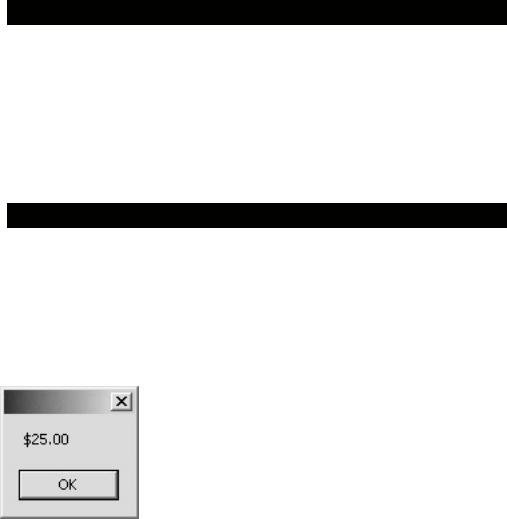
12.Press F5 to run the application. The result is shown in the following screen. You have created the completely functional base class, BankAccount.
Creating the SavingsAccount Derived Class
The first derived class you create will be the SavingsAccount class. In this example SavingsAccount is identical to BankAccount except in the following respects:
§A savings account offers interest. The SavingsAccount class will have an additional property, Interest.
§A savings account can accrue interest over time. The SavingsAccount class will have an additional method, AddInterest.
§One person can have both a savings account and a checking account, an expansion of your banking world. To distinguish between the two accounts, the ID property will indicate the type of account.
Create the SavingsAccount class
1.On the Project menu, click Add Class. The Add New Item dialog box appears.
2.Name the file SavingsAccount.vb or SavingsAccount.cs, depending on the language you’re using.
3.Modify the class declaration to indicate that BankAccount is the base class as shown here:
4.‘ Visual Basic
5.Public Class SavingsAccount
6.Inherits BankAccount
7.End Class