

C# ПІДРУЧНИКИ / c# / MS Press - Oop With MS Vb Net And C# Step By Step (2002)
.pdf9.private CheckingAccount checking = new CheckingAccount("Your Name");
10.private SavingsAccount savings = new SavingsAccount("Your Name");
11.Add this code to the Form1_Load method to initialize the accounts:
‘Visual Basic
Private Sub Form1_Load(ByVal sender As System.Object, _
ByVal e As System.EventArgs) Handles MyBase.Load
Me.account.Items.Add(checking)
Me.account.Items.Add(savings)
Me.account.SelectedIndex = 0
Me.action.SelectedIndex = 0
Me.amount.Text = "100"
End Sub
// Visual C#
private void Form1_Load(object sender, System.EventArgs e) {
this.account.Items.Add(checking);
this.account.Items.Add(savings);
this.account.SelectedIndex = 0;
this.action.SelectedIndex = 0;
this.amount.Text = "100";
}
In the designer, you used the String Collection Editor dialog box to add strings to the ComboBox control. You can add any item to the ComboBox using the Items.Add method. At run time, the name of the class will be displayed in the ComboBox control, as shown in the following screen. If you have defined a ToString method for the class, the ToString method would be called and displayed in the ComboBox. For example, if you had defined a ToString method in the SavingsAccount object that returned the ID property, the ComboBox would display Your Name-S instead of TheBank.SavingsAccount.
Submit the transaction
1.In the designer, double-click the Submit button to create the Click event method in the code editor.
2.Add this code to the code editor to submit the transaction and report the new account balance:
3.‘ Visual Basic
4.Private Sub submit_Click(ByVal sender As System.Object, _
5.ByVal e As System.EventArgs) Handles submit.Click
6.Dim selectedAccount As BankAccount
7.Dim item As Object = Me.account.SelectedItem
8.selectedAccount = CType(item, BankAccount)
9.Select Case action.Text
10.Case "Deposit"
11.selectedAccount.Deposit(Decimal.Parse(amount.Text))
12.Case "Withdraw"
13.selectedAccount.Withdraw(Decimal.Parse(amount.Text))
14.End Select
15.MessageBox.Show(String.Format("{0}: {1:C}", _
16.selectedAccount.ID, selectedAccount.Balance))
17.End Sub
18.
19.// Visual C#
20.private void submit_Click(object sender, System.EventArgs e) {
21.BankAccount selectedAccount;
22.object item = this.account.SelectedItem;
23.selectedAccount = (BankAccount)item;
24.switch (action.Text) {
25.case "Deposit" :
26.selectedAccount.Deposit(decimal.Parse(amount.Text));
27.break;
28.case "Withdraw" :
29.selectedAccount.Withdraw(decimal.Parse(amount.Text));
30.break;
31.}
32.MessageBox.Show(String.Format("{0}: {1:C}",
33.selectedAccount.ID, selectedAccount.Balance));
}
As with the SortedList and ArrayList classes, you can add any type of object to the ComboBox, but the ComboBox treats them all as being of type System.Object. (Remember that all classes implicitly derive from System.Object.) That means that what is returned from
ComboBox.SelectedItem can be directly assigned only to a System.Object reference.
Because your code has control over the Account combo box, you have restricted the items of the combo box to be of type CheckingAccount or SavingsAccount. Therefore you can cast the System.Object item in the submit_Click method to a BankAccount object. Once you have a BankAccount object, you can call any of its properties and methods.
When you cast an object from one type to another, no changes occur in the instance itself. The only thing that changes is the view of the object. The preceding code doesn’t convert account.SelectedItem from a System.Object into a SavingsAccount object. The cast only directs the compiler to treat the instance as a SavingsAccount instead of a System.Object. There is, after all, only one instance of SavingsAccount. It’s just that the account combo box is storing a System.Object reference to it, and the Form is storing a SavingsAccount reference to it.
When you have a base class reference to an instance, you can access only the properties and methods defined on the base class. In this example, you
couldn’t call the AddInterest method using the selectedAccount variable. You’ll see how to do that in the next section.
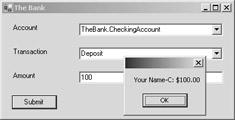
34.Press F5 to run the application. Make some deposits and withdrawals with the accounts, and you’ll see the common and specialized behaviors of the CheckingAccount and SavingsAccount classes.
Find the type of the object
1.Open Form1 in the designer.
2.Add another button to Form1. Set its Name property to addInterest, its Text property to Add interest, and its Visible property to False.
3.Double-click the button to create the Click event method in the code editor.
4.In the form designer, double-click the account ComboBox control to create the account_SelectedIndexChanged method in the code editor.
5.Add the following code to the account_SelectedIndexChanged method to display the Add Interest button if the selected account is the savings account.
6.‘ Visual Basic
7.Private Sub account_SelectedIndexChanged(ByVal sender As _
8.System.Object, ByVal e As System.EventArgs) _
9.Handles account.SelectedIndexChanged
10.If TypeOf (account.SelectedItem) Is SavingsAccount Then
11.addInterest.Visible = True
12.Else
13.addInterest.Visible = False
14.End If
15.End Sub
16.
17.// Visual C#
18.private void account_SelectedIndexChanged(object sender,
19.System.EventArgs e) {
20.if (account.SelectedItem is SavingsAccount) {
21.addInterest.Visible = true;
22.}
23.else {
24.addInterest.Visible = false;
25.}
26.}
27.Add the following code to the Click event method of the Add Interest button to call the AddInterest method of SavingsAccount.
28.‘ Visual Basic
29.Private Sub addInterest_Click(ByVal sender As System.Object, _
30.ByVal e As System.EventArgs) Handles addInterest.Click
31.If TypeOf (account.SelectedItem) Is SavingsAccount Then
32.Dim theSavings As SavingsAccount = _
33.CType(account.SelectedItem, SavingsAccount)
34.theSavings.AddInterest()
35.MessageBox.Show(String.Format("{0}: {1:C}", _
36.theSavings.ID, theSavings.Balance))
37.End If
38.End Sub
39.
40.// Visual C#
41.private void addInterest_Click(object sender, System.EventArgs
e){
42.SavingsAccount theSavings = account.SelectedItem as SavingsAccount;
43.if (theSavings != null) {
44.theSavings.AddInterest();
45.MessageBox.Show(String.Format("{0}: {1:C}", theSavings.ID,
46.theSavings.Balance));
47.}
}
This method checks the type of the selected item before casting it to a SavingsAccount object. C# has a keyword, as, that tests and casts the reference in one step. The as keyword is an operator that returns null if the object cannot be cast as the selected type.
48. Press F5 to run the application. The results are shown here:
Inherit from a Control: The RoundButton Class
You can use inheritance to create new classes from .NET Framework classes, as well as from classes you have written yourself. In this next section, you will create a new class by deriving from a class that you didn’t develop.
You create a round button control by using System.Windows.Forms.Button as the base class. This task requires only that you override the OnPaint method of the Button class.
Creating the RoundButton Class
To create a derived class from a .NET class, you declare the class and indicate the base class, just as you did with the bank account classes.
Create the project
1.Create a new Windows Control Library project and name it ARoundButton.
2.Open Form1 in the code editor.
Add the RoundButton class
§If you’re using Visual Basic, add the class declaration at the end of the source file. If you’re using Visual C#, add the class declaration at the end of the file, but before the closing brace of the RoundButton namespace.
§‘ Visual Basic
§Public Class RoundButton
§Inherits Button
§
§End Class
§// Visual C#
§public class RoundButton : Button {
}
Overriding the OnPaint Method
By overriding the OnPaint method, you direct the runtime to draw a round button, instead of the usual rectangular button.
Create the OnPaint method
1.If you’re using Visual Basic, click RoundButton (Overrides) in the Class List, and then click OnPaint in the Method Name list. The following empty method definition is added to the class. You can also simply type this method into the editor.
2.‘ Visual Basic
3.Protected Overrides Sub OnPaint(ByVal pevent As _
4.System.Windows.Forms.PaintEventArgs)
5.
6.End Sub
If you’re using Visual C#, in the Class View expand the Bases And Interfaces nodes of the RoundButton class button until you find the ButtonBase class. Expand the ButtonBase node, right-click the OnPaint method, point to Add and click Override on the shortcut menu. The following empty method definition is added to the class. You can also simply type this method into the editor.
// Visual C#
protected override void OnPaint( System.Windows.Forms.PaintEventArgs pevent) {
}
The OnPaint method is called each time the control is drawn on the form. The base class draws the familiar rectangle. By overriding the OnPaint method, you can determine the appearance of the button.
7.Add the following code to draw the round button. Not only will the button be round when it’s painted on the form, but the clickable area of the button will be round as well.
8.‘ Visual Basic
9.Protected Overrides Sub OnPaint(ByVal pevent As _
10.System.Windows.Forms.PaintEventArgs)
11.Me.Size = New Size(50, 50)
12.Dim aCircle As System.Drawing.Drawing2D.GraphicsPath = _
13.New System.Drawing.Drawing2D.GraphicsPath()
14.aCircle.AddEllipse(New System.Drawing.RectangleF(0, 0, 50, 50))
15.Me.Region = New Region(aCircle)
16.End Sub
17.
18.// Visual C#
19.protected override void OnPaint(
20.System.Windows.Forms.PaintEventArgs pevent) {
21.this.Size = new Size(50,50);
22.System.Drawing.Drawing2D.GraphicsPath aCircle =
23.new System.Drawing.Drawing2D.GraphicsPath();
24.aCircle.AddEllipse(new System.Drawing.RectangleF(0, 0, 50, 50));
25.this.Region = new Region(aCircle);
}
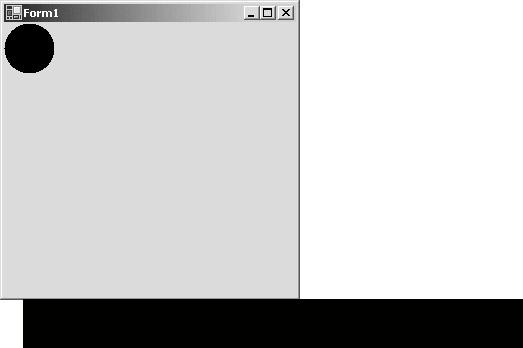
To make a control assume a particular shape, in this case round, you must define its Region property so that it achieves that shape. You can create a shape using the GraphicsPath object. The GraphicsPath object allows you to create a shape by drawing. In this example, you create a drawing by adding a circle to GraphicsPath. The size of the button is constrained to 50 by 50 pixels so that the full circle is visible.
Using the Class
The RoundButton class has been defined in the source file and doesn’t appear in the Toolbox for dragging on the form. To add a RoundButton instance to Form1, you can use the same methods you used to create buttons in Chapter 4.
Add a RoundButton control to the form
1.Add the following code to the Form1 class to respond to the Click event of the RoundButton object.
2.‘ Visual Basic
3.Private Sub roundButton_Click(ByVal sender As System.Object,
_
4.ByVal e As System.EventArgs)
5.MessageBox.Show("Hello")
6.End Sub
7.
8.// Visual C#
9.private void roundButton_Click(object sender, System.EventArgs
e){
10.MessageBox.Show("Hello");
}
11.In the form designer, double-click Form1 to add the Form1_Load method to the code editor.
12.Add the following code to create a RoundButton object and add it to the form.
13.‘ Visual Basic
14.Private Sub Form1_Load(ByVal sender As System.Object, _
15.ByVal e As System.EventArgs) Handles MyBase.Load
16.Dim rb As New RoundButton()
17.Me.Controls.Add(rb)
18.AddHandler rb.Click, AddressOf roundButton_Click
19.End Sub
20.
21.// Visual C#
22.private void Form1_Load(object sender, System.EventArgs e) {
23.RoundButton rb = new RoundButton();
24.rb.Click += new
System.EventHandler(this.roundButton_Click);
25.this.Controls.Add(rb);
26.}
Run the application
§Press F5 to run the application. Here are the results:
Design Considerations
Inheritance is a powerful tool in object-oriented programming and is used extensively in the .NET Framework. The following points will help you write classes that work better together and are less error-prone.
The is-a relationship Remember that inheritance models the is-a relationship between objects. The derived classes should represent objects that truly are special cases of the base object. If you find yourself trying to eliminate properties or methods of the base class, then you don’t have an is-a relationship. For example, if you’re creating a class that derives from the Button class but you’re trying to eliminate the Click event, the new class isn’t really a Button. It might be something like a button, but it isn’t a button.
Polymorphism If you aren’t going to use the classes polymorphically, consider whether you need to use inheritance at all. It might be that your class only needs to contain an instance of the class rather than serve as a base class.
Type-checking In general, type-checking (using the type of operator) is a clue that you are using inheritance incorrectly. Analyze your code to determine whether the objects truly represent an is-a relationship. Determine whether you’re defining the proper properties and methods so that type-checking is unnecessary.
Select or switch statements If your code is full of select or switch statements, consider whether using inheritance would simplify the code. Consider the following code snippet where you have defined a Shape class with a type property that will be set to Rectangle or Circle. To draw the Shape object, you might write some code like this:
If aShape.Type = "Rectangle" then
DrawARectangle()
Else
DrawACircle()
End If

Using inheritance, you might create a Shape class with a Draw method as the base class. Then you would create Rectangle and Circle classes as derived classes, and override the Draw method in each class. Then you would replace the preceding code with the following:
‘aShape is a reference to the Shape class, but is
‘currently referring to either a Rectangle or Circle aShape.Draw()
Single inheritance Visual Basic and Visual C# provide single inheritance only. That means you can specify only one base class. Sometimes the choice is obvious, such as BankAccount as a base class for SavingsAccount. But if you want to be able to drag a SavingsAccount onto your form as you would a Timer control or a TextBox, you might want to derive from one of the control or component classes. Because derived classes also inherit from their base classes, you could use the control as the base class for BankAccount, and then derive SavingsAccount from BankAccount. Another way to get the behavior of multiple inheritance using single inheritance is with interfaces, as you’ll see in Chapter 9.
Quick Reference
To
Declare a base class
Declare a derived class
Declare a protected field
Call the base class constructor
Do this
Create any class.
‘ Visual Basic Public BaseClass End Class
// Visual C# public BaseClass {
}
In Visual Basic, use the Inherits keyword.
‘ Visual Basic Public SomeClass Inherits BaseClass End Class
In C#, use the : character.
public BaseClass : BaseClass {
}
Or
Use the Add Class Wizard and select the base class.
Add the protected keyword.
‘ Visual BasicPublic BaseClass
Protected aField As Integer End Class
// Visual C# public BaseClass {
protected int aField;}
Use the MyBase or base keyword.
‘ Visual Basic Public Sub New() MyBase.New()
End Sub

To
Override a property
Override a method
Do this
// Visual C#
public DerivedClass() : base() {
}
In the base class, add the overridable property to the property declaration.‘ Visual Basic
Public Overridable ReadOnly_ Property ID() As String
Get
Return m_owner End Get
End Property
// Visual C#
virtual public string ID { get {
return m_owner;
}
}
In the derived class, add the override keyword to the property declaration.
‘ Visual Basic
Public Overrides ReadOnly_ Property ID() As String Get
Return Me.m_owner & "-S" End Get
End Property
// Visual C#
override public string ID { get {
return this.m_owner + "-S";
}
}
Or
In Visual Basic, click the property to override in the Method Name list in the code editor.
In Visual C#, right-click the base class property in the Class View, and then point to
Add and click Override on the shortcut menu.
In the base class, add the Overridable or virtual keyword to the method declaration.
‘ Visual Basic Public Overridable_
Function Withdraw(ByVal amount As Decimal)_
As Decimal End Function
// Visual C#
virtual public decimal Withdraw(decimal amount) {
}
In the derived class, add the Overrides or override keyword to the method declaration.
Public Overrides_
Function Withdraw(ByVal amount As Decimal)_

To
Refer to the class instance from within the class
Do this
As Decimal
End Function
// Visual C#
override public decimal Withdraw(decimal amount) {
}
Or
In Visual Basic, click the method to override in the Method Name list in the code editor.
In Visual C#, right-click the base class method in the Class View, and then point to Add
and click Override on the shortcut menu.
Use the Me or this keyword. ‘ Visual Basic
Public Overrides ReadOnly_ Property ID() As String Get
Return Me.m_owner & "-S" End Get
End Property
// Visual C#
override public string ID { get {
return this.m_owner + "-S";
}
}
Chapter 6: Designing Base Classes as
Abstract Classes
Overview
ESTIMATED |
2 hr. |
TIME |
|
|
|
In this chapter, you’ll learn how to
§Create an abstract base class using the MustInherit or abstract keyword.
§Create a derived class from an abstract class.
§Derive from a .NET abstract class to create a typed collection class.
§Seal a class using the NotInheritable or sealed keyword.
§Hide a base class member using the Shadows or new keyword.
In Chapter 5, “Using Inheritance to Create Specialized Classes,” you created a base class and derived two classes from it. You created methods and properties in the base class, which you specialized in the derived classes. That chapter showed you the basics of inheritance and polymorphism.You can, however, exercise much more control than