


4
Selecting Database Creation and Net8
Configuration Methods
This chapter describes the Oracle8i database creation and Net8 client/server configuration methods available during installation. You must understand these methods before performing an installation.
Specific topics discussed are:
■
■
■
Understanding Your Methods Before Installation
Selecting a Database Creation Method
Selecting a Net8 Configuration Method
Note: This chapter uses networking terms and concepts with which you may be unfamiliar. See the Glossary for definitions of terms used in this chapter and the Net8 Administrator’s Guide for detailed descriptions of concepts.
Selecting Database Creation and Net8 Configuration Methods 4-1

Understanding Your Methods Before Installation
Understanding Your Methods Before Installation
Oracle Universal Installer provides several methods for creating an Oracle8i database and configuring your Net8 client/server environment during installation.
The method to select during installation depends upon:
■
■
Your own expertise with database creation and network configuration
The requirements of your database and network environment
You must understand these methods before you begin installation. By reviewing the information in this chapter, you can ensure that you create and configure a database and network environment that best matches your needs from the beginning.
Oracle8i database and Net8 components are installed through several installation types. Review the installation types in this table to identify how much user input is required for database creation or network configuration during installation. The "X" indicates whether you are prompted to provide no, minimal, or extensive input during installation. See the remaining sections of this chapter for specific details on what information is automatically created for you, and what information you must manually provide.
|
|
User Input Required for |
User Input Required for Net8 |
||||
Installation Types |
Database Creation |
|
Configuration |
||||
|
|
None |
Minimal |
Extensive |
None |
Minimal |
Extensive |
|
|
|
|
|
|
|
|
■ |
Oracle8i Typical Installation |
|
X |
|
X |
|
|
|
8.1.7.0.0 |
|
|
|
|
|
|
■ |
Oracle8i Minimal Installation |
|
X |
|
X |
|
|
|
8.1.7.0.0 |
|
|
|
|
|
|
■ |
Oracle8i Custom Installation |
|
|
|
|
|
|
|
8.1.7.0.0, and then select: |
|
|
|
|
|
|
|
Net8 Client or Net8 Server |
|
Not applicable |
|
X |
X1 |
|
|
or |
|
|
|
|
|
|
|
Oracle8i Server2 |
|
X |
X |
|
Not applicable |
|
1Selecting through the Custom installation type prompts you to create a configuration requiring either no user input or a configuration requiring extensive user input. See "Selecting a Net8 Configuration Method" on page 4-6 for more information.
2Selecting Oracle8i Server through the Custom installation type offers several database creation choices, from a complete custom creation to a creation requiring minimal user input. See "Selecting a Database Creation Method" on page 4-3 for more information.
4-2 Oracle8i Personal Edition Installation Guide for Windows 98
Selecting a Database Creation Method
Selecting a Database Creation Method
Oracle Database Configuration Assistant is a tool that enables you to create an Oracle8i database. Oracle Database Configuration Assistant can be automatically started by Oracle Universal Installer when you select to create an Oracle8i database or manually run as a standalone tool.
Note: This chapter describes running Oracle Database Configuration Assistant from within Oracle Universal Installer. See Chapter 6 of the Oracle8i Personal Edition Administrator’s Guide for Windows 98 for information on running Oracle Database Configuration Assistant in standalone mode. See Chapter 2, "Database Tools Overview", of the Oracle8i Personal Edition Administrator’s Guide for Windows 98 for instructions on starting this tool in standalone mode.
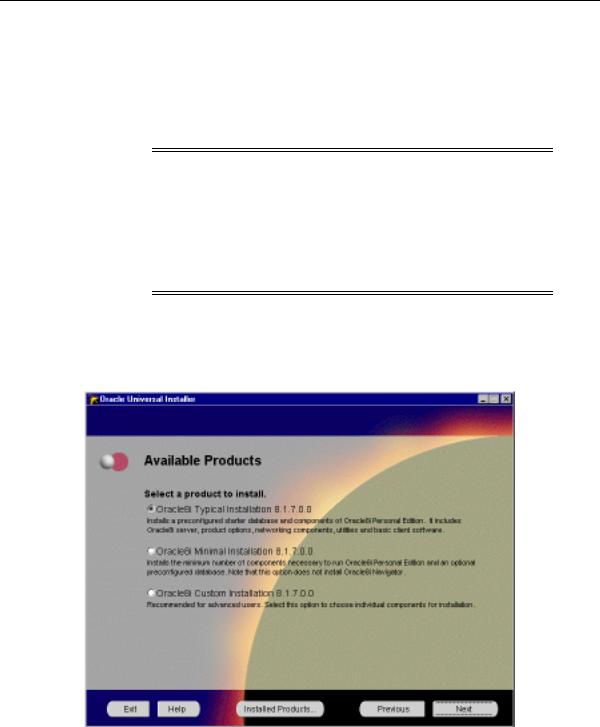
When you run Oracle Universal Installer, the Available Products window presents you with three installation option. Each installation option enables you to create an Oracle8i database.
Selecting Database Creation and Net8 Configuration Methods 4-3

Selecting a Database Creation Method
The types of databases created with the Typical, Minimal, and Custom installation types and the amount of user input required are described in the following table. Review these selections and identify the database that best matches your database requirements and database creation expertise:
If You Perform These Steps... |
Then... |
|
|
|
|
1. |
Select the Typical |
Oracle Database Configuration Assistant automatically starts at the end of |
|
installation type. |
installation and creates a preconfigured, ready-to-use Multipurpose starter |
|
|
database with: |
|
|
■ Default initialization parameters |
|
|
■ Automatic installation and configuration of Oracle JServer1 |
|
|
■ Database configured in dedicated server mode |
|
|
■ Archiving mode set to NOARCHIVELOG |
|
|
No user input is required other than the global database name and SID you |
|
|
are prompted to enter prior to Oracle Database Configuration Assistant |
|
|
startup. |
|
|
|
1. |
Select the Minimal |
Oracle Database Configuration Assistant automatically starts at the end of |
|
installation type. |
installation and creates the same Oracle8i database that you receive with the |
2. |
Select Yes when |
Typical installation type. |
|
||
prompted to create a starter database.
Note: If you select No, all server components are installed. A database is not created. You can create your database later by manually running Oracle Database Configuration Assistant or a SQL script. See Chapter 6 of the Oracle8i Personal Edition
Administrator’s Guide for Windows 98 for instructions.
4-4 Oracle8i Personal Edition Installation Guide for Windows 98
Selecting a Database Creation Method
If You Perform These Steps... |
Then... |
|
|
|
|
1. |
Select the Custom |
If You Select the Custom database creation method... |
|
installation type. |
Oracle Database Configuration Assistant guides you in the creation of a |
|
Select Oracle8i Server and |
|
2. |
database in dedicated server mode with OracleJServer and replication option. |
|
|
additional products in the |
Select this option only if you are experienced with advanced database creation |
|
Available Product |
procedures, such as customizing: |
|
Components window. |
■ Data, control, and redo log file settings |
|
|
|
3.Select Yes when prompted to create a starter database.
4.Oracle Database Configuration Assistant prompts you to select a database creation method:
■Custom
■Typical
■Tablespace and extent sizes
■Database memory parameters
■Archiving modes, formats, and destinations
■Trace file destinations
■Character set values
If You Select the Typical database creation method...
You have two choices. Oracle Database Configuration Assistant’s role in database creation depends on your selection:
If you select...
■Copy existing files from CD
Oracle Database Configuration Assistant creates the same Oracle8i database as described under Typical Installation Type on page 4-4 with Oracle JServer and replication option. No user input is required other than the global database name and SID you are prompted to enter prior to Oracle Database Configuration Assistant startup.
■Create new database files
Oracle Database Configuration Assistant prompts you to answer several questions, including the number of concurrent connections. Oracle Database Configuration Assistant then creates a database. Oracle JServer and replication are automatically configured if selected.
1 Oracle Database Configuration Assistant only configures components that were installed through Oracle Universal Installer.
Selecting Database Creation and Net8 Configuration Methods 4-5