

Network Plus 2005 In Depth
.pdf432 |
|
|
Chapter 9 NETWORKING WITH UNIX-TYPE OF OPERATING SYSTEMS |
|
|
||||
|
|
|
|
|
|
|
command. Most commands that accept typing from your keyboard also accept input from other |
||
NET+ |
|
|
||
3.1commands.
Now that you have learned about commands commonly used by UNIX network administrators, you are ready to plan the installation of a UNIX-type of system. In many cases, you will not need to worry about installing UNIX. For example, Sun Microsystems ships its SPARC servers with Solaris already installed and Apple Computer ships Xserve servers with Mac OS X Server already installed. However, if you are setting up a Linux system, chances are you will have to install and configure it from scratch. The following example of installing Linux uses a popular, free version of Linux called Fedora Core.
Installing Linux
NET+ |
This section describes the prerequisites for and the process of installing Fedora Core, the ver- |
3.1sion of Linux packaged and distributed by Red Hat, Inc., on a PC. Most PC manufacturers ship their systems with Windows already installed, so it is usually necessary to install Linux from CD or DVD. As with other network operating systems, a successful Fedora Core installation begins with planning.
Planning a Linux Installation
In the preceding chapter, you learned about the importance of thorough planning in the installation of a new Windows Server 2003 server. These considerations apply to Linux as well. Although making changes to the server setup after you install a Linux system is simple, you should nevertheless plan as carefully as possible to avoid service interruption after a Linux server is running.
Before installing Linux, be prepared to answer the following questions:
What is the new server’s name? This name is a less important issue for Linux systems than for Windows Server 2003 or NetWare systems, but it’s still a good idea to choose it before beginning installation. You can add the server’s name to your network name service (DNS, for example) as soon as you choose it. (Using DNS names rather than using IP addresses makes it easier for users to remember how to access computers on the network.) You may use any name containing a maximum of 32 alphanumeric characters, except the following:
> < [ ] . _ : ; | = , + * ´ ?
What is the server’s IP address? You’ll need this address to enable the network on the new server. Network administrators usually configure workstations to obtain an IP address automatically upon start-up. Servers, however, are usually configured with reserved or static IP addresses because some client applications require configuration with a server’s IP address rather than a server’s name. You’ll also need the subnet mask, the IP address of the server’s primary gateway (in other words, the default gateway), and the IP address of the new server’s domain name server.

NET+
3.1
INSTALLING LINUX |
Chapter 9 433 |
What kind of video card is installed in the server? The Linux setup program (commonly referred to as the “installer”) attempts to detect the video card and installs the correct driver if possible. Otherwise, it will prompt you to choose the type of video card from a list. Either way, you should know what kind of video card your server contains.
What do you want the administrative user’s password to be? Like Windows Server 2003, Linux assigns the system a default administrative user name. In Linux, this user name is called root. Choose a difficult-to-guess password for the Linux administrator account. Chapter 14 provides advice on choosing good passwords.
How can I remember all of this information? After you have answered these questions, you should create a server installation form and keep the form with you during installation. Appendix D offers an example of such a form.
This list highlights only the most significant installation options. In addition, you should be prepared to identify your keyboard and mouse type, choose a time zone, and specify a new user name. After gathering the information described in this section, you’re ready to begin.
Installing and Configuring Fedora Core
Although you can install Fedora Core over the network, this installation summary assumes a typical installation using DVD-ROM. First verify that your computer’s BIOS configuration is set to boot from the DVD-ROM, and then boot your system with the Fedora Core 3 disk in your server’s DVD-ROM drive. After booting, the system presents you with a welcome screen that prompts you to press Enter to perform a check of the medium, or to skip it and begin the installation. The Fedora Core installation program leads you through the process step-by-step. Help is available in the left-hand panel. Be certain to pay close attention to each option on each screen of the installation process. During this procedure, you’re prompted to perform the following:
Select the language the system will use.
Confirm the keyboard layout.
Select Server as the installation type (you could also choose Personal Workstation, Desktop, or Custom).
Select disk drive partitioning options.
Choose booting options (to allow for more than one operating system on the drive).
Configure the network interface (or interfaces).
Configure the network firewall and security level options for the server.
Add support for additional languages.
Set the time and time zone for the server.
Enter (and confirm) the root (administrator) password.
After entering the administrative “root” password, the Fedora Core installer presents you with the Package Group Selection dialog box. This dialog box includes a list of packages in several

434 |
|
|
Chapter 9 NETWORKING WITH UNIX-TYPE OF OPERATING SYSTEMS |
|
|
||||
|
|
|
|
|
|
|
categories. You may refine your choices by clicking the Details link in the package group selec- |
||
NET+ |
|
|
||
3.1tion dialog box. For the purpose of this installation, do not select any of the graphical desktop environments in the Desktops category of the Package Selection Group dialog box.
The Fedora Core installer then formats the hard drive and copies the software to your server. This process may take as long as 60 minutes depending on the speed of your hardware. To complete the installation, the Fedora Core installer prompts you to confirm the server’s autodetected video card and monitor type. When you confirm these settings, the server reboots the new operating system. When it reboots, the server is nearly ready to offer services to network users.
The following section addresses some general system administration tasks common to UNIXtype of systems. These tasks must be completed before users can share resources via the server.
Administering a UNIX-Type of Server
NET+ |
Like Windows Server 2003 and NetWare, UNIX-type of systems require the use of user names |
3.1and passwords to connect clients to the network. Also like these operating systems, UNIX-type of systems assign access rights to groups, and allow users to be members of multiple groups. For example, the UNIX group named mail can access the electronic mail programs and electronic mail files. Without user accounts, a UNIX server is little more than a powerful workstation. This section introduces you to the setup process for administering a UNIX-type of system. You’ll learn:
The basics of adding users and groups
The basics of modifying file access permissions
To add users and groups to Linux and UNIX systems, you must rely on two commands: groupadd and useradd. Both are explained in their own manual pages. Their names imply their function: groupadd enables you to add a new group to the system, and useradd enables you to add a new user to the system. The process of adding users and groups on a Mac OS X Server system is different. On Mac OS X Server, you use the GUI Workgroup Manager application. The following sections explain how to add users and groups on Linux or Solaris and on Mac OS X Server computers.
Establishing Groups and Users on Linux and Solaris
On a Linux or Solaris system, the groupadd command creates a new group ID and makes the group available for use. Linux and Solaris assign a unique identification number to each group. Note that creating a new group does not automatically assign access rights to that group; you’ll learn how to accomplish that task later in this section.
The steps described in this section assume that you are logged on to a Solaris or a Linux system as the administrative user (root) and that your system has presented you with a command prompt.

NET+
3.1
ADMINISTERING A UNIX-TYPE OF SERVER |
Chapter 9 435 |
NOTE
UNIX commands provide no response if they successfully complete the operation. You will see a response only if the command experienced an error.
To add the group teachers to your Linux or Solaris system:
1.Type groupadd teachers and then press Enter at the command prompt. The group teachers is added.
You use the useradd command to add a new user ID to a Linux or Solaris system. It creates a new user ID and assigns that user ID to one or more groups. In this example, you’ll create a new user, thomas, and assign that user to the group teachers. The new user will then belong to the general users group as well as the group teachers. You must use two options when typing the useradd command: the -g option, which specifies the initial (or primary) group for the user, and the -G option, which specifies the additional groups to which the new user will belong (teachers, in this case). Note that useradd does not assign a password for the new user ID, so you’ll use the passwd command to assign a password for thomas.
NOTE
Logon passwords on UNIX-type of systems are case sensitive and can include any of the characters on the keyboard.
To add a new user, add the user to an existing group, and assign the user a password:
1. Type useradd -m –g users -G teachers thomas and then press Enter.
2.Type passwd thomas and then press Enter.
3.Linux prompts you to type the new password. As you type the password, notice that the characters do not appear on the screen and the cursor remains stationary. This security precaution prevents people from peering over your shoulder and seeing the password as you type it. After typing the password, press Enter.
4.Linux prompts you to retype the user’s password. Enter the same password again; this confirmation helps ensure that you type the new password accurately.
To learn more about the passwd command, read the passwd manual page, which you can access by typing man passwd, and press Enter at the shell prompt.
Establishing Groups and Users on Mac OS X Server
You use the Workgroup Manager application to add groups and to assign users to groups on a Mac OS X Server system. Workgroup Manager is a GUI application included with Mac OS

436 |
|
|
Chapter 9 NETWORKING WITH UNIX-TYPE OF OPERATING SYSTEMS |
|
|
||||
|
|
|
|
|
|
|
X that allows you to manage users and groups. As with Linux and Solaris, creating a new |
||
NET+ |
|
|
||
3.1group on a Mac OS X Server does not assign users to that group, but makes it available for use. When you create a new group on Mac OS X Server, you assign a unique name and numeric ID to the group. As with Windows Server 2003, Solaris, and Linux, to manage users and groups in Mac OS X Server, you must be logged on to the system as a user with administrative rights. The following steps use the same example user account and group used in the previous section.
To create the group teachers on a Mac OS X Server:
1.Click on the Workgroup Manager icon in the Dock. The Workgroup Manager Connect window opens.
2.Make certain your server’s address appears in the Address text box. Enter a user name with administrator-equivalent privileges in the User Name text box and the correct password in the Password text box, then click Connect. The Workgroup Manager window opens, with the user account selected by default.
3.Click the group account icon (which depicts three people and is located above the search box). The group account window opens.
4.Click the New Group icon.
5.In the Name text box, type teachers. By default, the word “teachers” will also appear in the Short Names text box.
6.Click Save to save the new group you created.
You also use Workgroup Manager to create new user accounts on a Mac OS X Server.
To create a new user account:
1.If you do not already have Workgroup Manager open, launch it by following Steps 1 and 2 in the previous exercise. The user account window will open by default. If you did not close Workgroup Manager after creating a group in the previous exercise, click the user account icon (the picture of a single person located above the search box).
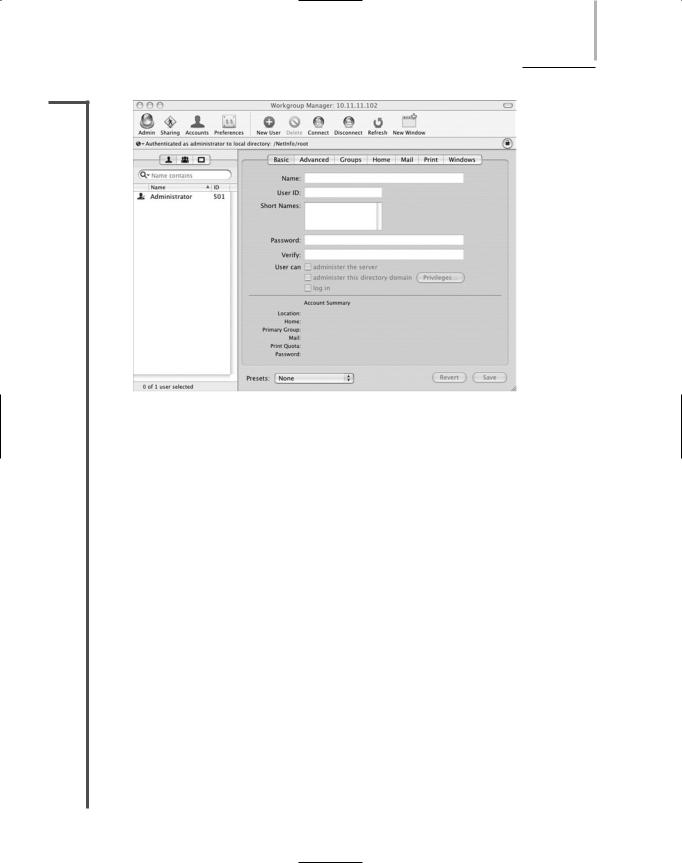
2.Click the New User icon in the Workgroup Manager toolbar. The user options window opens with the Basic pane selected, with default values entered for the Name, User ID, and Short Names text boxes. Delete these default values. Your user options window will look like the one shown in Figure 9-4.
3.In the Name text box, enter the user’s full name—for this example, type Thomas Day. In Mac OS X Server, long user names are case sensitive when used to log on to the server and can be no longer than 255 characters.
4.In the User ID text box, enter the ID 1025 for this user. In Mac OS X Server, the user ID is a number associated with a user that the NOS uses to identify that user’s resources and privileges. It can be any number between 100 and 2,147,483,640 and should be unique for each user.
ADMINISTERING A UNIX-TYPE OF SERVER |
Chapter 9 437 |
NET+
3.1
FIGURE 9-4 User creation in Mac OS X Server’s Workgroup Manager
5.In the Short Name text box, enter thomas. The short name will be used to name the user’s home directory and identify group memberships on the server. It can also be used to log on to the server.
6.Type a password for the user account called thomas in the Password text box, and then type the same password again in the Verify text box.
7.You have the option to enable this user to administer the server, administer the domain, or log in to the server. Click the log in check box, if it is not already selected.
8.Click Save to save the new user you have created.
To add the user Thomas Day to the teachers group you just created with Workgroup Manager:
1.In Workgroup Manager, with the user Thomas Day selected, and click the Groups tab.
2.Click the add icon, which is represented by a plus sign next to the list of Other Groups. A drawer with a list of groups opens to the right of the main Workgroup Manager window.
3.Double-click teachers in the list of groups. The group teachers appears in the list of Other Groups for the user Thomas Day.
4.Click Save to save your changes.
5.Close the Workgroup Manager window.
Now that you know how to create users and make them members of a group, you are ready to assign permissions to files that users can share.

438 Chapter 9 NETWORKING WITH UNIX-TYPE OF OPERATING SYSTEMS
NET+ Changing File Access Permissions
3.1UNIX-type of systems enable you to restrict access to resources by assigning user and group permissions to files and directories. Every file and directory on a UNIX-type of system is owned by exactly one user and is a member of exactly one group. That is, one user and one group have or directory, that user is the file or directory’s owner. As an owner, you may assign (or reassign) permissions for yourself, your group, or anyone else.
For example, suppose you are the principal and network administrator for an elementary school. Your user name is thomas and you belong to the group teachers (both of which were created in the previous section). You want to create a PROGRAMS directory and allow teachers to place new programs in the directory according to the example in Table 9-5. You also want students to be able to run the programs, but not to add new files to the directory or delete existing programs.
The method of creating directories and assigning file access permissions for Linux and UNIX systems, including Solaris, is the same. Mac OS X Server, however, uses a different method. The following two sections describe how to create directories and modify file access permissions on all three types of systems, beginning with Linux and Solaris.
Table 9-5 Providing security through groups
Group |
Rights to PROGRAMS |
Rights to GRADES |
Rights to STAFF |
Teachers |
Read, modify |
Full control |
No access |
Students |
Read |
No access |
No access |
Administrators |
No access |
Read, modify |
Full control |
|
|
|
|
Changing File Access Permissions on Linux and Solaris
To create a directory and assign it to a group on a Linux or Solaris system:
1.If you are still logged on to your UNIX system, log off by typing exit and then pressing Enter.
2.To log back on to your system as user thomas, type thomas at the login prompt, and then press Enter.
3.Type the password you assigned for thomas, and then press Enter.
4.You see a command window and a command prompt. To create the new directory, type mkdir PROGRAMS and then press Enter.
5.Type ls -l and then press Enter. Notice that the directory belongs to the group users. That’s because the primary group to which the user thomas belongs is users.
6.Type chgrp teachers PROGRAMS and then press Enter to assign ownership of the PROGRAMS directory to the group teachers.
7.Type ls -l and then press Enter. Notice that the directory is now assigned to the group teachers.

ADMINISTERING A UNIX-TYPE OF SERVER |
Chapter 9 439 |
NET+ Now that you’ve created the directory PROGRAMS and assigned it to the group teachers, you must
3.1limit access to the files contained within PROGRAMS. Your goal is to enable members of the group teachers to create new files in and delete files from PROGRAMS and to limit access to all others (including members of the group students). To accomplish this task, you must add write permissions to PROGRAMS for the teachers group and remove write permission for all others.
Changing file and directory permissions requires use of the chmod command. The UNIX chmod command uses a kind of shorthand (made up of two sets of one-letter abbreviations) to specify the permission changes for files. The first set of abbreviations identifies for whom the change will occur: the file’s owner (u for “user”), a file’s group (g), and all others (o). The second set of abbreviations identifies the access rights for the users in the first set of abbreviations: read (r), write (w), and execute (x). The two sets of abbreviations are separated with a plus sign (+) or a minus sign (-). The plus sign indicates that access rights should be added; the minus sign indicates that access rights should be removed. (You can read more about chmod in its manual page, which you can view by using the command man chmod in a command window on a UNIX-type of host.)
To change the access permissions for the PROGRAMS directory:
1.Verify that you are logged on as the user thomas (whose primary directory is teachers). Type chmod g+w PROGRAMS and then press Enter. This command adds write access for the teachers group to the directory PROGRAMS.
2.Next, you will remove read and write access to the PROGRAMS directory for all others. To do so, type chmod o-rw PROGRAMS, and then press Enter.
3.Type ls -l and then press Enter to view the access permissions assigned to PROGRAMS. You should see a line for PROGRAMS that includes permissions of
drwxrwx--x.
Now, any user who is assigned to the group teachers may add files to and remove files from the directory PROGRAMS. All other users (users in the group students, for example) will be able to run programs that are in the PROGRAMS directory, but will not be able to add or delete files in that directory.
Changing File Access Permissions on Mac OS X Server
Creating directories and changing file permissions on a Mac OS X Server is accomplished through the GUI interface. First, make certain you are logged onto the server as a user with administrator privileges, and then:
1.Open a Finder window, and click the icon that represents the server’s hard disk.
2.Click on the Shared Items folder.
3.Click the File menu and then click Get Info. The Shared Items Info dialog box opens.
4.Click the triangle to expand Ownership & Permissions, if necessary, and then click the triangle next to Details.

440 |
|
|
Chapter 9 NETWORKING WITH UNIX-TYPE OF OPERATING SYSTEMS |
|
|
||||
|
|
|
|
|
|
|
5. Click the lock icon to enable changing the group. |
||
NET+ |
|
|
||
3.16. From the drop-down list next to Owner, select your administrator-equivalent user name.
7.Enter your password in the Authenticate dialog box that opens and then click OK.
8.From the drop-down list next to Group, select teachers.
9.In the Access drop-down list beneath the Group drop-down list, choose Read & Write, if necessary.
10.Close the Shared Items Info dialog box.
You have now created a folder called PROGRAMS and allowed only the group teachers full access to read, write, modify, execute, or delete files within that folder. Next, you’ll learn how to interconnect UNIX-type of servers with computers running different operating systems.
NET+ Connecting to UNIX-Type of Servers
3.1Over the years, programmers and network administrators have continually added functional-
3.2ity to UNIX-type systems to make them integrate more easily with other operating systems and with protocols other than TCP/IP. Some of their changes include the addition of Windows networking tools and Windows programming tools. At the same time, as modern operating systems have incorporated the TCP/IP protocol suite, they have gained the ability to communicate with UNIX-type of systems such as Linux servers at some basic level.
However, although UNIX-type of systems and Windows can both communicate via TCP/IP, that doesn’t mean their file systems are compatible. One application that bridges this incompatibility is called Samba. When installed on a UNIX-type of system, Samba provides all the networking services necessary to make your UNIX-type of system a fully featured Windows fileand printer-sharing server. Windows users can access resources on UNIX-type of systems as if they were Windows server resources. Users logged on to UNIX-type of hosts can also access Windows drives that have been made available on the network. Printers shared from UNIX-type of systems with Samba appear to Windows users as if they were shared from a Windows server. To achieve this compatibility, Samba communicates with Windows servers using the SMB (server message block) file-sharing protocol and the CIFS (Common Internet File System) protocol, both of which are native to the Windows operating systems. Mac OS X Server includes Samba, but calls it Windows Services. Mac OS X Server also includes the GUI application Server Manager to configure Windows Services.
All modern flavors of UNIX, Linux, and Mac OS X Server support data sharing using directory services based on LDAP. Solaris, for example, implements LDAP in the Sun Java System Directory Server Enterprise Edition. Popular Linux distributions include the open source application OpenLDAP for directory services. Mac OS X Server includes Open Directory, which is Apple’s implementation of OpenLDAP.

ADMINISTERING A UNIX-TYPE OF SERVER |
Chapter 9 441 |
NET+ As you might guess, UNIX-type of systems also include a full complement of Internet tools.
2.10You can use UNIX-type of systems as Web servers, as FTP servers, and as mail servers. One
3.1of the most basic Internet services is connecting to a TCP/IP host from a remote computer.
3.2This type of connection is provided by the TCP/IP utility, Telnet, which you learned about earlier in this book. Any modern client running the TCP/IP protocol suite will be capable of connecting to a UNIX-type of host via Telnet. Following are steps for accessing a UNIX-type of server from a Windows XP workstation using the Telnet utility. This example uses the user name and password you created earlier in the “Administering a UNIX-type of Server” section of this chapter.
1.To start the Windows Telnet client, click Start, point to All Programs, point to Accessories, and then click Command Prompt. The Command Prompt window opens.
2.Type telnet in the text box, and press Enter. The cursor changes to Microsoft Telnet>.
3.Type open followed by the IP address of the UNIX server to which you want to connect, and press Enter. Figure 9-5 shows an example of a Windows Telnet session after logging in to a UNIX-type of server and typing ls.
FIGURE 9-5 Windows Telnet session
4.Type the user name (in this example, thomas) at the login prompt and press Enter. A password prompt appears.
5.Enter the password you chose when you added the user thomas. You see a shell prompt. You are now logged on to the UNIX server from a remote client via Telnet. You can type commands and view the screen in the Telnet window just as if you were using the keyboard and monitor directly attached to the UNIX server. Type ls -l / and then press Enter. Figure 9-6 shows the output of the ls -l / command.
6.Type exit and then press Enter to end your Telnet session.