

Network Plus 2005 In Depth
.pdf392 Chapter 8 NOS AND WINDOWS SERVER 2003-BASED NETWORKING
NET+
2.10
3.1
FIGURE 8-15 Distinguished name and relative distinguished name
UPN (user principal name) —The preferred naming convention for users in e-mail and related Internet services. A user’s UPN looks like a familiar Internet address, including the positioning of the domain name after the @ sign. When you create a user account, the user’s logon name is added to a UPN suffix, the portion of the user’s UPN that follows the @ sign. A user’s default UPN suffix is the domain name of her root domain. For example, if Mary Smith’s user name is msmith and her root domain is trinketmakers.com, her UPN suffix is trinketmakers.com, and her UPN is msmith@trinketmakers.com.
In addition to these names, each object has a GUID (globally unique identifier), a 128-bit number that ensures that no two objects have duplicate names. The GUID is generated and assigned to an object upon its creation. Rather than use any of the alphabetical names, network applications and services communicate with an object via the object’s GUID.
Now that you have been introduced to the Windows Server 2003 Active Directory structure and naming conventions, you are ready to learn about installing the NOS.
Planning for Installation
NET+ |
When installing and configuring an NOS, you must create a plan for your server and its place |
3.1in your network before you insert the installation CD. You need to consider many factors, including organizational structure, server function, applications, number of users, LAN architecture, and optional services (such as remote access) when developing this plan. After you have installed and configured the NOS, changing its configuration may prove difficult and cause service disruptions for users. To begin, first ensure that your server hardware meets the Windows Server 2003 requirements (see Table 8-2). Next, you must prepare answers to the following list of critical preinstallation decisions.

NET+
3.1
PLANNING FOR INSTALLATION |
Chapter 8 393 |
How many, how large, and what kind of partitions will the server require? Windows Server 2003 must be installed on a single partition. When you install it, you will have a choice of:
Creating a new partition on a nonpartitioned portion of a hard disk
Creating a new partition on a partitioned hard disk
Installing Windows Server 2003 on an existing partition
Removing an existing partition and creating a new one for installation
The option you choose will depend on how your server is currently partitioned, whether you want to keep data on existing partitions, and how you want to subdivide your server’s hard disk. If you know the number and size of the partitions you need (for example, on a 16-GB hard disk you might want to create a 6-GB system partition and a 10-GB data partition), it is best to create them during installation.
What type of file system will the server use? Recall that the optimal file system for a Windows Server 2003 computer is NTFS. Choose NTFS unless your applications require a different file system. NTFS must be used if you intend to use Active Directory and the domain model for centralized resource and client management.
What will you name the server? You may use any name that includes a maximum of 15 characters, and that includes numerals, letters, and hyphens, but no spaces, periods, or other special characters (for example, ? or =). Choose a practical, descriptive name that distinguishes the server from others and that is easy for you and your users to remember. For example, you might use geographical server names, such as Boston or Chicago. Alternatively, you might name servers according to their function, such as Marketing or Research. If the server is a member of a large domain, you might identify it in relationship to its domain name. For example, the Marketing server in the Pittsburgh domain might be called Mktg-Pitts.
Which protocols and network services should the server use? Before you begin installing Windows Server 2003, you need to know which protocol (or protocols) your network requires. On Windows Server 2003, TCP/IP is the default protocol, and depending on your circumstances, you should probably leave it as such. If your server runs Web services or requires connectivity with UNIX, Linux, or Mac OS X Server systems, you must run TCP/IP. If your Windows Server 2003 must communicate with an older NetWare server that relies on IPX/SPX, you should also install the NWLink IPX/SPX Compatible Protocol and Gateway Services for NetWare. For communication with Macintosh computers running the AppleTalk protocol, you need to install AppleTalk.
What will the Administrator password be? Use a strong password—in other words, one that is difficult to crack. In Windows Server 2003, network administrators can require users to choose stronger passwords than ever, which means, among other things, they must include a mix of different characters, including numbers, uppercase letters, lowercase letters, and special characters (such as *, & !, @, and so on), and they cannot contain any part of the user’s name, nor can they resemble any known English words. The strongest passwords are also the longest. The Administrator password should meet the most stringent criteria.

394 Chapter 8 NOS AND WINDOWS SERVER 2003-BASED NETWORKING
NET+
3.1
Should the network use domains or workgroups, and, if so, what will they be called? First decide whether your network will use workgroups or domains. During installation you will be asked whether the server should join an existing workgroup, be a new workgroup server, or join an existing domain. As you learned, in a workgroup situation, computers share network access in a peer-to-peer fashion. It is more likely that your environment will require domains, in which the security for clients and resources is centralized. If the server will be joining an existing domain, you must know the domain name, domain controller name, and the DNS server name. Domain names should describe the logical group of servers and users they support. You may use any name that includes numerals, letters, and hyphens, but no spaces, periods, or other special characters (for example, ? or =). Popular schemes for naming domains incorporate geography and function into the names. For example, in a domain model for a WAN spanning several cities, you might want to name your domains Boston, Chicago, Detroit, Pittsburgh, and so on. In a very large organization, you may want to use a less limiting convention. For example, if your company’s business is chemical production, you might want to name your domains Hydrocarbons, Resins, Solvents, and so on.
Will the server support additional services? During installation, you will be asked to choose which services your server will support. Of course, you must install certain protocols and network services in order for clients to access the server. You may also want to install optional services, such as: Remote Installation Services, Terminal Server, Windows Media Services, and Management and Monitoring Tools. Although it’s easiest to include additional services during the original installation, they can be added later as well.
Which licensing mode will you use? You may choose one of two licensing modes: per seat or per server. The per server licensing mode allows a limited number of clients to access the server simultaneously. (The actual number is determined by your Windows Server 2003 purchase.) In per server mode, any of your organization’s clients may be capable of connecting to the server. The number of concurrent connections is restricted. Per server mode is a popular choice in organizations that have a limited number of servers and many users, or where multiple users share workstations (for example, a mail-order catalog’s call center). The per seat mode requires a license for every client capable of connecting to the Windows Server 2003. In environments that include multiple Windows Server 2003 computers and in which each user has his own workstation, this choice is probably more economical than per server licensing.
NOTE
If you are running Windows Server 2003 as a Web or FTP server for anonymous clients (for example, Internet users from anywhere in the world), you do not need separate Windows Server 2003 client licenses for these types of clients.

INSTALLING AND CONFIGURING A WINDOWS SERVER |
Chapter 8 395 |
NET+
3.1
How can I remember all of this information? As you make these preinstallation decisions, you should note your choices on a server installation form and keep the form with you during installation. Appendix D offers an example of such a form.
The preceding list describes only the most significant installation options. You should also be prepared to:
Read and accept the license agreement.
Identify your organization.
Provide your Product Key (which can be found on the jacket of your Windows Server 2003 CD-ROM).
Select the appropriate time and date.
Specify display settings.
Identify and supply drivers for hardware components, such as video cards, NICs, printers, and so on.
If you are upgrading a server that currently runs an older Windows NOS, such as Windows NT or Windows 2000 Server, you will have to follow a special upgrade process, as described in the Microsoft documentation. The following section walks you through a new Windows Server 2003 installation.
Installing and Configuring a Windows
Server 2003 Server
NET+
3.1
After you have devised a plan for your Windows Server 2003 installation, you can begin the actual installation process. In this section, you will learn about the available options and the decisions you must make when installing and initially configuring your Windows Server 2003 server.
The Installation Process
You can install Windows Server 2003 from a CD-ROM or remotely over the network. If you use the network method, be aware that this type of installation generates a high volume of network traffic and shouldn’t be performed while clients are attempting to use the network. You also have the choice of performing a Windows Server 2003 installation in attended or unattended mode. The term “attended mode” simply means that someone is at the computer responding to installation prompts as they appear. Unattended mode relies on a preprogrammed script (which can be customized for different environments) to answer installation prompts. This mode prevents the need for a network administrator to be present during server installation. However, creating the script requires forethought and preparation.
Now that you understand the variables and considerations for a Windows Server 2003 installation, you are prepared to install the NOS. Following is a summary of the process, which

396 |
|
|
Chapter 8 NOS AND WINDOWS SERVER 2003-BASED NETWORKING |
|
|
||||
|
|
|
|
|
|
|
assumes an attended installation using a CD-ROM (in other words, somebody will be respond- |
||
NET+ |
|
|
||
3.1ing to prompts, rather than allowing a script to respond to prompts automatically). It represents a typical, simple installation for a small or home office. The options you choose and the prompts you see during installation will depend on your network environment and your preinstallation decisions. The time your installation requires will also depend on the options you choose, in addition to your server’s processor speed and amount of memory.
Insert the Windows Server 2003 CD-ROM in your server’s CD-ROM drive and restart the server (making sure your computer is configured to boot from a CD-ROM). After booting, you may be prompted to press any key to install Windows Server 2003. After you press a key, the Windows Setup screen appears, and installation will proceed, with prompts, to:
Inspect your hardware and load appropriate hardware drivers and other files.
Display the Windows Licensing Agreement, which you should read and then press the F8 key to accept if you want to continue.
Search the hard disk to determine whether any previous versions of Windows are installed.
Scan the hard disk to assess how many partitions and what type of partitions are available.
Select a partition for Windows Server 2003 installation (at this point, you may also create a new partition or delete an existing partition).
Format the disk partition you selected.
Copy files to the Windows installation folders on the hard disk.
After the Windows installation files are copied to your server’s hard disk, the Setup process has finished preparing your computer for the Windows Server 2003 installation. Your computer restarts and returns to a graphical user interface screen. During the next part of the process, you are prompted to:
Customize regional and language options, which include how numbers should be formatted and what languages you want Windows Server 2003 to support.
Personalize your software by entering your name and your organization’s name.
Enter the 25-character Product Key that appears on your CD-ROM folder.
Select the licensing mode you want to use—either Per Server, Per Device, or Per User.
Assign a name to your server and enter (and confirm) the password associated with the Administrator user account.
Enter modem dialing information.
Enter date and time settings.
Choose whether you want to use typical network settings or manually configure your server’s networking components.
Indicate whether the server is part of a workgroup or a domain.

INSTALLING AND CONFIGURING A WINDOWS SERVER |
Chapter 8 397 |
NET+ |
After gathering the preceding information, the setup program installs and registers the com- |
3.1ponents you’ve selected, installs Start menu items, saves settings, and removes the temporary files created during installation. Then, your system restarts (or prompts you to click Finish to restart). Finally, you can log on to the server using the Administrator user name and password.
Initial Configuration
After you have completed the Windows Server 2003 installation, the server still isn’t ready to support clients on a network. First, you must configure the software (for instance, assign it a role in the domain, if your network follows the domain model). The first time you log on to the server using the Administrator ID, the Manage Your Server window will open, as shown in Figure 8-16. Here you can establish the server’s role. For example, you can designate the server as a file server, print server, mail server, terminal server, and so on.
FIGURE 8-16 Manage Your Server window
Suppose you want to assign the role of file server to a newly installed Windows Server 2003 computer. In that case, you would follow these steps:
1.If the Manage Your Server window is not open, click Start, and then click Manage Your Server. The Manage Your Server window opens.
2.Click Add or remove a role. The Configure Your Server Wizard window opens, reminding you to make sure that all of the server’s peripherals are installed, that it is connected to the network and to the Internet, if Internet access is desired, and that you have the Windows Server 2003 installation CD handy.
3.Click Next to continue.
398 Chapter 8 NOS AND WINDOWS SERVER 2003-BASED NETWORKING
NET+
3.1
4.The Configure Your Server Wizard detects your network connection settings. Then, it prompts you to select the server’s role from a list of possibilities.
5.Click File server, then click Next to continue.
6.The Configure Your Server Wizard prompts you to set default disk quotas (a limit on how much of the server’s hard disk space users’ personal files can occupy) for new users, if desired. After you have made your choice, click Next to continue.
7.Next, you are prompted to choose whether you want to enable the File Server Indexing Service, which allows users to search indexed files for specific words or characters. (By default, the Indexing Service is turned off.) After making your selection, click Next to continue.
8.Finally, you are presented with a summary of your selections. Confirm that the selections are correct, and then click Next to continue.
9.The Share a Folder Wizard appears, prompting you to establish shared folders on the server. Click Next to continue.
10.Specify a folder path for the folder you want to share. For example, you might want to share the folder called “C:\Documents and Settings\All Users\Documents.” Then click Next to continue.
11.You are prompted to name the share you have just created and, if you desire, provide a description. For example, you could name the share “Public documents” and enter a description of “A directory available for file sharing among all users.” Click Next to continue.
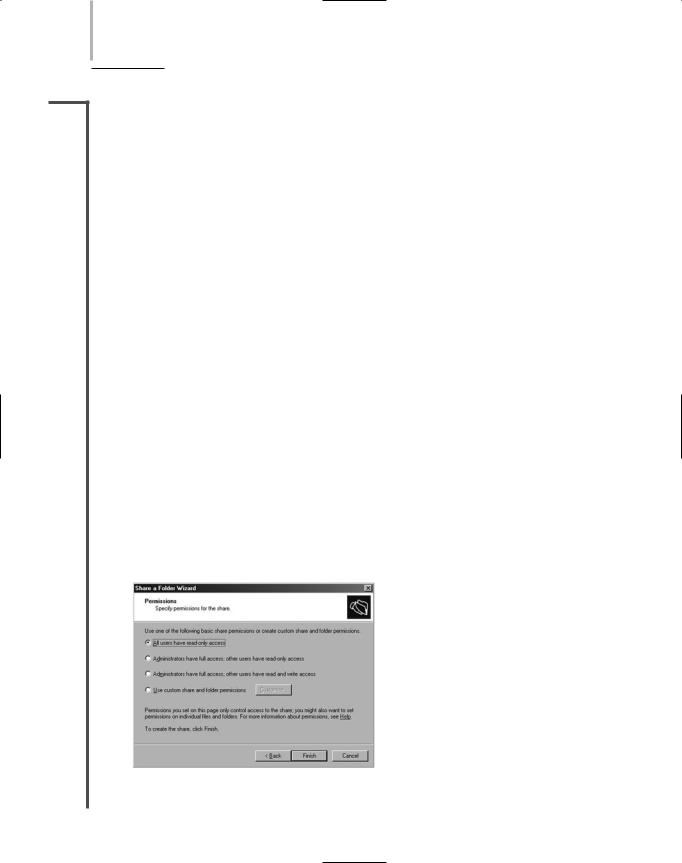
12.The Share a Folder Wizard prompts you to indicate users’ permissions to the folder. The default selection allows users read-only access to files in the folder, as shown in Figure 8-17. (“Read-only access” means that users can view data files and execute program files within a folder, but they cannot modify, delete, or add files.) If you want users to be able to save files to the folder, you could choose Administrators have full access; other users have read and write access. Click Finish to continue.
FIGURE 8-17 Specifying permissions in the Share a Folder Wizard

INSTALLING AND CONFIGURING A WINDOWS SERVER |
Chapter 8 399 |
NET+
3.1
13.The next screen announces that “Sharing was Successful.” Click Close to close the Share a Folder Wizard.
14.The Configure Your Server Wizard announces that “This Server is Now a File Server.” Click Finish to close the wizard.
15.You have now made it possible for users to share files on this server. In the next section, you will learn how to create user accounts and make users part of a group.
Establishing Users and Groups
The installation process creates two accounts: Guest and Administrator. The Guest account is a predefined user account with limited privileges that allows a user to log on to the computer. The Administrator account is a predefined user account that has the most extensive privileges for resources both on the computer and on the domain that it controls (if it is a domain controller). These two predefined user accounts are designed primarily to allow you to log on to a computer after installation and before you have created any additional user accounts. The Guest and Administrator accounts cannot be deleted; however, they may be disabled.
CAUTION
To enhance security, at some point you should create a new user account with administrative privileges to perform network administration, and disable the Administrator user account. If you keep the Administrator account active with full privileges, hackers have half the information they need to break into your system.
Additional accounts that you create may be local accounts, or those that only have rights on the server they are logged on to, and domain accounts, those that have rights throughout the domain. To create domain accounts, you must have Active Directory installed and your domains properly configured. Active Directory is not installed by default when you install Windows Server 2003. To install Active Directory, click Start, and then click Manage Your Server. From the Manage Your Server window, click Add or remove a role, and then select Domain Controller (Active Directory) from the list of server roles that the Configure Your Server Wizard offers. The Active Directory Installation Wizard will lead you through the process of making the computer a domain controller. The following exercise assumes that Active Directory is installed on your Windows Server 2003 computer and that domains have already been configured.
To create a domain user account:
1.Make sure you are logged on as Administrator.
2.Click Start, point to All Programs, point to Administrative Tools, and then click
Active Directory Users and Computers. The Active Directory Users and Computers snap-in opens.

400 Chapter 8 NOS AND WINDOWS SERVER 2003-BASED NETWORKING
NET+
3.1
3.Double-click the Active Directory container in which you want to create the new user. This may be a domain or an OU.
4.Right-click the Users folder, point to New on the shortcut menu, and then click User. The New Object - User dialog box opens, as shown in Figure 8-18.
5.Type the user’s last and first name in the appropriate text boxes. You then see the user’s full name in the Full name text box.
6.Enter a user name in the User logon name text box. This name uniquely identifies the user in a domain or forest. The domain name is provided automatically. Click Next to continue.
7.In the New Object - User dialog box shown in Figure 8-19, enter a password for the user. Enter a strong password (one that consists of at least 10 characters, cannot be found in the dictionary, and contains numbers, letters, and special characters). Retype the password in the Confirm password text box. You may also select from four additional options: User must change password at next logon, User cannot change password, Password never expires, or Account is disabled. It’s a good policy to force the user to pick a new password the first time they log on, so that they have a password that is meaningful to them and so that you, as the network administrator, don’t know their password. It is also a good policy to allow the password to periodically expire. With this in mind, make certain that the first option, User must change password at next logon, is checked, and then click Next.
8.The next New Object - User window displays the information you have entered. Click Finish to complete the creation of a new domain user account.
FIGURE 8-18 New Object–User dialog box |
FIGURE 8-19 Password settings in the |
|
New Object–User dialog box |
After you have created a new user, you can configure the properties associated with his account, including his address, telephone number, and e-mail address, his rights to use remote access, his position in the organization, his group memberships, what hours of the day he may log on to the network, and so on. To modify user account properties, you can use the Active Directory Users and Computers snap-in. In the snap-in window, double-click the user account in
INSTALLING AND CONFIGURING A WINDOWS SERVER |
Chapter 8 401 |
NET+ |
the right-hand pane. The User Account Properties dialog box opens, with multiple tabs that |
3.1represent different categories of attributes you may change.
Before you add many users, you will probably want to establish groups into which you can collect user accounts. But before creating a group, you must know what type of scope the group will have. The group’s scope identifies how broadly across the Windows Server 2003 network its privileges can reach. The possible scopes are domain local, global, or universal. A domain local group is one that allows its members access to resources within a single domain. Domain local groups are used to control access to certain folders, directories, or other resources. They may also contain global groups. A global group allows its members access to resources within a single domain also. However, a global group usually contains user accounts and can be inserted (or nested) into a domain local group to gain access to resources in other domains. A universal group is one that allows its members access to resources across multiple domains and forests.
To create a group in Windows Server 2003:
1.Make sure you are logged on as Administrator.
2.Click Start, point to All Programs, point to Administrative Tools, and then click
Active Directory Users and Computers. The Active Directory Users and Computers snap-in starts.
3.Double-click the Active Directory container in which you want to create the new group. This may be a domain or an OU.
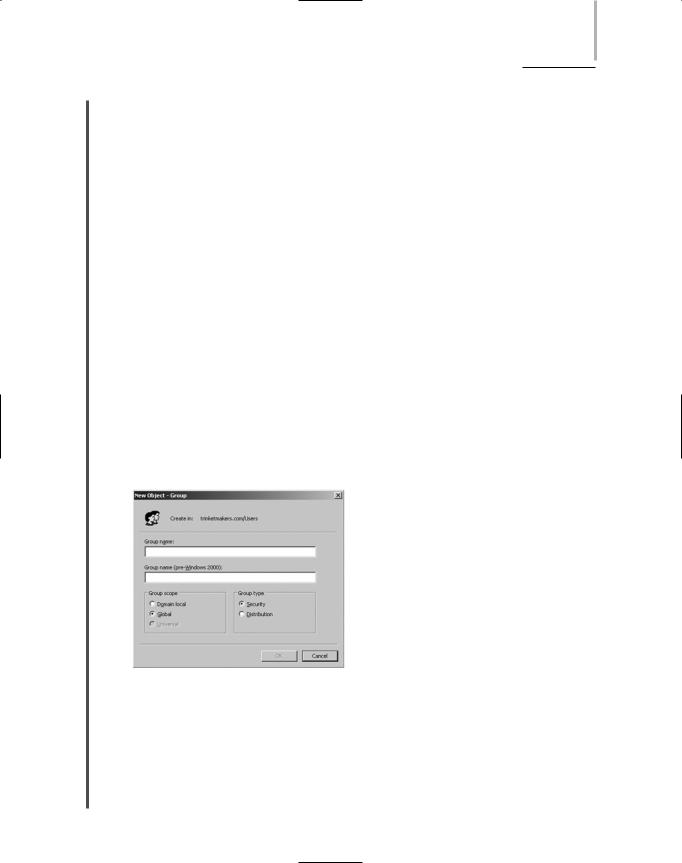
4.Click Action on the menu bar, click New, and then click Group. The New Object - Group dialog box appears, as shown in Figure 8-20.
FIGURE 8-20 New Object–Group dialog box
5.In the New Object - Group dialog box, enter the name of the group in the Group name text box. In case you are using Windows NT servers on your network, the Group name (pre-Windows 2000) text box is automatically completed.
6.Choose the group scope: Domain local, Global, or Universal.