

Chapter 8 Microsoft Azure
I have shown you the manual steps involved in building and deploying a Docker-based application. A next step would be to automate this entire process in your CI/CD pipeline.
Azure Functions
The final part in our discovery of Microsoft Azure brings us to serverless computing. Serverless computing means you have a piece of code running in the cloud without needing to worry about maintenance of the server, updating the operating system, scaling, containers, all of those classic overhead units of work are not needed in serverless systems. Obviously we still use servers to run our code in the cloud, but the fact that we can just build something and deploy it and it just works is where the term serverless computing comes from.
Serverless computing on Azure is done through a service called Azure Functions. Think back to RESTful APIs for a second. Remember how we created controllers with GET and POST requests? Imagine that you isolate one of those requests, the GET requests that load the list of books, for example. Now imagine that you can take that one request and deploy it to the cloud without any ASP.NET overhead, just the bare request, nothing else. That is what an Azure Function is. There is going to be a small overhead to define how the function is called as we will see, but it is much smaller than the overhead of setting up the entire ASP.NET environment.
Azure Functions are called by a trigger. Triggers are like events. These triggers can originate from different places; there are HTTP triggers that are called by doing an HTTP request to the function endpoint, very similar to a REST call. There are also numerous triggers that originate from other Azure resources, like a blob trigger that fires whenever a blob is added to a Blob Storage Container or a service bus queue trigger that fires whenever a message is received by a service bus.
Azure Functions can be written in different languages such as JavaScript and C# and different IDEs such as Visual Studio Code and Visual Studio 2022. Since this book is about .NET 6, we will focus on writing Functions with C# in Visual Studio 2022. When we select Azure Functions as a project type in Visual Studio 2022, the wizard lists the available triggers for us.
245

Chapter 8 Microsoft Azure
Figure 8-23. Function triggers in Visual Studio
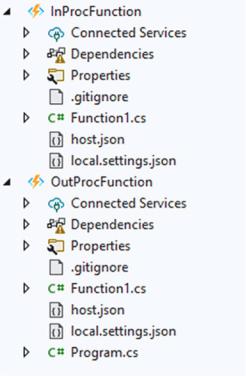
There are two modes for Azure Functions. By default an Azure Function runs in-process with the Functions runtime, meaning that the class library containing our Function code is executed on the same runtime as the Functions process is running on.
246
Chapter 8 Microsoft Azure
This means that our code is tightly coupled to the runtime version of Azure Functions itself. This is fine for now since the Azure Functions runtime is currently running on
.NET 6, but back when .NET 5 was released, this really was a problem. That is when support for out of process functions was added. That way the function itself can run in its own process, with its own self-contained runtime. For .NET 6 we can choose between
.NET 6, which is in-process, or .NET 6 (isolated) which is out of process.
Figure 8-24. In-proc vs. out-proc projects
There are a few differences in template availability between both modes, and there is a small difference in template as well; the out-of-process version needs a Program.cs to serve as a starting point for the function. For now we will continue with the in-process function. To get Azure Functions support in Visual Studio, you will need to add the Azure workload using the Visual Studio Installer.
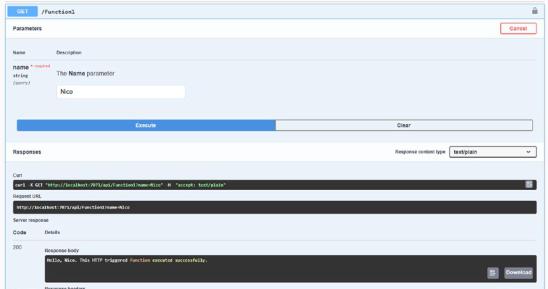
For this demo, I have selected a function with HttpTrigger and OpenAPI support. When running the generated project, we get a result very similar to an ASP.NET WebAPI, a Swagger UI with an endpoint we can call.
247
Chapter 8 Microsoft Azure
Figure 8-25. Swagger UI for Azure Functions
This function is running locally using the Azure Functions tools; since we have an HTTP trigger, it behaves exactly like a REST API. Let’s dive into the function code. Listing 8-7 shows the code for this function.
Listing 8-7. A default Azure Function
[FunctionName("Function1")]
[OpenApiOperation(operationId: "Run", tags: new[] { "name" })] [OpenApiSecurity("function_key", SecuritySchemeType.ApiKey, Name = "code", In = OpenApiSecurityLocationType.Query)]
[OpenApiParameter(name: "name", In = ParameterLocation.Query, Required = true, Type = typeof(string), Description = "The **Name** parameter")] [OpenApiResponseWithBody(statusCode: HttpStatusCode.OK, contentType: "text/ plain", bodyType: typeof(string), Description = "The OK response")]
public async Task<IActionResult> Run( [HttpTrigger(AuthorizationLevel.Function, "get", "post", Route = null)] HttpRequest req)
{
string name = req.Query["name"];
248
Chapter 8 Microsoft Azure
string requestBody = await new StreamReader(req.Body).ReadToEndAsync(); dynamic data = JsonConvert.DeserializeObject(requestBody);
name = name ?? data?.name;
string responseMessage = $"Hello, {name}. This HTTP triggered function executed successfully.";
return new OkObjectResult(responseMessage);
}
We start with a couple of attributes. The first one gives the function its name. The name is used in Swagger UI and the Azure Portal. The other attributes are all used to describe the function according to the OpenAPI spec so that Swagger UI can generate a great experience; we have looked at Swagger and OAS in detail in the previous chapter. The HttpTrigger attribute configures the trigger for this function. It registers the function as an HTTP endpoint with specific verbs, in this case GET and POST, in the Azure Functions runtime. The HttpRequest comes in through the req parameter; from this request, we can fetch the request body, deserialize it, and use the request parameters to build the response. We will go a bit deeper with a more clear example.
For this example, we will port the book service we have created in the ASP.NET WebAPI chapter over to Azure Functions. In the WebAPI version, we use dependency injection to inject the IBookService into our controller or minimal API. We need to add some extra configuration to our Azure Function since an in-process function does not have a startup class by default. To add a startup object to an Azure Function, we first need to add the Microsoft.Azure.Functions.Extensions NuGet package to the project. Once that is added, we can create a startup object to configure Dependency Injection in our Function.
Listing 8-8. Custom startup object in an Azure Function
[assembly: FunctionsStartup(typeof(FunctionsDemo.Startup))] namespace FunctionsDemo;
public class Startup : FunctionsStartup
{
249
Chapter 8 Microsoft Azure
public override void Configure(IFunctionsHostBuilder builder)
{
builder.Services.AddSingleton<IBookCatalogService,
BookCatalogService>();
}
}
The class name itself is not important; it is important that the class inherits
from FunctionsStartup and that the namespace is decorated with an assembly-level FunctionsStartup attribute. We need to override the Configure method from
the FunctionsStartup base class. The IFunctionsHostBuilder object that is passed in serves the same function as the WebApplicationBuilder from ASP.NET. We use the builder to register our service as a singleton, and that is all we need to do
here. Listing 8-9 shows the class declaration, constructor, and a field to hold our injected service for our Azure Function that we will write.
Listing 8-9. BookFunctions class
public class BookFunctions
{
private readonly IBookCatalogService _bookCatalogService;
public BookFunctions(IBookCatalogService bookCatalogService)
{
_bookCatalogService = bookCatalogService;
}
}
In our functions class, we can now inject the IBookCatalogService, just like we did in previous chapters. Listing 8-10 is the actual Function that we add to the class we just defined.
Listing 8-10. Fetching a list of books through an Azure Function
[FunctionName("FetchBooks")]
[OpenApiOperation(operationId: "FetchAll", tags: new[] { "Books" })] [OpenApiResponseWithBody(statusCode: HttpStatusCode.OK, contentType: "application/json", bodyType: typeof(Book[]), Description = "A list of books")]
250

Chapter 8 Microsoft Azure
public async Task<IActionResult> Run([HttpTrigger("get", Route = "books")] HttpRequest req)
{
Book[] books = await _bookCatalogService.FetchBookCatalog();
return new OkObjectResult(books);
}
The first function will fetch a list of all books, hence the function name “FetchBooks.” The OpenApiOperation specifies the name of this operation and what group it belongs to. This grouping of operations can be clearly seen in Swagger UI. OpenApiResponseWithBody specifies the response type, HTTP status code, and content type. The method parameter specifies that we have an HTTP Trigger using a GET verb.
Figure 8-26. Fetching books in Swagger UI
251
Chapter 8 Microsoft Azure
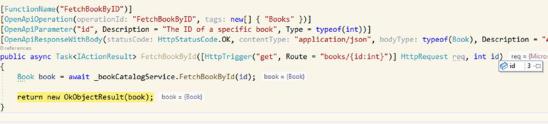
Listing 8-11. Fetching a specific book by ID
[FunctionName("FetchBookByID")]
[OpenApiOperation(operationId: "FetchBookByID", tags: new[] { "Books" })] [OpenApiParameter("id", Description = "The ID of a specific book",
Type = typeof(int))]
[OpenApiResponseWithBody(statusCode: HttpStatusCode.OK, contentType: "application/json", bodyType: typeof(Book), Description =
"A specific book")]
public async Task<IActionResult> FetchBookById([HttpTrigger("get", Route = "books/{id:int}")] HttpRequest req, int id)
{
Book book = await _bookCatalogService.FetchBookById(id);
return new OkObjectResult(book);
}
The second operation is fetching a book by ID. We specify an OpenApiParameter via an attribute to light up the input field in Swagger UI. The route specifies {id:int} as a parameter; this way we can add an extra id parameter to the method. Using that parameter, we can fetch the correct result from our datastore and pass it back to the requester.
Figure 8-27. Parameter filled in through routing
The final operation we are going to implement is a POST request to create a new book.
252