

Chapter 7 ASP.NET Core
intercepted by using an invalid certificate. The default template only enables HSTS when not running in development; that is because when we want to debug an ASP. NET application, we use a development certificate that HSTS would deem invalid. After configuring environment-specific options, we enable HTTPS redirection by calling app.UseHttpsRedirection, meaning that all requests sent to HTTP will automatically redirect to HTTPS. UseStaticFiles enables the web server to serve files without trying
to interpret them, not calling this method means that the web server will interpret everything and won’t be able to serve static files. UseRouting enables the routing system, more about that in the next section. UseAuthorization allows us to secure specific pieces of the application by hiding it behind a login system; we have mentioned ASP.NET Identity in the beginning of the chapter. More information can be found here https:// docs.microsoft.com/en-us/aspnet/core/security/authentication/identity?view =aspnetcore-6.0&tabs=visual-studio. MapControllerRoute sets the default route; we can add more routes here if needed. And finally we run the application to execute the request. The pipeline is now configured, and every request that comes in will be piped through the pipeline before being executed. Keep in mind that the order we configure the middleware components is exactly the order they will be executed in whenever a request passes through the pipeline.
Routing
As mentioned before, ASP.NET MVC works by convention; this is particularly visible in the routing system. Routing is not done on a file bases as it is in default HTML; instead, it is done by the concept of controllers and actions. Listing 7-3 showed us a default routing path; Listing 7-5 repeats that path.
Listing 7-5. Mapping a route
app.MapControllerRoute( name: "default",
pattern: "{controller=Home}/{action=Index}/{id?}");
This is the default routing set bij ASP.NET, but we are always free to change it when needed. For now let’s keep it at default. Let’s take https://localhost:5001/Employees/ Detail/5 as an example. When routing this URL into our ASP.NET MVC application, it will break it apart and try to map it onto a controller route. The route called “default”
is the one it will usually try, unless we specify a specific one. The pattern in the route
185
Chapter 7 ASP.NET Core
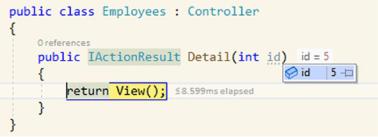
breaks into three parts, controller/action/optional id. If we look at the URL, passed the base address, we also notice three parts, Employees/Detail/5. The route will map Employees as a controller, meaning it will search for an EmployeesController class. It will do this because, by convention, a controller ends in “Controller.” The second part is the action, in our case Detail. The system will look for a public function called Detail that returns an IActionResult and lives in the EmployeesController. Finally, because we pass in an id, the Detail method also needs to accept a parameter. Figure 7-6 shows the code for our Detail method and that the parameter of the method gets filled in through the routing system. We are getting an integer into our parameter; note that this is not
a nullable int even though it looks like one in the routing template. Marking it with a question mark in the routing template just means that it is optional; the methods
receiving the parameter do not need to match the optional or nullable notation; as long as the datatype matches, we should be fine.
Figure 7-6. Parameter passed from url to variable
From here, the matching view is found and inflated and passed back to the user in the form of HTML.
Views
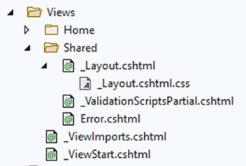
The views in an MVC scenario are the actual pages that a user gets to see on his monitor. In ASP.NET, views are built using an HTML-like syntax called Razor. Figure 7-7 shows the views in a default ASP.NET MVC template.
186
Chapter 7 ASP.NET Core
Figure 7-7. Views in ASP.NET MVC
Another one of ASP.NET MVC’s conventions dictates that for every controller, there is a folder containing its views. By default, we get a HomeController, so we also get a Home folder containing the views. Views are files with the *.cshtml, or *.vbhtml extensions, depending on the language we are using to write the application in. The Shared folder contains components that are reused across multiple views. Those shared components are usually prefixed with an underscore.
Razor works with master layouts; the default one is in the Shared folder and is called _Layout.cshtml. In the _Layout.cshtml file, we can declare our root html element, include the necessary CSS and JS files, and set up the navigation and structure of our application. In .NET 6, the ASP.NET team has also added scoped CSS files, meaning that the _Layout.cshtml file looks like it has a sort of code-behind file in the tree structure visible in the Solution Explorer in Visual Studio. This is a partial CSS file where the styles defined are only applied to the content of the file they are attached to. Adding a scoped CSS file to a cshtml file is as simple as creating a new CSS file with the same name as the cshtml file. Somewhere in the layout file you can find the snippet shown in Listing 7-6.
Listing 7-6. Rendering the body of the application
<div class="container">
<main role="main" class="pb-3"> @RenderBody()
</main>
</div>
187
Chapter 7 ASP.NET Core
Razor might look like generic HTML but we can add .NET code to it by prefixing a one line statement with an @ or an entire code block with @{ //code here }. The @RenderBody method is the place where your Razor views will be rendered inside of the template.
Putting some labels around the RenderBody method shows exactly what I mean.
Listing 7-7. Labels around RenderBody
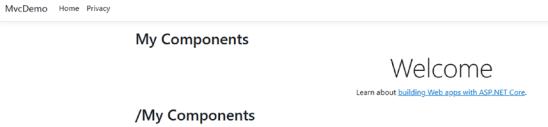
<main role="main" class="pb-3"> <h2>My Components</h2> @RenderBody()
<h2>/My Components</h2> </main>
Figure 7-8. Rendering components in the template
As you can tell from the placement of the h2 elements, it really is only the actual content that comes from the different views. The general styling and layout of the application is done from the main layout file. Listing 7-8 shows the default Index.cshtml view. This is the Index.cshtml file in the Home folder.
Listing 7-8. Home/Index view
@{
ViewData["Title"] = "Home Page";
}
<div class="text-center">
<h1 class="display-4">Welcome</h1>
<p>Learn about <a href="https://docs.microsoft.com/aspnet/ core">building Web apps with ASP.NET Core</a>.</p>
</div>
188