

Chapter 3 Command Line Interface
Dotnet Publish
Dotnet publish takes the compiled application and its dependencies and publishes them to the file system, ready for deployment either through a webserver or application setup through an MSI or setup file, …
Listing 3-12. Dotnet publish options
Usage:
dotnet [options] publish [<PROJECT | SOLUTION>...]
Arguments:
<PROJECT | SOLUTION> The project or solution file to operate on. If a file is not specified, the command will search the current directory for one.
Options: |
|
--use-current-runtime |
Use current runtime as the target |
|
runtime. |
-o, --output <OUTPUT_DIR> |
The output directory to place the |
|
published artifacts in. |
--manifest <MANIFEST> |
The path to a target manifest |
|
file that contains the list of |
|
packages to be excluded from the |
|
publish step. |
--no-build |
Do not build the project before |
|
publishing. Implies --no-restore. |
--sc, --self-contained |
Publish the .NET runtime with your |
|
application so the runtime doesn't |
|
need to be installed on the target |
|
machine. |
|
The default is 'true' if a runtime |
|
identifier is specified. |
--no-self-contained |
Publish your application as a |
|
framework-dependent application. |
|
A compatible .NET runtime must be |
|
installed on the target machine to |
|
run your application. |
52
|
Chapter 3 Command Line Interface |
--nologo |
Do not display the startup banner or |
|
the copyright message. |
-f, --framework <FRAMEWORK> |
The target framework to publish |
|
for. The target framework has to be |
|
specified in the project file. |
-r, --runtime <RUNTIME_IDENTIFIER> |
The target runtime to publish for. |
|
This is used when creating a self- |
|
contained deployment. |
|
The default is to publish a |
|
framework-dependent application. |
-c, --configuration <CONFIGURATION> |
The configuration to publish for. |
|
The default for most projects is |
|
'Debug'. |
--version-suffix <VERSION_SUFFIX> |
Set the value of the |
|
$(VersionSuffix) property to use |
|
when building the project. |
--interactive |
Allows the command to stop and wait |
|
for user input or action (e.g., to |
|
complete authentication). |
--no-restore |
Do not restore the project before |
|
building. |
-v, --verbosity <LEVEL> |
Set the MSBuild verbosity level. |
|
Allowed values are q[uiet], |
|
m[inimal], n[ormal], d[etailed], and |
|
diag[nostic]. |
-a, --arch <arch> |
The target architecture. |
--os <os> |
The target operating system. |
-?, -h, --help |
Show command line help. |
Running dotnet publish will compile the application and publish the output to a specific directory. The output will contain the DLLs, a *.deps.json file listing all the
project dependencies, a *.runtime.json file that specifies the runtime for the application, and the dependencies for the application. Just like with dotnet build, this command also runs dotnet restore implicitly, and just like with dotnet build, dotnet restore also calls into msbuild, passing the parameters through.
53
Chapter 3 Command Line Interface
Dotnet publish comes with a plethora of options; however, most of those are just pass-through to the dotnet build command that gets called when publishing. Those parameters have already been discussed when talking about dotnet build, so let us focus on the dotnet deploy specific ones.
--framework, or -f, deploys the application for a specific target framework. Note that the target framework moniker (TFM) needs to be specified in the project file. If we
specify multiple frameworks, we will get output for all of these different frameworks with one deploy command. Listing 3-13 lists the TFMs for .NET 6.
Listing 3-13. Target framework monikers for .NET 6
•\ net6.0
•\ net6.0-android •\ net6.0-ios
•\ net6.0-macos
•\ net6.0-maccatalyst •\ net6.0-tvos
•\ net6.0-windows
Listing 3-14 shows how the target framework is specified in the project file.
Listing 3-14. Specifying .NET 6 as target framework
<Project Sdk="Microsoft.NET.Sdk">
<PropertyGroup>
<OutputType>Exe</OutputType>
<TargetFramework>net6.0</TargetFramework>
</PropertyGroup>
</Project>
Listing 3-14 comes from a command line-type application. It specifies .NET 6 as target framework; this is not an OS-specific TFM so this application will run everywhere
.NET 6 is supported (Windows, Linux, MacOS, …). Projects can specify multiple TFMs by changing the TargetFramework tag to the plural TargetFrameworks.
54
Chapter 3 Command Line Interface
Listing 3-15. Specifying multiple target frameworks
<Project Sdk="Microsoft.NET.Sdk">
<PropertyGroup>
<OutputType>Exe</OutputType>
<TargetFrameworks>net6.0;net45</TargetFrameworks>
</PropertyGroup>
</Project>
Listing 3-15 targets both .NET 6 and .NET 4.5. If we were to build this project, we would get two output folders, one for each target platform containing a binary compiled for that specific platform.
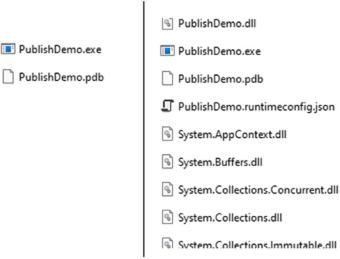
-p:PublishSingleFile=true gives you a single file as output. This single file executable is a self-extracting archive containing all dependencies and libraries for your application. At first run, it extracts everything in a directory based on version number and name of the application. Every new launch of the application will launch from that folder, meaning that the first run will be slower since the extracting needs to happen first. Having a single file makes it easier to distribute applications. Publishing as a single file works since .NET Core 3.0; if you’re targeting older versions, you’ll get compiler errors. Figure 3-7 shows the differences in publishing single file or not.
Figure 3-7. Publishing single file (left) or default (right)
55