

Chapter 7 ASP.NET Core
The default home component does little more than welcome the user to the application and link to the ASP.NET documentation. But, it does start with a code block setting a value in the ViewData. ViewData is a specific sort of typed dictionary that can transfer data for a specific model type from the controller to the view, but not the other way around. It lives for the duration for the request; for any next requests, new ViewData instances are created. In this example, we are setting the KeyValue pair with key “Title” to what we want to be the title of this page. We do want that value to be reflected in
the main layout, in the Title tag. All of this ViewData code then gets executed when a controller method is creating an HTML response to a request. Remember that ASP.NET MVC always creates the entire page as a response, and while creating the static HTML for a page, the system has time to evaluate all the ViewData logic.
Listing 7-9. Rendering the title through ViewData in _Layout.cshtml
<head>
<meta charset="utf-8" />
<meta name="viewport" content="width=device-width, initial-scale=1.0" /> <title>@ViewData["Title"] - MvcDemo</title>
<link rel="stylesheet" href="~/lib/bootstrap/dist/css/bootstrap. min.css" />
<link rel="stylesheet" href="~/css/site.css" asp-append-version="true" /> </head>
The rest of Index.cshtml is basic HTML code; we’ll go through some more exciting views in a minute.
Controllers
Controllers are the glue in an MVC application; they are the connector between the data and the view. As we have seen, the routing system brings us from a url straight into a controller method. In general, that method will load data from somewhere, optionally using any parameters passed into the method; it will inflate a view, execute all .NET code in that Razor view so that we end up with static generated HTML code, and send that back to the user. ASP.NET is a client-server framework; all .NET-based logic is executed on a server, and only the result, in the shape of HTML, is sent back to the client. This is simply because browsers do not understand .NET by default. Silverlight fixed this by installing an add-in in browsers so they could run compiled .NET code, but the add -in
189
Chapter 7 ASP.NET Core
system is not ideal in today’s world of mobile browsers and devices. The next best thing is running the code on the server and sending only the result back. In short, it is very important to realize that everything in ASP.NET MVC runs on the server; only the result of a request, which is generated HTML code based on Razor files, is sent back to the client.
Let’s go through the flow of creating a new controller, method, and view to clear up how MVC and its built-in tooling work. We’ll build a controller for the Apress book collection.
First we start with the model. Listing 7-10 shows the Book class.
Listing 7-10. The Book class
public class Book
{
public Book(int id, string title, string description, string author)
{
Id = id; Title = title;
Description = description; Author = author;
}
public int Id { get; set; } public string Title { get; set; }
public string Description { get; set; } public string Author { get; set; }
}
We’re keeping things pretty basic for sake of the example. I’ve created a dummy BookCatalogService that returns a hardcoded list of books. We won’t go into the code for that specific service, but if you are interested you can find it on the book’s GitHub repository. For now it is just important to know that the service is registered in ASP.NET’s DI container by calling builder.Services.AddSingleton<IBookCatalogService, BookCatalogService>() in Program.cs. Now that we have our data source and DI setup, it’s time to add the controller. A controller is a class that inherits from Controller. Keep in mind that we are registering the service as singleton so that we can abuse it as an inmemory datastore.
190

Chapter 7 ASP.NET Core
Be very careful with this in real applications; singleton means not only that you will get the same instance every time but that same instance is also shared across all your users.
Listing 7-11. The BookController
public class BookController : Controller
{
private readonly IBookCatalogService _bookCatalogService;
public BookController(IBookCatalogService bookCatalogService)
{
_bookCatalogService = bookCatalogService;
}
public async Task<IActionResult> Index()
{
Book[] books = await _bookCatalogService.FetchBookCatalog(); return View(books);
}
}
Listing 7-11 shows the implementation of the BookController. The constructor takes the dummy BookCatalogService as a parameter. The parameter will be filled in by ASP. NET’s ServiceCollection. The Index method fetches an array of books from the service and passes that array into a method called View.
The method called Index will be called by ASP.NET MVC’s routing system when we navigate to https://<url>:<port>/book. In case you are wondering why we don’t have to specify Index in the url, that is because Index is set as the default action when no action is provided.
Listing 7-12. Setting the route defaults in Program.cs
app.MapControllerRoute( name: "default",
pattern: "{controller=Home}/{action=Index}/{id?}");
191
Chapter 7 ASP.NET Core
The View method that is called in the Index method comes from the Controller base class. It is used to select the correct view, depending on the name of the controller and the action method, and inflate it.
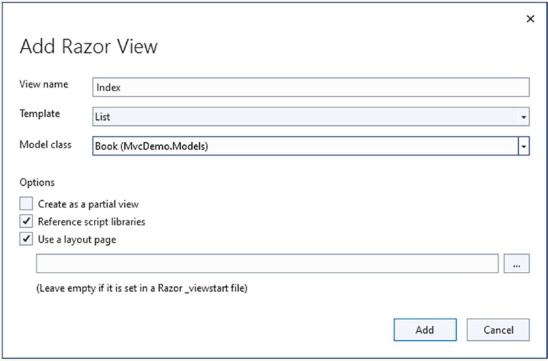
Now that we have a controller, it is time to add a view. Visual Studio provides tooling to easily add views. Adding a view can be done through right-clicking the call to View and selecting Add View.
Figure 7-9. Adding a view through tooling
Second step is selecting what type of view we want to generate, an empty Razor View or a scaffolded one. Scaffolding in ASP.NET is done by the Microsoft.VisualStudio. Web.CodeGeneration.Design NuGet package. The first time you launch a scaffolding command in Visual Studio this package will get added to the project. With scaffolding, we can easily generate entire parts of the application, from controller to view, including all the actions and even database operations. We will select the Razor View template. A dialog pops up where we can specify what model class we want to generate a view for, what it should be called, and what template to use. The name for the view is prefilled with the same name of the method we were just working on; the template is basically a list of basic create–read–update–delete or CRUD screens that we can take as a base for our view. Figure 7-10 shows the settings that we used for this example.
192
Chapter 7 ASP.NET Core
Figure 7-10. Scaffolding a view using a template
When scaffolding is done, you will notice a new folder in the Views folder called Book, containing an Index.cshtml file.
Listing 7-13. Model declaration and ASP tags
@model IEnumerable<MvcDemo.Models.Book>
@{
ViewData["Title"] = "Index";
}
<h1>Index</h1>
<p>
<a asp-action="Create">Create New</a>
</p>
193
Chapter 7 ASP.NET Core
Listing 7-13 shows the top of the generated page. A Razor view can specify a model class, in this case an IEnumerable of Book. I would advise to switch from IEnumerable to a more specific interface as soon as possible, since having it as an IEnumerable has no added value whatsoever. In this case we can go with an ICollection<Book> if we wanted to. With this model attribute set, we get access to a property called Model, which is of the type we just specified using the model attribute. The anchor tag contains an asp-action attribute. It is not the default HTML anchor tag; in this case, it is an ASP.NET tag helper, an extension of existing HTML tags. The asp-action attribute takes the name of a controller action and transforms that into a correct url using the routing system in ASP.NET MVC.
The generated view is meant to be a list of books. In the Razor view template, this is an HTML table. But tables are static, just like HTML is. Using Razor we can, on the server, generate all static HTML and send it back to the client. Listing 7-14 shows how it is done for a table. As I just mentioned, we get a Model property that is an IEnumerable<Book>; we can loop over that IEnumerable and generate a table row for every book in the collection.
Listing 7-14. Generating a table in Razor
@foreach (var item in Model) { <tr>
<td>
@Html.DisplayFor(modelItem => item.Id) </td>
<td>
@Html.DisplayFor(modelItem => item.Title) </td>
<td>
@Html.DisplayFor(modelItem => item.Description) </td>
<td>
@Html.DisplayFor(modelItem => item.Author) </td>
<td>
@Html.ActionLink("Edit", "Edit", new { /* id=item. PrimaryKey */ }) |
194
Chapter 7 ASP.NET Core
@Html.ActionLink("Details", "Details", new { /* id=item. PrimaryKey */ }) |
@Html.ActionLink("Delete", "Delete", new { /* id=item. PrimaryKey */ })
</td>
</tr>
}
For the book information, we use the Html.DisplayFor tag helper. This helper generates HTML content based on the model property we specify using a lambda. The generated HTML from DisplayFor is based on a default template that could be overwritten if needed, but that goes beyond the scope of this book. The Razor template also specifies action links to edit or delete the book or to load the details of a specific book. Those links are generated using Html.ActionLink, which is quite similar to the ASP.NET anchor TagHelper we just saw. An action link takes in a label that it will show on the actual page, a controller action, and an optional controller name for when the
action we want to execute is in another controller than the one this view is linked to and some optional parameters like, for example, the id of the entity we want to delete. In the generated view code, the id is not set in the route values as the system can’t decide for us what the unique identifier is. There is commented code in the Details and Delete links that we can use to set our id.
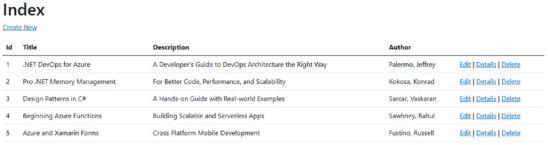
Let’s have a look at the result of the generated page.
Figure 7-11. The generated list view
The generated Razor view uses the default CSS from the ASP.NET MVC template and looks rather nice. We get a good looking table, nicely listing our books and showing the generated actions. Do note that the scaffolding does not include any logic to hide
195
Chapter 7 ASP.NET Core
primary keys or IDs from the user. So always adjust the scaffolded code to hide that information. In our case the first column in the table is the book IDs, that is, internal information that should not be leaked on screen.
Listing data on screen is quite easy; we only need to pull data from the datastore, shape it according to what we need on screen, and display it. There is a bit more work involved if we want to edit or create data. For example, let’s create the logic to add extra books to the list.
We’ll start by adding two methods to the BookController. We need two methods this time, one to prepare a book instance to ready the fields on the create form and one to actually receive the entered data and store it in our data store.
Listing 7-15. Creating a new Book
[HttpGet]
public IActionResult Create()
{
return View(new Book());
}
[HttpPost]
public async Task<IActionResult> Create(Book book)
{
await _bookCatalogService.AddBook(book); return RedirectToAction("Index");
}
Both methods have the same name, but they have different purposes. The Create method without parameters is the one that will be called to open the form in the application. It is decorated with an HttpGet attribute, telling the MVC pipeline that this method can only be reached with a GET request. GET is the default for controller actions in MVC; however, I like to explicitly decorate the method in this case to avoid confusion. The second Create method is decorated with the HttpPost attribute so that it will only be reached via a POST method that will receive the data entered on the form. Since our form is in the shape of a book, data-wise, the ASP.NET MVC pipeline can safely bind the received value to a Book instance. If we inspect the request, we can see that the only thing that is going over the wire is basic HTML form data.
196

Chapter 7 ASP.NET Core
Figure 7-12. Inspecting a create request
As you can see, the data going over the wire is in the shape of a book, but there is no notice of it being a book. The _RequestVerificationToken is an extra security token added by ASP.NET to verify that the received data on the server was not manipulated by a man-in-the-middle attack.
If we inspect the POST Create method, we can see that the parameter is filled in with an instance of Book, containing all the values we just entered on the form.
Figure 7-13. Parsed data in the controller method
In a real application, we of course need to do data validation before storing the data in the datastore. For the sake of the demo, we can assume that this validation happens in the service. Once the book is added in the datastore, we redirect from the Create action to the Index action so that we end up on the list of books, including our freshly created book.
Once again, we can let ASP.NET generate a view for us. This time we are selecting the Create template. I have already removed the entry for ID since we are not allowing our users to choose their own primary keys.
197
Chapter 7 ASP.NET Core
Listing 7-16. Generated Create form
<form asp-action="Create">
<div asp-validation-summary="ModelOnly" class="text-danger"></div> <div class="form-group">
<label asp-for="Title" class="control-label"></label> <input asp-for="Title" class="form-control" />
<span asp-validation-for="Title" class="text-danger"></span> </div>
<div class="form-group">
<label asp-for="Description" class="control-label"></label> <input asp-for="Description" class="form-control" />
<span asp-validation-for="Description" class="text-danger"></span> </div>
<div class="form-group">
<label asp-for="Author" class="control-label"></label> <input asp-for="Author" class="form-control" />
<span asp-validation-for="Author" class="text-danger"></span> </div>
<div class="form-group">
<input type="submit" value="Create" class="btn btn-primary" /> </div>
</form>
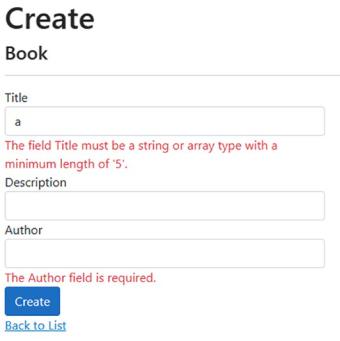
A form is a basic HTML form containing an action where the data in the form can be posted to. We are once again using ASP.NET taghelpers to generate the correct url based on controller and action names. For every property we want our users to fill in, three elements are generated, one that serves as the label. By default, the property name is shown as label but this can be overwritten. The second element is the actual input field; ASP.NET’s source generation will try to pick the correct input field based on the datatype. For a string we’ll get a text field, Boolean will give us a checkbox and so on. The third element is a placeholder for when client-side validation fails. Figure 7-14 shows the form with failed validations.
198
Chapter 7 ASP.NET Core
Figure 7-14. Failed validations
So, where are these validations coming from? There are some basic validations based on datatype such as fields being required if they are not nullable. However, in this case,
I have added validation rules directly on the Book class using data annotations from the System.ComponentModel.DataAnnotations namespace. Listing 7-17 shows these data annotations, together with a way to make the validation error message a bit more user- friendly instead of bombarding our users with terms like string and array.
Listing 7-17. Book class with validation rules
public class Book
{
public Book(int id, string title, string description, string author)
{
Id = id; Title = title;
Description = description; Author = author;
}
199
Chapter 7 ASP.NET Core
public int Id { get; set; }
[MinLength(5, ErrorMessage = "The title needs to have at least 5 characters")]
public string Title { get; set; }
public string? Description { get; set; }
[Required]
public string Author { get; set; }
}
Using data annotations, we can specify required fields, minimum and maximum length, and much more.
The rest of the operations that can be generated by ASP.NET work in a very similar way so we won’t go into any more detail here. Instead, let’s have a look at another member of the ASP.NET family.
Web API
ASP.NET WebAPI is Microsoft’s version of a REST-based service. API is an industry term that stands for Application Programming Interface. In short, an API provides endpoints that, instead of HTML, return just a set of data. The collection of endpoints that provide data we call a contract. WebAPI is a RESTful API, meaning that it conforms to a set of guidelines. The term guidelines is very important here. REST is not set in stone, the rules of a REST service are not enforced in any way, and it is up to the developer to comply to the guidelines according to their skills and needs. ASP.NET WebAPI provides us with a set of helper methods and classes to guide us through the guidelines of REST to help us provide an API that complies to the guidelines as much as possible.
Before .NET 6, WebAPI was largely based on the MVC principle. We had models and controllers, but no view. Instead of inflating an HTML template and returning HTML, the controllers took the data, serialized them into JSON, and returned that. It gave us a very familiar way to build RESTful services. Meanwhile, the world of APIs evolved, and setting up a quick and easy API to consume some data became very easy in technologies like NodeJS but was often found bloated and involved in ASP.NET WebAPI. To counter this, the .NET team introduced minimal APIs in .NET 6. Figure 7-15 shows both a default WebAPI project next to a minimal API project to show the difference in project structure.
200