

CHAPTER 7
ASP.NET Core
ASP.NET is the successor of Active Server Pages or ASP. ASP was a classic server-side framework from Microsoft that was released in 1996. The first version of ASP.NET was released in 2002. It was, and still is, built on the .NET Framework CLR, allowing .NET developers to write web applications with .NET.
ASP.NET Core is a complete rewrite of ASP.NET meant to modernize the platform using the latest programming techniques. It greatly increased speed and ease-of-use. As of ASP.NET Core, the framework is open sourced; the source code can be found at https://github.com/dotnet/aspnetcore.
For the rest of this chapter, I will be using the term ASP.NET instead of ASP.NET Core. Remember when you read ASP.NET, I mean the latest .NET 6-based version.
Model-View-Controller
Model-View-Controller, or MVC, was first described in SmallTalk back in the 1970s. It did take until the late 1980s for the MVC pattern to be described in an article by
which it started to gain adoption across languages. Today MVC is a well-known design pattern that has a default implementation in quite a lot of languages. Besides being well adopted, it also became the base of many other design patterns like Model-View- Presenter and Model-View-ViewModel. ASP.NET comes with its own implementation of the MVC pattern.
Just like with any framework within .NET, ASP.NET also ships with a couple of project types and templates. One of the most used templates is the Model-View-Controller, or MVC, template. The MVC template is built around the Model-View-Controller design pattern. The core strength of the MVC project template in ASP.NET lies in its great tooling, base classes, and convention-based way of working. But before we dive into the template itself, let’s look at the design pattern.
177
© Nico Vermeir 2022
N. Vermeir, Introducing .NET 6, https://doi.org/10.1007/978-1-4842-7319-7_7

Chapter 7 ASP.NET Core
Figure 7-1. The MVC pattern
The MVC pattern consists of three building blocks: the view, the controller, and the model. By splitting an application into these blocks, we can separate the concerns of the applications and apply loose coupling. By doing this, we create a code base that is easier to read, easier to maintain, and easier to learn for developers who are new to the team.
•\ |
View: the view renders the UI to the user. |
•\ |
Controller: the controller responds to user input and acts as the glue |
|
between the view and the model. |
•\ |
Model: maintaining state, storing, and retrieving data. |
Our view consists of HTML pages since we are developing web applications. HTML is still to this day a very static markup language that cannot understand data and how to shape it, unless modified by JavaScript libraries or when generated by server-side logic. That is where the controller layer comes into play. The controller takes data that was requested by the user, and it takes a form of HTML template that optionally contains some C#-based logic. The controller executes the logic contained in the template using the data as datasource; this is called inflating the template. The result is an HTML page with hard coded data. That snippet is sent back to the client and rendered in the browser.
Now that we know what the Model-View-Controller design pattern is about, let’s explore how Microsoft implemented this in ASP.NET.
Figure 7-2 shows the different templates available for ASP.NET:
178

Chapter 7 ASP.NET Core
Figure 7-2. ASP.NET Core templates
ASP.NET offers different templates for different purposes, and there are many more than the ones we see here. Since we can’t talk about all of them, we’ll go over the Model- View-Controller, the Web API, and the minimal Web API templates. We’ll start with ASP. NET Core Web App (Model-View-Controller). Visual Studio might also show ASP.NET templates without the Core moniker. These are the templates for the traditional .NET framework up to version 4.8; the templates for .NET Core, .NET 5, or .NET 6 are all called ASP.NET Core.
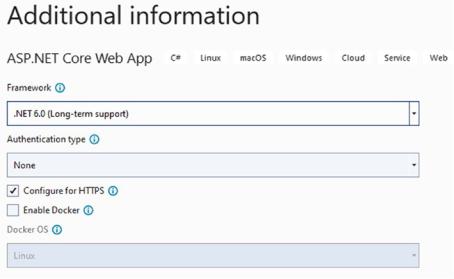
After selecting the ASP.NET Core Web App (Model-View-Controller) template, Visual Studio asks for some extra information. We can select the version of .NET to use, .NET 6 in this case. We can specify an authentication type; the options are None, Microsoft Identity Platform, or Windows. By default, None is selected, but when an option is selected for Authentication Type, the project will be bootstrapped with a login/registration system based on ASP.NET Identity. You can find more information
179
Chapter 7 ASP.NET Core
on that topic on https://docs.microsoft.com/en-us/aspnet/core/security/ authentication/identity?view=aspnetcore-6.0&tabs=visual-studio. Configure for HTTPS is selected by default; this will add redirect logic so that all HTTP requests are automatically redirected to HTTPS. Enable Docker adds a Docker file containing everything needed to run this application in a Docker container. Both Windows and Linux Docker containers are supported since .NET 6 also has a Linux runtime: https:// docs.microsoft.com/en-us/dotnet/core/install/linux.
Figure 7-3. Project wizard
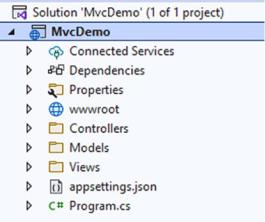
After creating a project with all default settings, we get the project structure shown in Figure 7-4.
180
Chapter 7 ASP.NET Core
Figure 7-4. MVC project
The folder structure in the project clearly shows the Model-View-Controller structure. We’ll go over the project folder by folder but just like with every .NET 6 project, everything starts with Program.cs.
Program.cs is another top-level class. Just like before, we are using implicit usings and top-level statements, new features in C#10. It combines what used to be two methods in previous versions of ASP.NET, Configure and ConfigureServices. Not only that, but it also combines Startup.cs and Program.cs, no more trying to remember what goes where. The entire application startup and configuration happens in these less than 30 lines of code.
Listing 7-1. Configuring the WebApplication builder
var builder = WebApplication.CreateBuilder(args);
// Add services to the container. builder.Services.AddControllersWithViews();
var app = builder.Build();
The first part of the class is what used to be Program.cs. It configures a
WebApplicationBuilder. A WebApplicationBuilder is a factory for creating a WebApplication instance; a WebApplication contains the pipeline and routing configuration for the running application. ASP.NET Core comes with a lot of helper methods to get everything up and running fast; one of those is AddControllersWithViews. This method registers all MVC controllers
181
Chapter 7 ASP.NET Core
and views in the built-in Inversion of Control (IoC) container. Methods like this that help configure the application are usually extension methods on
IServiceCollection or IApplicationBuilder. Listing 7-2 shows the signature of the AddControllersWithViews method.
Listing 7-2. AddControllersWithViews method
public static IMvcBuilder AddControllersWithViews(this IServiceCollection services)
The IServiceCollection is the Inversion of Control mechanism in .NET 6 and lives in the Microsoft.Extensions.DependencyInjection namespace.
After the AddControllersWithViews call where we can register dependencies ourselves, we will dive into an example soon but for now we keep everything default. The final thing that happens is calling the Build method on the WebApplicationBuilder; this will create the WebApplication instance.
Now that the WebApplication is configured, we are ready to configure the HTTP request pipeline.
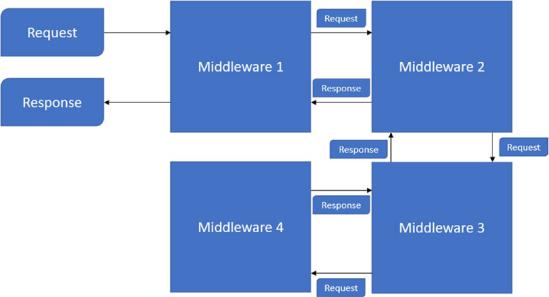
ASP.NET Core works with a pipeline. Every request that comes in gets routed through a series of connected middleware systems that we call a pipeline. The middlewares pass the request forward until it reaches the end of the pipeline or gets short-circuited by
a middleware. Once it reaches the end, the result is passed back through the pipeline the other way around. Once finished, the request is handled and the result passed back to the user. Examples of these middlewares are authentication, authorization, routing, and so on.
182
Chapter 7 ASP.NET Core
Figure 7-5. HTTP Request pipeline
Listing 7-3 shows the default pipeline configuration in an MVC project.
Listing 7-3. Pipeline configuration
// Configure the HTTP request pipeline. if (!app.Environment.IsDevelopment())
{
app.UseExceptionHandler("/Home/Error");
// The default HSTS value is 30 days. You may want to change this for production scenarios, see https://aka.ms/aspnetcore-hsts. app.UseHsts();
}
app.UseHttpsRedirection();
app.UseStaticFiles();
app.UseRouting();
app.UseAuthorization();
183
Chapter 7 ASP.NET Core
app.MapControllerRoute( name: "default",
pattern: "{controller=Home}/{action=Index}/{id?}");
app.Run();
The first configuration is configuring the default exception page, but only when not running in development. This is an example of where we use middleware components in the pipeline. Whether or not we are running in development mode depends on the profile we use for launching the application. In our MVC project is a Properties folder containing a launchsettings.json file. This file holds the configuration for every profile. By default there are two profiles, one to launch our application using IIS and one for Kestrel. These profiles are reflected in Visual Studio’s Debug target selector.
Listing 7-4. Profile configuration
"MvcDemo": { "commandName": "Project",
"dotnetRunMessages": true, "launchBrowser": true,
"applicationUrl": "https://localhost:7033;http://localhost:5033", "environmentVariables": {
"ASPNETCORE_ENVIRONMENT": "Development"
}
}
As you can see in Listing 7-4, we can set whatever value we want to the ASPNETCORE_ENVIRONMENT variable. “Development” is by convention the value used when running locally. When running or debugging locally, we usually want to see the stack trace when an unexpected exception occurs, but when running on a deployed environment we want to hide that information from our users, hence the difference in registering error handlers.
After setting the exception handler, we configure HTTP Strict Transport Security, or HSTS when not in development. HSTS is an optional security enhancement. It adds a specific response header to a web application. The browser sending requests to that application will receive the header; from that moment on, all traffic will happen over HTTPS without the possibility to use untrusted or invalid certificates. By using HSTS, we can effectively prevent man-in-the-middle attacks since traffic can no longer be
184