


Chapter 3 Command Line Interface
•\ --framework sets the framework used for the test host. This does not set the framework your application is built against; it’s only the framework version that the test host is using.
Using the CLI in GitHub Actions
In case you’re wondering why you would ever use command line functions when you have a perfectly good, very powerful IDE experience, you’ve come to the right place. The
.NET CLI is mostly used in CI/CD pipelines. We’ll dive deeper in the nitty-gritty of CI/ CD in Chapter 7 of this book; for now just remember that it is a tool chain that builds, tests, and deploys applications automatically, for example, on every source code push on specific branches. GitHub Actions is one example of a cloud-based CI/CD toolchain that developers can leverage. Other examples are Azure DevOps or Jenkins. In this example, we’ll use GitHub Actions. The different steps required to make a GitHub Action build and deploy a .NET 6 application are defined in a YAML file. If you don’t know YAML, it’s a data language that is often used for configuration files. It has a minimal syntax, based on indentation instead of brackets like JSON or element tags like XML.
GitHub Actions are available from the top menu on a GitHub Repository as shown in Figure 3-10.
Figure 3-10. GitHub Actions
Listing 3-19 shows a simple example of a GitHub Actions YAML file.
Listing 3-19. Building a .NET 6 application through GitHub Actions
Name: Net6Demo
on:
push:
branches: [ main ] pull_request:
branches: [ main ]
60
Chapter 3 Command Line Interface
env:
PROJECTFILE_PATH: './src/Net6Demo.Api/Net6Demo.Api.csproj' PROJECT_PATH: './src/Net6Demo.Api/'
DOTNET_VERSION: '6.0' CONFIG: Release
jobs:
build:
runs-on: ubuntu-latest
steps:
-uses: actions/checkout@v2
-name: Setup .NET 6
uses: actions/setup-dotnet@v1 with:
dotnet-version: ${{ env.DOTNET_VERSION }}
-name: Install dependencies
run: dotnet restore ${{ env.PROJECTFILE_PATH }}
-name: Build run: |
dotnet build ${{ env.PROJECTFILE_PATH }} –c ${{ env.CONFIG }} – no-restore
dotnet publish ${{ env.PROJECTFILE_PATH }} -c ${{ env.CONFIG }}
Let’s go over the top-level blocks first. The first block, ‘name’, specifies the name for this specific GitHub Action.
‘on’ specifies the triggers. In this case the action will get triggered whenever a new commit happens on the main branch or when a pull request against the main branch is created.
‘env’ registers variables that can be used throughout the YAML file, to prevent duplicate hard-coded values.
‘jobs’ is where the magic happens; in this example, we have a ‘build’ job. This job will compile our application and publish the output, ready for a deploy job to pick it up and push it to a server.
61
Chapter 3 Command Line Interface
‘build’ has two blocks. The first one ‘runs on’ specified the operating system that will be used for the build. Pipelines, like GitHub Actions or Azure DevOps, are run on,
usually virtual, machines. Those machines have a specific operating system installed and have a piece of software called an agent. This agent reports the machine’s status to the build service and can accept build requests. Once a request comes in, it downloads all the different tasks and starts executing the request. The GitHub Actions agent takes the YAML file, downloads the tasks needed, and performs them. GitHub Actions provides agents on Windows, Linux, and MacOS. They also provide an option to host your own agent on your own machines.
‘steps’ contain all the steps needed to compile the application. This is quite a simple setup. Listing 3-20 shows the extracted steps from the complete file in Listing 3-19.
Listing 3-20. Steps in a GitHub Action
steps:
-uses: actions/checkout@v2
-name: Setup .NET 6
uses: actions/setup-dotnet@v1 with:
dotnet-version: ${{ env.DOTNET_VERSION }}
-name: Install dependencies
run: dotnet restore ${{ env.PROJECTFILE_PATH }}
-name: Build run: |
dotnet build ${{ env.PROJECTFILE_PATH }} --c ${{ env.CONFIG }} --no-restore
dotnet publish ${{ env.PROJECTFILE_PATH }} -c ${{ env.CONFIG }}
The first step in the action only has a ‘uses’ statement. ‘uses’ specifies a specific task to be used for this step. In this case, it specifies ‘actions/checkout@v2’; this means that the agent will look for an action called checkout and download version 2 of this action. This specific one will perform a git checkout command against the main branch, as defined earlier in the YAML file, of our current GitHub repository.
62
Chapter 3 Command Line Interface
The ‘Setup .NET 6’ step will download the actions/setup-dotnet/@v1 task and pass in the environment variables we’ve defined earlier. This task will then setup the specified version of the .NET SDK and install it on the machine where the agent is hosted.
The final two steps use .NET CLI commands that we’ve described earlier in this chapter. First, we will restore the dependencies using dotnet restore. I like to do the restore separately from the build command. When a task failed, we can search for the reason in the task logs; by splitting the restore and build task, we limit the log size we potentially need to look through.
In the ‘Build’ step, we use dotnet build in Release configuration; we prevent restoring dependencies with the --no-restore flag since that happened in the previous step. And finally we use dotnet deploy to create our artifacts.
This specific action only builds the application and creates artifacts ready for deployment. The actual deployment of the artifacts is usually defined separately and is very dependent on the environment you want to deploy to.
Other Commands
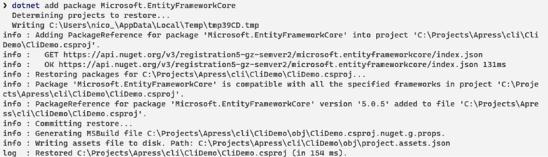
This chapter has described the most common basic commands in the .NET CLI tooling. There are plenty more commands, like add and remove. Add and remove are used for adding or removing both NuGet packages and project references. Figure 3-11 shows adding the Entity Framework NuGet package using the CLI.
Figure 3-11. Adding a NuGet package through the command line
Figure 3-12 shows adding a project reference to a .NET 6 class library using the command line.
63