

Chapter 4 Desktop Development
WinForms relies on the COM wrappers exposed by Windows, and COM runs in a process with a single thread (the UI thread); however, new threads can be created from that point on. This is needed, for example, when you need to execute a long-running operation and you want to prevent the UI from freezing.
The final concept we need to know is the apartment. An apartment is a group of COM objects in a process. Every COM object lives in exactly one apartment, meaning that the methods on a COM object can only be called from a thread that belongs to the same apartment; should any other thread need to call into that COM object, it needs to pass through a proxy.
The WinForms process contains a single thread for rendering the UI; to render the UI, it needs to call into COM wrappers, which means that the COM wrappers and the single thread in our application’s process need to belong to the same apartment. Since apartments come in two flavors, single-threaded and multithreaded, and we only have one thread, we need a single-threaded apartment. However, we are building a C# application; C# applications ever since .NET Framework 2.0 by default use a multithreaded apartment. That’s why the STAThread attribute is set on the Program class, to indicate that this application needs a single-threaded apartment.
WinForms Startup
To keep the Program class clean and tidy, some configuration is abstracted away since
.NET 6. The Initialize method that you can see in Program.cs, or Listing 4-2, that is called on ApplicationConfiguration calls three configuration methods, shown in Listing 4-3.
Listing 4-3. The configuration calls in Initialize
Application.SetHighDpiMode(HighDpiMode.SystemAware);
Application.EnableVisualStyles();
Application.SetCompatibleTextRenderingDefault(false);
DPI Mode
After the STAThread attribute, we see some default configuration being set, starting with high DPI mode. DPI, or dots per inch, specifies how many pixels a screen can render on a one inch line; nowadays, the term DPI is often used together with PPI, pixels per inch.
Strictly speaking, DPI is a term used for printers and PPI for screens, but DPI seems to be
72
Chapter 4 Desktop Development
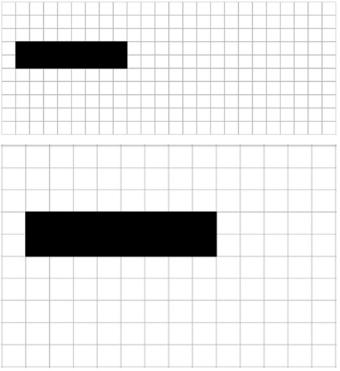
the term most often used in both contexts. So in short, the higher the DPI of a monitor, the more pixels can be placed upon the screen. So why does this matter? Let’s compare two surfaces with different DPI values and draw a rectangle of 8 by 2 pixels on them.
Figure 4-3. Comparing different DPI
Figure 4-3 shows the same rectangle but drawn on surfaces of the same physical size, but with different DPI values; notice that the higher the DPI of a surface is, the smaller the objects drawn on that surface seem to appear. Operating systems, including mobile operating systems, solve this problem by implementing logical pixels per inch. It’s sort of a virtual screen that is laid over the actual screen; this technique exists to ensure that applications look the same across different screens; aspect ratios are a different problem of course; but that’s beside the point here.
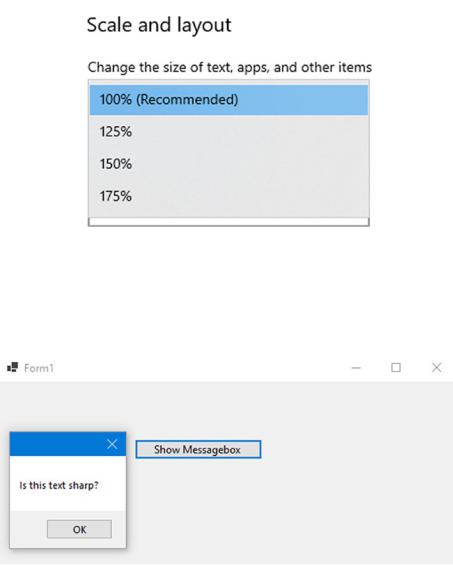
So what was the problem with WinForms applications? Windows tried to make sure that an application looked the same size on every monitor; in a multi-monitor setup that combines high DPI monitors with normal DPI monitors, this means that applications will be “zoomed in” if you will, instead of being scaled natively. This results in a blurry, pixelated image. We can simulate this in Windows by changing the scale factor in the display settings, shown in Figure 4-4.
73
Chapter 4 Desktop Development
Figure 4-4. Display scale settings in Windows
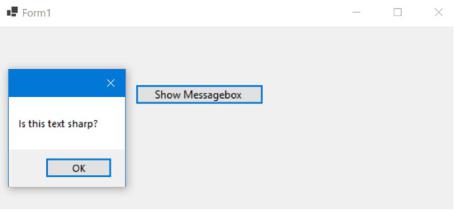
Figures 4-5 and 4-6 show the difference in application sharpness when high DPI support is switched off in a WinForms application. The screenshots were taken on 175% size.
Figure 4-5. A sharp looking application
74
Chapter 4 Desktop Development
Figure 4-6. The same application at a different scale factor
Notice that Figure 4-6 shows a very blurry experience, not what you want to see on an expensive, fancy 4k ultrawide monitor is it? To fix this, Microsoft updated the GDI API with multiple modes for high DPI. The work on high DPI mode started in .NET Core 3 and kept improving with each release.
•\ |
DPI Unaware – this is the “old” behavior; applications assume 100% |
|
scaling at 96 DPI; this will result in the blurry applications that are |
|
demonstrated in Figure 4-6. |
•\ |
System DPI Aware – apps will scale according to the DPI of the main |
|
monitor at the time of login into Windows. This can still result in |
|
blurry applications on the other monitors, but the application will |
|
look great on the main monitor. |
•\ |
Per Monitor DPI Aware – this enables applications to update their |
|
rendering according to the DPI of the monitor they are currently |
|
on. These applications can update immediately when moved to a |
|
monitor with a different DPI; this does require developers to test their |
|
UI at different DPI settings. |
•\ |
Mixed Mode DPI Aware – in mixed mode, we can set one of the |
|
above three modes on every top-level window, meaning that we can |
|
have different application windows behave differently on different |
|
monitors. |
75