

Chapter 8 Microsoft Azure
Web Apps
Azure Web Apps are easiest described as your basic web hosting that you can get from thousands of providers all over the world. The difference being that since this is a cloud service this can scale to huge scales. By default, web apps support applications in:
•\ .NET
•\ .NET Classic
•\ Java
•\ Ruby
•\ NodeJS
•\ PHP
•\ Python
Let’s start building our first web app. As mentioned before, there are several ways to create Azure resources, but for now we will use the portal. The portal greets you with a list of recent resources and a list of resource types that are commonly created.
Creating an App Service
To be able to follow along with this demo, you will need to have an ASP.NET Core 6 project checked into a GitHub repository.
222
Chapter 8 Microsoft Azure
Figure 8-1. Azure portal start page
There is a button with a big + icon to create a new resource. This will once again bring up a page with some quick options for resource types but also a search to search through the extensive catalog of Azure services. It is important to know that not every service in the Azure services catalog is a Microsoft product. There are tons of third-party services in there as well. Some examples are MariaDB, SendGrid, several Linux distros for virtual machines, and many more. For this example, we need a web app. After we find it in the catalog and click Create, we enter into a setup wizard.
Make sure to select Web App, not Static Web App. Those are for the next section.
223
Chapter 8 Microsoft Azure
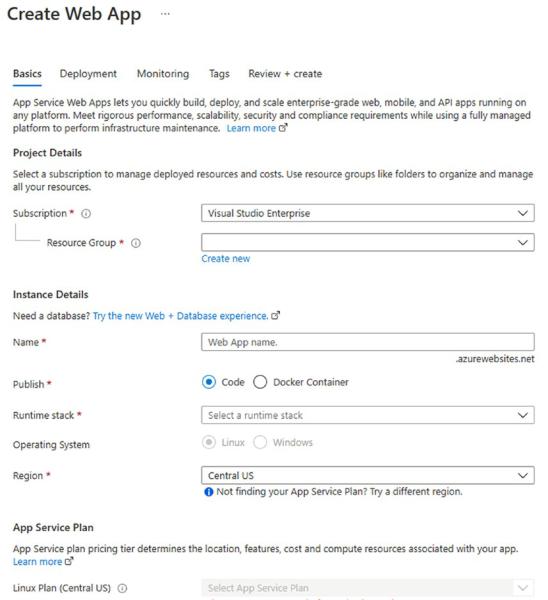
Figure 8-2. Web App creation wizard
First we need to select a subscription. Being an Azure user means you have a subscription. Azure has a lot of free services, but depending on how much flexibility, scale, or redundancy you need, you will quickly get into paid territory. To track what you use, Microsoft requires you to have a subscription. You can have several subscription
224
Chapter 8 Microsoft Azure
tied to the same email address. As a Visual Studio customer, you get monthly Azure credits that you can spend. The amount depends on the type of Visual Studio license you have.
A Resource Group is a functional group that you can place your services in. Resource Groups are mostly meant for customers to order their services. Azure resources in the same resource group share the same lifecycle, permissions, and policies. Click Create New and give your resource group a name.
Next step is configuring the resource itself. Most important is how you want to call this. This name needs to be unique across all Azure customers since the name will be used as a url. As an Azure Web App user, you get a free domain in the form of https://<your web app name>.azurewebsites.net. This makes your web application easily reachable across the Internet, and you can make use of the SSL certificate for *.azurewebsites.net free of charge. It is of course possible to attach your own domain name to a web app instance, but that also means that you are responsible for the SSL certificate.
After selecting a name, we can choose if we want to deploy our project as code or as a Docker container. Azure supports multiple ways of deploying containerized applications; this is one of the more basic versions. When deploying as a container,
Azure assumes that the container contains a web application that exposes ports 80 (http) or 443 (https). Deploying as code means that we publish our generated binaries onto the file system and the web server interprets and serves the response, just like in a shared hosting with any hosting provider. For now, we will stick to deploy as code and we will get into Docker later on in this chapter.
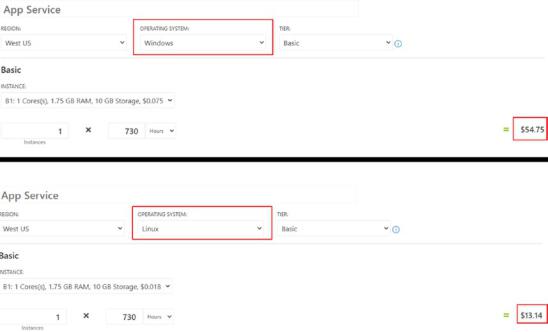
The runtime stack is where we define the technology that we used for building our application. As mentioned in the start of this chapter, we have quite a lot of options. Since this book is about .NET 6, we will select .NET 6 (LTS) as runtime stack. Depending on the option you select in the runtime stack dropdown, the option for selecting an operating system might light up. That is because not all runtime stack options support both Linux and Windows, for example, classic ASP.NET 4.x can only run on Windows hosts. Ever since .NET Core, .NET became cross-platform so we can run on Linux as well. There are several differences between running an app service on Linux or Windows; most of them have to do with pricing. Running a Windows service is more expensive than running a Linux service. Figure 8-3 shows the difference using the Azure pricing calculator.
225
Chapter 8 Microsoft Azure
Figure 8-3. Price difference Linux – Windows
The pricing shown in Figure 8-3 is monthly cost calculated for a basic instance estimating 730 hours of usage. Looking at the pricing in the calculator, Windows is four times as expensive as Linux. However, Linux does not have a free tier in web app while Windows does. So there is more to it than just selecting the cheapest option. Make sure that you know very well what the different options are.
The next option is the region. Azure has datacenters across the world, but a region is not just one datacenter. A region is a collection of datacenters that are relatively close to each other. When you deploy a service to a region, you know that your application is running in one or more of the datacenters in that region but you do not know which one. The reason for this is redundancy; should one datacenter loose connection, one of the others in the same region can take over. There are several assurances of where data is stored and how data is transferred. These were put in place to comply to privacy regulations like GDPR in Europe. The list of regions is constantly extending as Azure
is growing. At the time of writing, Azure has 33 regions. Do note that not every region supports every resource type. Newer resource types are usually available in US regions first and are gradually rolled out across the entire Azure network.
226
Chapter 8 Microsoft Azure
Final option to set is the App Service Plan. App Service Plans are another grouping method, but while resource groups go about lifecycle, permissions, and policies, App Service Plans are about location, features, cost, and resources. A service plan is tied to a region, so if you want all of your services in the same service plan, they also need to be in the same region. The SKU is the computing power you want this service to have. More power comes with a higher cost.
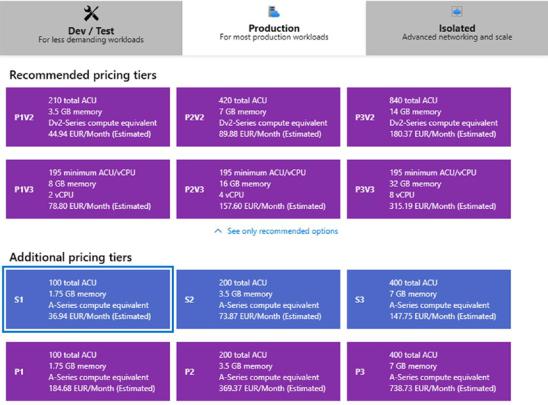
Figure 8-4. Selecting an SKU
The selection screen groups the available SKUs according to workloads and immediately shows estimated monthly cost. The selected SKU can be adjusted later on, for example, when your application usage is on the rise. If you switch to the Dev/Test tab at the top, you can select the Free tier; this will be sufficient for the demo and will keep you from spending Azure credits. After selecting the right SKU for your project, we can advance to step 2 of the wizard: Deployment.
227
Chapter 8 Microsoft Azure
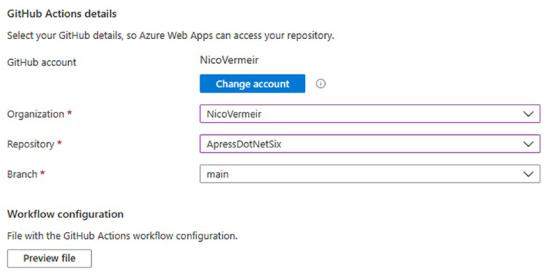
Azure App Services can integrate with GitHub Actions to automatically set up a CI/CD pipeline. With CI/CD, we can automatically build and deploy our application. Connect the Azure portal to the GitHub account that has access to the GitHub repository we mentioned in the beginning of this section. Once connected, you can select the right organization, repository, and branch.
Figure 8-5. Automatically configure CI/CD from Azure
Setting this up will generate a YAML file that is added to the code repository for a GitHub action. That action can automatically build and deploy your application to the newly created Azure Web App. A preview of the YAML file can be seen here in the Azure portal before it is added to your repository on GitHub. For more information on setting up the connection between Azure and GitHub Action, go checkout the documentation https://docs.microsoft.com/en-us/azure/app-service/deploy-github- actions?tabs=applevel.
The next step in setting up an Azure App Service instance is Monitoring.
228
Chapter 8 Microsoft Azure
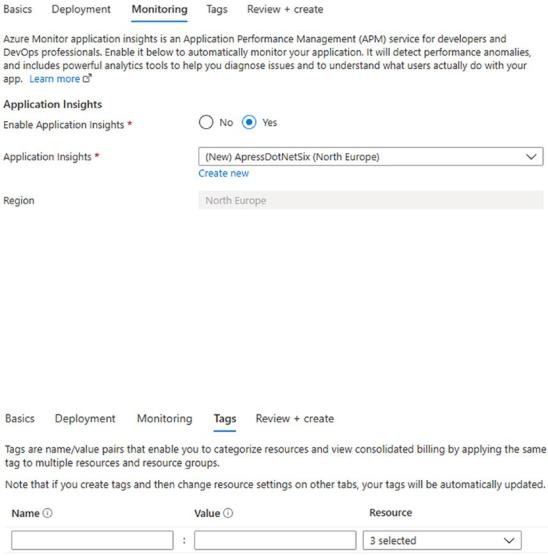
Figure 8-6. Configuring monitoring
Application Insights is another Azure service that provides extensive logging and monitoring capabilities. Enabling it here will provide error and crash logging; for further logging, you will need to add the Application Insights SDK to your project.
The final step in the wizard allows for tagging your resources. With these tags, you can create categories for your services to allow for easier filtering when searching through your Azure services.
Figure 8-7. Tagging the resources
Right before the Azure resource is created, you will get a final overview of all the selected options. If everything looks okay, we can click Create and Azure will work its magic.
229

Chapter 8 Microsoft Azure
Figure 8-8. Deployment status
Azure will keep you informed about the deployment status. You are free to leave this page and come back later; deployment will continue just fine.
For this demo, I have checked in the ASP.NET MVC demo project from the previous chapter. I have selected the GitHub repository and branch that point to this project. Now that Azure is creating the resource, it will also deploy our project. After a few minutes, we get the result shown in Figure 8-9.
Figure 8-9. Deployment complete
To summarize, the following things just happened. Azure created an App Service instance to host our .NET 6 web application. Azure also generated a YAML file for a GitHub Build/Deploy pipeline. GitHub Actions compiled our application and deployed it to the newly generated Azure App Service. From now on, whenever new changes are committed to the main branch of the GitHub repository, the GitHub Action will compile and deploy a new version.
On the portal side of things, we get a dashboard with some analytics, if we kept Application Insights enabled.
230
Chapter 8 Microsoft Azure
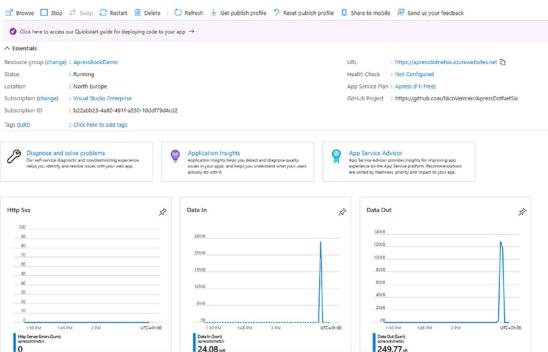
Figure 8-10. Dashboard on the Azure portal
From here we can stop, start, or restart our application server, look into our application logs, change the configuration, change service plans, and so on.
We can also download a publish profile that we can import in Visual Studio to deploy directly from the IDE to the cloud. The publish profile is a configuration file that we
can import in Visual Studio from the Deploy option that we will use in a minute. In the Deploy wizard, we can either create a new publish profile or import a downloaded one.
To summarize, we have created an Azure App Service instance to host our .NET 6-based web application. We deploy this code directly from GitHub using its built-in CI/ CD pipeline (more about CI/CD in the architecture chapter). Deploying directly from GitHub is optional; we can deploy directly from Visual Studio using publishing profiles or connect to Azure using the Visual Studio right-click on a project publish tooling. In the publish wizard, we select publish to Azure and an Azure App Service.
231

Chapter 8 Microsoft Azure
Figure 8-11. Deploying to Azure from Visual Studio
When publishing from within Visual Studio, we can login with our Microsoft account that has an Azure subscription attached to it. After authenticating, we can publish directly to an existing resource or create a new one. The publish wizard allows for filtering on resource type to easily find the existing resource you want to publish to. Finishing this wizard will generate a publish profile in the form of a pubxml file. This publishing profile serves the same purpose as the one you can download from the Azure portal, but it is in a different format. The publishing profile from the portal contains three nodes for three different publishing methods, zip deploy, web deploy, and FTP upload. Listings 8-1 and 8-2 compare both publishing profiles. I have removed two of the three publishing methods from the publishing profile from the portal for brevity.
232
Chapter 8 Microsoft Azure
Listing 8-1. Publishing profile from Azure portal
<?xml version="1.0" encoding="UTF-8"?> <publishData>
<publishProfile
profileName="ApressDotNetSix - Web Deploy" publishMethod="MSDeploy" publishUrl="apressdotnetsix.scm.azurewebsites.net:443" msdeploySite="ApressDotNetSix" userName="$ApressDotNetSix"
userPWD="***"
destinationAppUrl="http://apressdotnetsix.azurewebsites.net"
SQLServerDBConnectionString=""
mySQLDBConnectionString=""
hostingProviderForumLink=""
controlPanelLink="http://windows.azure.com"
webSystem="WebSites"> <databases />
</publishProfile>
</publishData>
Listing 8-2. Publishing profile from Visual Studio
<Project ToolsVersion="4.0" xmlns="http://schemas.microsoft.com/developer/ msbuild/2003">
<PropertyGroup>
<WebPublishMethod>MSDeploy</WebPublishMethod>
<ResourceId>/subscriptions/**/ApressDotNetSix</ResourceId>
<ResourceGroup>ApressBookDemo</ResourceGroup>
<PublishProvider>AzureWebSite</PublishProvider>
<LastUsedBuildConfiguration>Release</LastUsedBuildConfiguration> <LastUsedPlatform>Any CPU</LastUsedPlatform> <SiteUrlToLaunchAfterPublish>http://apressdotnetsix.azurewebsites.net </SiteUrlToLaunchAfterPublish> <LaunchSiteAfterPublish>True</LaunchSiteAfterPublish> <ExcludeApp_Data>False</ExcludeApp_Data> <ProjectGuid>cab9ed7b-f056-4849-98aa-db947b3cd09e</ProjectGuid>
233