


Chapter 4 Desktop Development
HorizontalAlignment="Stretch"
VerticalAlignment="Top" Content="Details" />
<Button
Grid.Row="2"
Grid.Column="1"
Margin="10"
HorizontalAlignment="Stretch"
VerticalAlignment="Bottom" Content="Delete Product" />
</Grid>
Looking at the rowdefinitions, you will notice three rows. The top two have height set to Auto; the third one takes on all available space. This combined with the correct VerticalAlignments and some margins results in exactly the layout we want, including responsiveness. A small extra performance optimalization could be to give the top two rows an absolute value. Those rows exist solely to contain one button each; if there is absolutely no reason for the buttons to grow in height, we can set the row height to a fixed value so that the layout cycle doesn’t need to calculate the height.
Visual Tree
The WPF designer includes some tools to speed up the process of developing a
UI. Figure 4-27 shows the toolbar in the title bar of a WPF application running in debug.
Figure 4-27. Visual Tree toolbar
Much like the DOM in HTML, WPF builds a visual tree of elements that are created in a window. That visual tree can be inspected and even adjusted at runtime.
Listing 4-18 shows a generic method that can be used to find ancestors of a certain type; these methods will traverse the visual tree in search for the specific type.
103
Chapter 4 Desktop Development
Listing 4-18. Finding a parent in the visual tree
public static T FindParentOfType<T>(this DependencyObject element) where T : DependencyObject
{
DependencyObject parentElement = element; do
{
parentElement = VisualTreeHelper.GetParent(parentElement); T parent = parentElement as T;
if (parent != null)
{
return parent;
}
}while (parentElement != null); return null;
}
This example uses the VisualTreeHelper to traverse the visual tree in search for a specific type. Being able to inspect and traverse the visual tree from code gives us a great flexibility. No matter what control or part of the UI we are in, we can always find specific control instances. This allows us to create dynamic views where classic databinding, where you need to know everything up front, would not suffice.
Back to the toolbar, the Select Element on the toolbar allows us to select an element in the running application and inspect its runtime values, much like the developer tools in a browser. First select the Select Element button on the toolbar, select an element
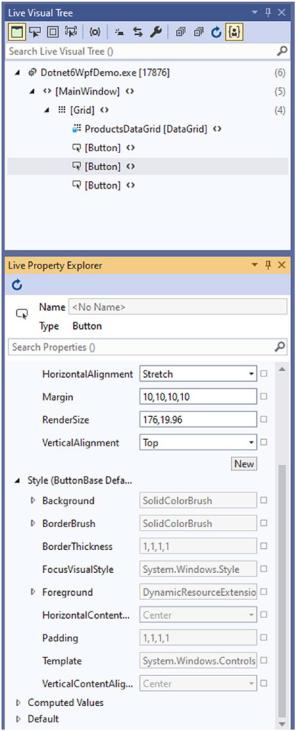
in the running application, and switch back to Visual Studio. In Visual Studio is a Live Visual Tree pane; it might be collapsed by default. If you can’t find it, use the Search box in the title bar to search for Live Visual Tree. In the Live Visual Tree pane, we can see the actual current visual tree. Right-clicking an element and selecting Show Properties will open the Live Property Explorer pane showing the properties of the selected element. The properties that are not calculated by WPF can be changed here and will impact the running application. Do note that your changes here will not automatically reflect in your XAML code. These are great tools to find the exact values you need, or debugging a visual issue while running your application, but it is not a real-time editor.
104
Chapter 4 Desktop Development
Figure 4-28. Inspecting the visual tree
105
Chapter 4 Desktop Development
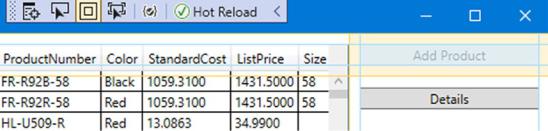
We can even use the toolbar to show us the layout adorners like margins and paddings of a selected element, as demonstrated in Figure 4-29. By toggling the layout adorners, we can inspect the margins and paddings of selected elements, again very similar to what you might be used to from browser developer tools.
Figure 4-29. Layout adorners for the selected button
The Hot Reload check in the toolbar shows that we can edit our XAML and save it, and the changes will be reflected in the running application without restarting it. We will dive deeper into Hot Reload later in this chapter.
Data Binding
One of the greatest strengths of XAML is its binding framework. XAML bindings allow us to bind UI properties to C# properties so that the UI updates whenever the property changes, or vice versa. In the example, we’ve been using so far the items in the datagrid loaded in a WinForms style of working, as demonstrated in Listing 4-19.
Listing 4-19. Loading the datagrid
public partial class MainWindow : Window
{
private List<Product> _products;
public MainWindow()
{
InitializeComponent(); Loaded += OnLoaded;
}
106
Chapter 4 Desktop Development
private async void OnLoaded(object sender, RoutedEventArgs e)
{
AdventureWorksContext ctx = new();
_ products = await ctx.Products.ToListAsync(); ProductsDataGrid.ItemsSource = _products;
}
private void AddProductButton_Click(object sender, EventArgs e)
{
_products.Add(new Product());
}
}
While this does work, it does not use any binding. Converting this is as simple as turning the private field into a public property and remove setting the itemssource manually.
Listing 4-20. Ready for binding
public partial class MainWindow : Window
{
public List<Product> Products { get; set; }
public MainWindow()
{
InitializeComponent(); DataContext = this; Loaded += OnLoaded;
}
private async void OnLoaded(object sender, RoutedEventArgs e)
{
AdventureWorksContext ctx = new();
Products = await ctx.Products.ToListAsync();
}
107
Chapter 4 Desktop Development
private void AddProductButton_Click(object sender, EventArgs e)
{
Products.Add(new Product());
}
}
A very important line that has snuck in here is DataContext = this. This line tells the binding framework in what instance it can resolve its bindings; in this case, we set it to the code behind of the window. Now we just need to set the binding statement in the datagrid.
Listing 4-21. Setting a binding in XAML
<DataGrid
x:Name="ProductsDataGrid"
Grid.Row="0"
Grid.RowSpan="3" ItemsSource="{Binding Products}" Grid.Column="0" Margin="10,10,0,10" />
That should do it! However, when we run the application, you’ll notice that the datagrid is still empty. Did we miss something? Are bindings broken in .NET 6? Do not worry; this is a result of the order in which things are happening and a result of the fact that we aren’t notifying the UI of a change yet.
The binding framework is not constantly monitoring its bound properties for changes; this would really tear down any performance. Instead, it listens to property changed events coming from its datacontext. To fire these events, we need to implement the INotifyPropertyChanged interface. Listing 4-22 shows the changes to make it work.
Listing 4-22. Implementing INotifyPropertyChanged
public partial class MainWindow : Window, INotifyPropertyChanged
{
private List<Product> _products;
//INotifyPropertyChanged member
public event PropertyChangedEventHandler PropertyChanged;
108