- •Contents
- •Foreword
- •1.1.1 Haemostasis
- •1.1.2 Inflammatory Phase
- •1.1.3 Proliferative Phase
- •1.1.4 Remodelling and Resolution
- •1.7 The Surgeon’s Preoperative Checklist
- •1.8 Operative Note
- •2.4.1 Local Risks
- •2.4.2 Systemic Risks
- •2.5 Basic Oral Anaesthesia Techniques
- •2.5.1 Buccal Infiltration Anaesthetic
- •2.5.2 Mandibular Teeth
- •2.5.2.1 Conventional ‘Open-Mouth’ Technique
- •2.5.2.2 Akinosi ‘Closed-Mouth’ Technique
- •2.5.2.3 Gow–Gates Technique
- •2.5.2.4 Mandibular Long Buccal Block
- •2.5.2.5 Mental Nerve Block
- •2.5.3 Maxillary Teeth
- •2.5.3.1 Greater Palatine Block
- •2.5.3.2 Palatal Infiltration
- •2.5.3.3 Nasopalatine Nerve Block
- •2.5.3.4 Posterior Superior Alveolar Nerve Block
- •2.6 Adjunct Methods of Local Anaesthesia
- •2.6.1 Intraligamentary Injection
- •2.6.2 Intrapulpal Injection
- •2.7 Troubleshooting
- •3.1 Retractors
- •3.2 Elevators, Luxators, and Periotomes
- •3.3 Dental Extraction Forceps
- •3.4 Ancillary Soft Tissue Instruments
- •3.5 Suturing Instruments
- •3.6 Surgical Suction
- •3.7 Surgical Handpiece and Bur
- •3.8 Surgical Irrigation Systems
- •3.9 Mouth Props
- •4.1 Maxillary Incisors
- •4.2 Maxillary Canines
- •4.3 Maxillary Premolars
- •4.4 Maxillary First and Second Molars
- •4.5 Mandibular Incisors
- •4.6 Mandibular Canines and Premolars
- •4.7 Mandibular Molars
- •5.3 Common Soft Tissue Flaps for Dental Extraction
- •5.4 Bone Removal
- •5.5 Tooth Sectioning
- •5.6 Cleanup and Closure
- •6.2 Damage to Adjacent Teeth or Restorations
- •7.4.1.1 Erupted
- •7.4.1.2 Unerupted/Partially Erupted
- •7.4.2 Mandibular Third Molars
- •7.4.2.1 Mesioangular
- •7.4.2.2 Distoangular/Vertical
- •7.4.2.3 Horizontal
- •7.4.2.4 Full Bony Impaction (Early Root Development)
- •8.1 Ischaemic Cardiovascular Disease
- •8.5 Diabetes Mellitus
- •8.6.1 Bleeding Diatheses
- •8.6.2 Medications
- •8.6.2.1 Management of Antiplatelet Agents Prior to Dentoalveolar Surgery
- •8.6.2.2 Management of Patients Taking Warfarin Prior to Dentoalveolar Surgery
- •8.6.2.3 Management of Patients Taking Direct Anticoagulant Agents Prior to Dentoalveolar Surgery
- •8.8 The Irradiated Patient
- •8.8.1 Management of the Patient with a History of Head and Neck Radiotherapy
- •9.5.1 Alveolar Osteitis
- •9.5.2 Acute Facial Abscess
- •9.5.3 Postoperative Haemorrhage
- •9.5.4 Temporomandibular Joint Disorder
- •9.5.5 Epulis Granulomatosa
- •9.5.6 Nerve Injury
- •B.1.3 Consent
- •B.1.4 Local Anaesthetic
- •B.1.5 Use of Sedation
- •B.1.6 Extraction Technique
- •B.1.7 Outcomes Following Extraction
- •B.2.1 Deciduous Incisors and Canines
- •B.2.2 Deciduous Molars
- •Bibliography
- •Index

7.4 Surgica Approac h t Thir d Mola 93
molars, as the maxillary bone is soft and usually thin around the tooth crown. If a small amount of bone removal is required, it should be sufficient to provide an application point on the mesiobuccal aspect between crown and alveolus. A curved elevator (e.g. a Warwick-James or Cryer) is used to elevate the tooth in a distobuccal direction and deliver the crown and roots. As with all surgical extractions, the socket should be irrigated and checked for debris and alveolar integrity, and the flap repositioned and sutured.
7.4.2 Mandibular Third Molars
The approach will vary significantly depending on the type and depth of impaction. This section provides a basic approach to each type of impaction, but it must be acknowledged that due to the great variability in presentations of mandibular third molar teeth, a number of different approaches are valid in each case; the choice should be based upon clinician preference and experience.
7.4.2.1 Mesioangular
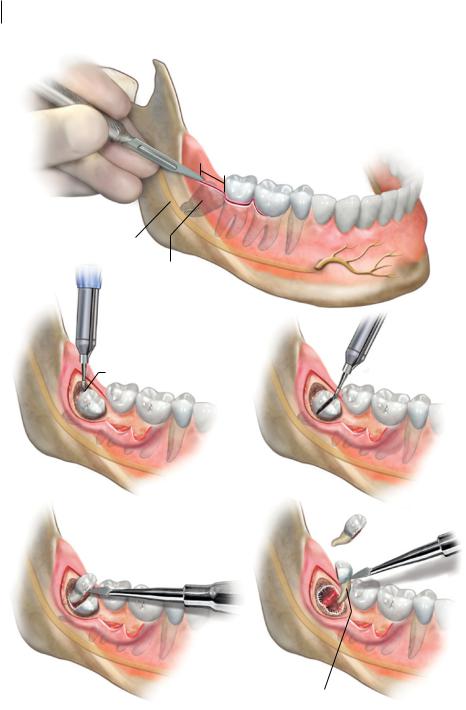
1)Soft Tissue Access. Raise an envelope flap from the absolute distal of the second molar, extending to the mid-buccal gingival margin of the first molar. A small distal relieving incision, including any partly erupted component of the third molar, lengthens this incision approximately 5 mm along the external alveolar ridge. If it is predicted that extensive bone removal is required, a mesial reliving incision or triangular flap should be considered. Elevate the flap gently using a periosteal elevator to expose the underlying crown and alveolus. Once the flap has been mobilised, retract and protect it with an appropriate retractor (e.g. a Minnesota retractor).
2)Bone Removal. Identify the bony margin between the alveolus and the crown of the third molar. Gently drill a buccal ‘gutter’ along the mesiobuccal to distobuccal surfaces of the crown, deep enough to expose the cementoenamel junction of the tooth. Sufficient bone should be removed as far distal as possible along the crown of the third molar at the ascending ramus, as this is the main point of bony impaction.
3)Tooth Sectioning. Perform an axial section, as far along the length of the root as possible, to separate the mesial and distal halves of the tooth. If the tooth has two roots, mesial and distal, the aim of this section is to separate them at the furcation. In single-rooted third molars, the aim is to remove as much of the distal part of the crown as possible, in order to create space for elevation. If axial sectioning is technically difficult, decoronation may be used as a first step to remove the crown and provide access to the root complex for further sectioning. Each time part of the tooth is sectioned with a drill, an elevator is used to separate and mobilise the tooth segments.
4)Delivery. Generally speaking, elevate the most distal part of the crown, with or without its attached distal root, first. Once this has been removed, access to the mesial portion of the tooth is easier, and this portion can be elevated into the resulting space. If there are root fragments remaining in the socket, remove these last.
5)Cleanup and Closure. Assess the tooth root to ensure it has been removed complete. Flush the socket with saline to remove any surgical debris. Examine the socket for bleeding, alveolar bone fracture, or soft tissue trauma, and manage as appropriate. Finally, reposition the flap, using a suture at the distal of the 7 to reoppose this section first, followed by additional sutures on the relieving incisions as required (Figure 7.3).
7.4.2.2 Distoangular/Vertical
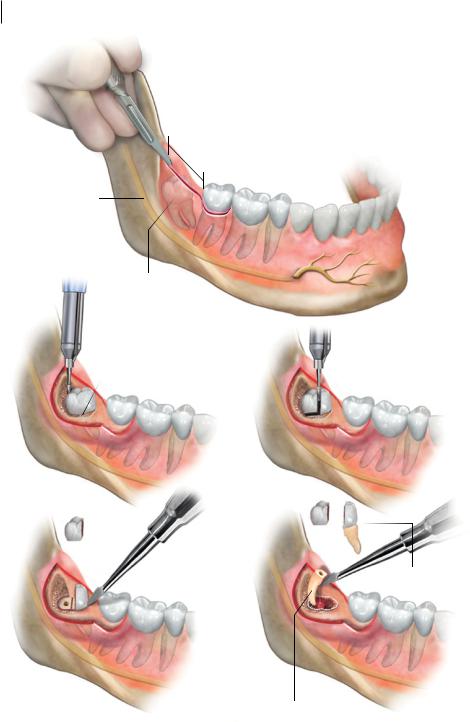
1)Soft Tissue Access. Raise an envelope flap from the distal of the second molar, extending to the papilla between the first and second molars. A large distal relieving incision approximately
https://t.me/DentalBooksWorld

94 7 Third Molar Surgery
Envelope flap with short distal relieving incision
5mm
(1)
Inferior alveolar nerve
Mesioangular lower third molar impaction
Creation of buccal trough |
|
|
Exposure of the |
Axial section of tooth |
|
cementoenamel junction |
||
|
(2) |
(3) |
Delivered distal crown and root
Elevate distal crown and root
(4) |
(5) |
Delivered mesial crown and root
Figure 7.3 Steps in the removal of a mesioangular mandibular third molar.
5–10 mm along the external alveolar ridge should be added to the envelope, including any partly erupted component of the third molar, to allow for predominant exposure of the distal crown and ascending ramus. Elevate the flap using a periosteal elevator, exposing the crown and alveolus. Retract and protect the flap with an appropriate retractor.
https://t.me/DentalBooksWorld

7.4 Surgica Approac h t Thir d Mola 95
2)Bone Removal. Identify the bony margin between the alveolus and the crown of the third molar. Gently drill a buccal ‘gutter’ along the buccal to distal surfaces of the crown, deep enough to expose the cementoenamel junction of the tooth. Most of the bone removal during a distoangular tooth extraction is on the furthest distal part of the crown, which is often difficult to access due to the ascending ramus; a large amount of bone removal is thus required to ensure success.
3)Tooth Sectioning. Axial sectioning of distoangular or vertical teeth is difficult in the context of limited access and given the length of the surgical bur. As such, removal of the distal twothirds of the crown is the first step in tooth sectioning. Do not remove whole crown at this point; leaving the mesial portion provides an application point for elevation, and maintaining some crown assists in providing anatomic reference points relative to the root.
4)Delivery. Complete the sectioning and remove the distal portion of the crown with a straight elevator. Once this has been done, elevate the remaining crown–root complex into the space, using a straight elevator wedged between the mesial edge of the third molar and the alveolus. If the tooth is multirooted, the roots may require individual sectioning prior to elevation and removal.
5)Cleanup and Closure. Assess the tooth root to ensure it has been removed complete. Flush the socket with saline to remove any surgical debris. Examine the socket for bleeding, alveolar bone fracture, or soft tissue trauma, and manage as appropriate. Finally, reposition the flap, using a suture at the distal of the 7 to reoppose this section first, followed by additional sutures on the relieving incisions as required (Figure 7.4).
Note that whilst vertically impacted mandibular third molars can sometimes be extracted using simple methods, this is often not the case, due to the limited access to the posterior mandible obtained using conventional extraction instruments. As such, whilst vertical impactions may appear technically simple on panoramic radiograph, the clinician must always be prepared to employ surgical techniques to successfully complete the extraction.
7.4.2.3 Horizontal
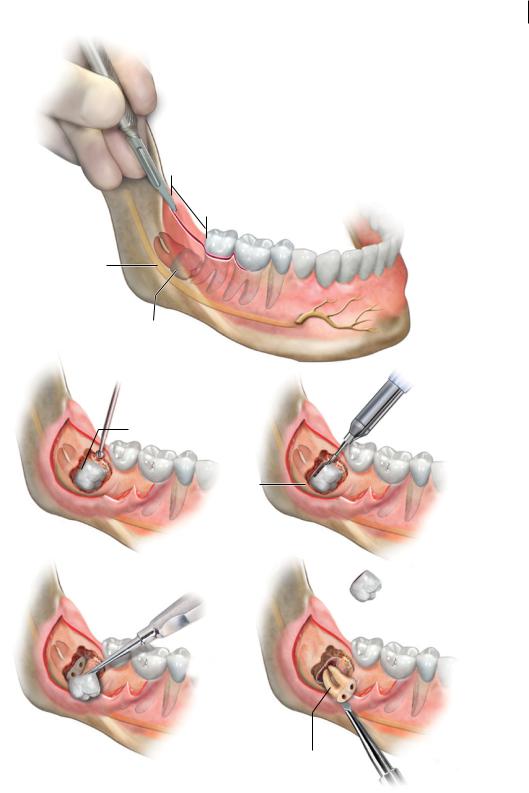
1)Soft Tissue Access. Horizontally impacted mandibular third molars require a large access, as the amount of bone removal needed to expose the crown of the tooth is significant. An envelope flap, extending to the mid-buccal area of the first molar, with an approximately 5–10 mm distal relieving incision along the external alveolar ridge, affords excellent exposure of the crown and alveolar bone.
2)Bone Removal. Use a fissure or round bur to remove alveolar bone from the superior surface of the tooth, until the cementoenamel junction has been exposed. Once this is done, continue bone removal along the buccal surface of the tooth, creating a deep buccal gutter that extends along the entire buccal-facing surface of the crown. Such extensive bone removal is necessary to provide space for luxation, as the third molar is often wedged firmly against the root of the second molar.
3)Tooth Sectioning. Almost always, decoronation at the cementoenamel junction is the best first step towards approaching a horizontally impacted third molar. Removal of the crown in one or more pieces affords visualisation and access to the root complex, which can then be addressed secondarily. However, it is important to note that the inferior alveolar nerve may lie directly underneath the crown of a horizontally impacted third molar; extreme care must thus be taken not to section completely through the tooth with the bur, as iatrogenic injury to this nerve is likely. Instead, use a bur to section through three-quarters of the total width of the tooth, and complete the section atraumatically with a large elevator (a Coupland elevator is useful for this purpose).
4)Delivery. Deliver the crown of the tooth in one or more pieces using a small elevator. Once the crown has been removed, examine the remaining root complex. Further sectioning between the roots may be required to deliver each root individually.
https://t.me/DentalBooksWorld

96 7 Third Molar Surgery
5 – 1 0mm
Envelope flap with large distal relieving incision
Inferior alveolar nerve
(1)
Distoangular lower third molar impaction
Creation of buccal trough
Sectioning of distal Exposure of the two-thirds of crown cementoenamel junction
(2) |
(3) |
Distal crown removed
Elevate mesial crown- |
Delivered mesial |
|
root complex |
||
crown-root complex |
||
|
(4) |
(5) |
Delivered distal root
Figure 7.4 Steps in the removal of a distoangular mandibular third molar.
5)Cleanup and Closure. Assess the tooth root to ensure it has been removed complete. Flush the socket with saline to remove any surgical debris. Examine the socket for bleeding, alveolar bone fracture, or soft tissue trauma, and manage as appropriate. Finally, reposition the flap, using a suture at the distal of the 7 to reoppose this section first, followed by additional sutures on the relieving incisions as required (Figure 7.5).
https://t.me/DentalBooksWorld

7.4 ScPgDi u ooPe ih led hDPn Meu PA 97
– |
Envelope flap with large |
|
5 |
|
|
1 |
distal relieving incision |
|
0mm |
||
|
Inferior alveolar nerve
(1)
Horizontal lower third molar impaction
Creation of buccal trough Exposure of the cementoenamel junction
Inferior alveolar nerve
(2) |
(3) |
Final 1/4 decoronation using a large elevator
(4) |
(5) |
Delivered root complex with small elevator
3/4 decoronation
at the CEJ using a bur
Removed crown
Figure 7.5 Steps in the removal of a horizontal mandibular third molar.
https://t.me/DentalBooksWorld

98 7 Third Molar Surgery
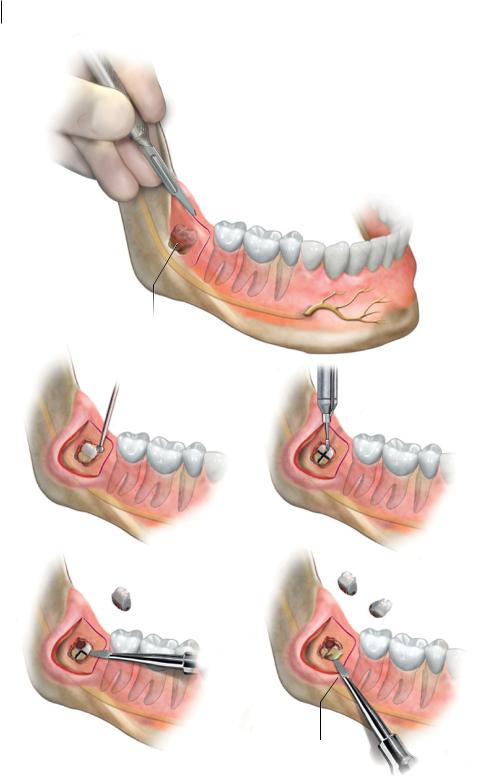
Triangular flap incision
Inferior alveolar nerve 
(1)
Full Bony Eruption lower third molar impaction
Round bur is used to shave away surface bone down to crown enamel
‘Hot cross bun’ configuration
for tooth sectioning
(2) |
(3) |
Crown sections delivered
Sections removed via small straight elevator
(4) |
(5) |
Root sections being delivered
Figure 7.6 Steps in the removal of a full bone impacted mandibular third molar.
https://t.me/DentalBooksWorld
