


4.5 Mandibula Incisor 61
6)Elevation. Use a straight elevator at the mesiobuccal line angle of the tooth. Use a wheel-and- axle motion subgingivally, to elevate between tooth and bone, and break the periodontal ligament. Only 1–2 mm of crown movement is required after elevation. Excessive elevation can cause crown or root fracture and should be avoided, as this may necessitate a switch to a surgical approach. The thumb and finger of the nondominant hand should be used to support the alveolus of the tooth being extracted, to guide the application of force to the tooth socket only, and to prevent instrument slippage.
7)Delivery. Apply the beaks of the upper molar forceps on to the cementoenamel junction of the tooth. Initially, use apical pressure to slide the beaks as deep on to the roots as possible. Employ rapid, small, figure-of-eight movements to expand the buccal bone. As upper molars may have three or four roots, care should be taken to avoid excessive movement in one direction only, until the tooth complex is mobile enough to deliver complete using a final buccal movement.
8)Assessment. Assess the tooth root to ensure it has been removed complete. Flush the socket with saline to remove any surgical debris. Examine the socket for bleeding, alveolar bone fracture, or soft tissue trauma, and manage as appropriate. If an oroantral communication is noted, this requires immediate management (see Chapter 6).
4.5Mandibular Incisors
1)Difficulty Assessment. Extraction of mandibular incisors is made simple by their singlerooted nature, relative lack of major root curvatures, and ease of access (Figure 4.5). Lower anterior teeth are a common subsite for advanced periodontal disease, due to the accumulation of calculus in this area; this can be the most common indication for extractions in the anterior mandible. Anterior mandibular bone can be unwieldy, however, and root fracture is a likely result if excessive force is placed on the tooth along an incorrect vector. Sharp luxators should be used with extreme care, as excessive force can cause slippage into the floor of the mouth, where many vital structures may be damaged, necessitating advanced surgical repair.
2)Obtain Consent. General risks of dental extraction apply for mandibular incisors. Any prosthetic rehabilitation plan for anterior teeth should be specifically included in the consent process for any tooth in the smile line.
3)Basic Equipment Required. A lower universal or lower root forceps can be used for mandibular central and lateral incisors, depending on the diameter of the tooth root. A straight elevator may be used to expand the periodontal ligament prior to extraction, but this should be approached with extreme care to avoid slippage.
4)Final Check. Confirm the tooth number and location with radiograph.
5)Local Anaesthetic. Infiltration of the buccal vestibule will provide sufficient anaesthesia for the maxillary buccal soft tissue and periodontal ligament. Localised lingual infiltration may be required to anaesthetise the lingual gingiva. For multiple anterior mandibular extractions, bilateral mental nerve blocks can be used to anaesthetise the entire anterior sextant from canine to canine, as local anaesthetic can diffuse through the mental foramen and cause profound retrograde anaesthesia.
6)Positioning. Sit the patient upright, with the mandibular teeth at the same vertical height as the surgeon’s elbow. Stand on the side of the patient that corresponds with the hand dominance of the surgeon. For example, a right-handed practitioner standing on the right side of the patient increases biomechanical advantage when removing the tooth, compared to standing on the opposite side.
https://t.me/DentalBooksWorld
62 4 Simple Extraction Techniques
Sagittal view
Lower universal forceps
|
Rapid, small |
Delivery along |
|
clockwise, |
buccolingual axis |
Initial |
counter- |
|
apical pressure |
clockwise |
|
|
rotational |
|
Cementoenamel |
movements |
|
|
|
|
junction |
|
|
Periodontal |
|
|
ligament |
|
|
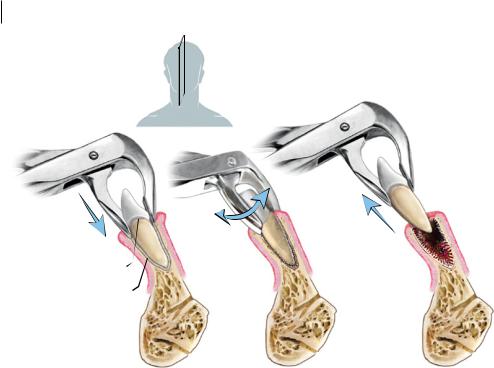
Figure 4.5 Extraction of a mandibular incisor tooth.
7)Elevation. Apply the straight elevator to the mesial and distal areas of the periodontal ligament. Using a wheel-and-axle motion, gently expand the periodontal ligament until a small amount of mobility is noted in the tooth. Take care to elevate between tooth and bone only, and not against adjacent teeth. As the cross-section of lower anterior roots is more ovoid in the buccolingual direction and narrower in the mesiodistal direction, excessive mesiodistal elevation of the tooth may cause root fracture. The thumb and finger of the nondominant hand should be used to support the alveolus of the tooth being extracted, to guide the application of force to the tooth socket only, and to prevent instrument slippage.
8)Delivery. Apply the beaks of the forceps on to the cementoenamel junction of the tooth. Initially, use apical pressure to slide the beaks as deep on to the roots as possible. Mandibular anterior soft tissues are extremely delicate, so care must be taken not to impinge them in the forceps, as large soft tissue tears may result. Since the strongest cross-sectional axis of the tooth is buccolingual, elevation and subsequent delivery of the tooth must occur along this axis to avoid root fracture.
9)Assessment. Assess the tooth root to ensure it has been removed complete. Flush the socket with saline to remove any surgical debris. Examine the socket for bleeding, alveolar bone fracture, or soft tissue trauma, and manage as appropriate.
4.6 Mandibular Canines and Premolars
1)Difficulty Assessment. As with maxillary canines, the extraction of mandibular canines can be deceptively difficult, due to their large root surface, thick buccal and lingual alveolar bone, and reduced periodontal ligament space (Figure 4.6). More often than not, a surgical approach is necessitated when little crown remains, as there is no purchase from which to grasp the tooth
https://t.me/DentalBooksWorld

4.6 ManxibiMa MaxaSr Mand aSeciMar 63
Frontal view
Lower universal forceps
Initial |
|
|
apical |
|
90° |
pressure |
|
|
|
rotation |
|
|
Rapid, small |
|
|
buccal |
|
Cementoenamel |
clockwise |
toward |
junction |
counter- |
midline |
Periodontal |
clockwise |
|
rotational |
|
|
ligament |
|
|
movements |
|
|
|
|
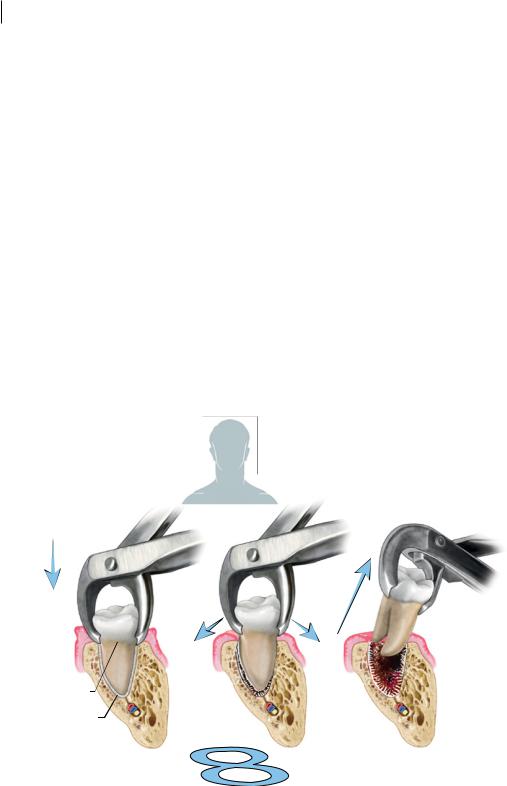
Figure 4.6 Extraction of a mandibular canine or premolar tooth.
root and apply sufficient force to deliver it from the mouth. Buccal alveolar plate fractures are very common with mandibular canine extraction and should be accounted for in difficulty assessment. Mandibular premolar teeth are similar to mandibular canines in terms of difficulty, and can be approached in the same fashion.
2)Obtain Consent. In addition to the general risks of dental extraction, patients should be specifically informed of the risk of buccal alveolar fracture, as this can be common with removal of canines, and can affect future prosthetic rehabilitation.
3)Basic Equipment Required. Lower universal forceps are well suited for removing lower canine teeth and premolars. A wide, straight elevator should be available to expand the periodontal ligament prior to forceps placement.
4)Final Check. Confirm the tooth number and location with radiograph.
5)Local Anaesthetic. Infiltration of the buccal vestibule and lingual gingiva should provide sufficient anaesthesia for the mandibular buccal soft tissue and periodontal ligament of the canine. For premolar teeth, an inferior alveolar nerve block, a lingual nerve block, and buccal infiltration are all required to produce sufficient anaesthesia for extraction.
6)Positioning. Sit the patient upright, with the mandibular teeth at the same vertical height as the surgeon’s elbow. Stand on the side of the patient where the teeth are being extracted, regardless of surgeon hand dominance. For example, lower left canines and premolars should be approached from the left side, whilst lower right canines and premolars should be approached from the right.
7)Elevation. Apply the straight elevator to the mesial and distal areas of the periodontal ligament. Using a wheel-and-axle motion, gently expand the periodontal ligament until a small amount of mobility is noted in the tooth. Take care to elevate between tooth and bone only, and not against adjacent teeth. The thumb and finger of the nondominant hand should be used to
https://t.me/DentalBooksWorld
64 4 Simple Extraction Techniques
support the alveolus of the tooth being extracted, to guide the application of force to the tooth socket only, and to prevent instrument slippage.
8)Delivery. Apply the beaks of the lower universal forceps on to the cementoenamel junction of the tooth. Initially, use apical pressure to slide the beaks as deep on to the root as possible. As the roots of lower canines and premolars are conical and usually straight, a rapid clockwise– counterclockwise rotational movement can be used to continue tearing the periodontal ligament. Finally, rotate the crown 90° to deliver the crown and root together.
9)Assessment. Assess the tooth root to ensure it has been removed complete. Flush the socket with saline to remove any surgical debris. Examine the socket for bleeding, alveolar bone fracture, or soft tissue trauma, and manage as appropriate.
4.7 Mandibular Molars
1)Difficulty Assessment. Mandibular molars can be difficult to extract using simple techniques alone (Figure 4.7). Appropriate engagement of a molar tooth with forceps is entirely dependent on the integrity of the tooth crown; deep subgingival caries are a sound indication for an early surgical approach. Molar teeth have at least two roots, but can have up to four. Roots are often divergent or may have a bridge of cancellous bone passing between them, locking the tooth in place and preventing removal. Rarely, they can be fused together, necessitating surgical sectioning and delivery of individual roots. This is further complicated by the dense and unforgiving nature of bone in the
Frontal view
Hawksbill
forceps
Initial |
|
|
apical |
Final buccal |
|
pressure |
||
tilting movement |
||
|
||
|
and delivery |
Cementoenamel |
|
|
|
junction |
First; |
Second; |
|
Periodontal |
|||
rapid, small, |
buccolingual |
||
ligament |
|||
figure-of eight |
tilting |
||
|
|||
|
movements |
movements |
Figure 4.7 Extraction of a mandibular molar tooth.
https://t.me/DentalBooksWorld

4.7 Mandibula r Mola 65
posterior mandible, the potential presence of lingual tori, and the limited access to posterior areas by buccal soft tissues. The most common problem encountered during extraction of mandibular teeth is a low root tip fracture, which can be very difficult to salvage. The proximity of mandibular molar roots to the inferior alveolar nerve canal should be assessed radiographically, as any attempts to extract root tips without due care may cause displacement into the inferior alveolar nerve canal.
2)Obtain Consent. General risks of dental extraction apply for mandibular molars. Additionally, the patient should be informed of the risk of temporary or permanent paraesthesia following extraction.
3)Basic Equipment Required. Two forceps options are available for removal of lower molar teeth. Hawksbill forceps are designed to engage a large portion of the circumference of the cementoenamel junction, like other forceps, allowing maximum rotational forces to be applied favourably. They are useful when the crown of a molar tooth is intact, but tend to fail and cause root fracture if there is crown compromise. Cowhorn forceps engage the furcation of the tooth only; whilst this increases the likelihood of crown fracture, this fracture tends to propagate between the roots and effectively sections the mesial and distal portions of the tooth. These forceps also allow for subgingival engagement in situations where there is extensive crown decay. A wide, straight elevator should be available to expand the periodontal ligament prior to forceps placement.
4)Final Check. Confirm the tooth number and location with radiograph.
5)Local Anaesthetic. Inferior alveolar nerve block, lingual nerve block, and buccal infiltration are all required to produce sufficient anaesthesia for extraction.
6)Positioning. Sit the patient upright, with the mandibular teeth at the same vertical height as the surgeon’s elbow. For the right-handed surgeon, removal of right mandibular molars is best approached standing behind the patient, to maximise mechanical advantage, whilst left mandibular molars are best removed standing on the patient’s left. The opposite holds for the lefthanded surgeon: stand behind the patient when extracting left mandibular molars and on the patient’s right when extracting right mandibular molars.
7)Elevation. Apply the straight elevator to the mesial and distal areas of the periodontal ligament. Using a wheel-and-axle motion, gently expand the periodontal ligament until a small amount of mobility is noted in the tooth. Take care to elevate between tooth and bone only, and not against adjacent teeth. The thumb and finger of the nondominant hand should be used to support the alveolus of the tooth being extracted, to guide the application of force to the tooth socket only, and to prevent instrument slippage.
8)Delivery. When using hawksbill forceps, apply the instrument to the cementeoenamel junction of the tooth, in a position that maximises contact between the tooth and the beaks. Employ rapid, small, figure-of-eight movements to expand the buccal bone, followed by buccolingual tilting movements to mobilise the tooth. Once the tooth complex is mobile enough to deliver complete, use a final buccal tilting movement. With cowhorn forceps, again apply the instrument to the cementeoenamel junction, engaging the furcation between the mesial and distal root structures. Use a crushing force initially, to wedge the cowhorn beaks into the furcation of the tooth causing the tooth to dislodge and to become easy to deliver using a buccal tilting movement. Rather than delivering the tooth, this crushing force may instead cause a favourable fracture of the crown between the mesial and distal roots; this allows each half of the tooth – each now a separate crown–root complex – to be delivered separately using lower universal forceps, as if it were a single-rooted tooth.
9)Assessment. Assess the tooth root to ensure it has been removed complete. Flush the socket with saline to remove any surgical debris. Examine the socket for bleeding, alveolar bone fracture, or soft tissue trauma, and manage as appropriate.
https://t.me/DentalBooksWorld
https://t.me/DentalBooksWorld
67
5
Surgical Extraction Techniques
In certain clinical situations, use of simple extraction instruments is insufficient to deliver an entire tooth and its roots in a safe and uncomplicated manner. Attempts to remove such teeth using simple methods only can be time-consuming and inefficient, and can expose the patient to undue risk or discomfort. In these situations, a surgical approach to tooth extraction is indicated. This chapter introduces the basic techniques of surgical extraction.
Historically, the terms ‘intra-alveolar’ and ‘transalveolar’ were used to differentiate extractions that could be performed with forceps alone from extractions that required advanced surgical techniques such as flap raising, bone removal, and tooth sectioning. Over time, these terms have become less representative of extraction difficulty or techniques required. This is largely due to the development of atraumatic extraction techniques for dental implant placement, where extractions are performed within the intra-alveolar structures, but use the same advanced surgical techniques of traditional trans-alveolar extraction. This terminology has thus now largely been replaced with ‘simple extraction’ and ‘surgical extraction’, respectively, as this better represents the kinds of presurgical planning required for tooth removal.
The distinction between ‘simple’ and ‘surgical’ dental extractions is still somewhat difficult to define. From a technical perspective, surgery by nature involves the manipulation of tissues of the body; as such, extraction of teeth with forceps and luxators is still within the realm of dentoalveolar ‘surgery’. Furthermore, use of the descriptive term ‘simple’ has been misconstrued to be synonymous with ‘low in difficulty’ – this, in fact, is not necessarily the case. Finally, it is not uncommon that a dental extraction procedure that is planned as a ‘simple’ extraction needs to be converted to a ‘surgical’ extraction due to intraoperative complications or unexpected difficulties that inhibit completion of the procedure.
In pragmatic terms, a ‘surgical extraction’ implies the use of additional surgical methods to successfully complete dental extraction, including soft tissue manipulation and flap raising, removal of bone, and sectioning of teeth using a rotary instrument (Table 5.1). Situations where a surgical extraction is indicated include (Table 5.2):
●●Preoperatively, where, in the difficulty assessment stage, it is determined that use of luxators and dental extraction forceps alone will be insufficient to safely and completely remove the tooth.
●●Intraoperatively, where:
––either the whole tooth or part of the tooth is unable to be removed with simple methods alone (‘failed extraction’);
Principles of Dentoalveolar Extractions, First Edition. Seth Delpachitra, Anton Sklavos and Ricky Kumar. © 2021 John Wiley & Sons Ltd. Published 2021 by John Wiley & Sons Ltd.
Companion website: www.wiley.com/go/delpachitradentoalveolarextractions
https://t.me/DentalBooksWorld

68 5 Surgical Extraction Techniques
Table 5.1 General steps in surgical extraction.
1) Obtain appropriate anaesthesia.
2) Raise mucoperiosteal flap.
3) Remove bone.
4) Section tooth.
5) Create point of elevation, if required.
6) Elevate roots.
7) Debride socket.
8) Achieve haemostasis and suture surgical site.
Table 5.2 Situations where surgical extraction methods may be required.
History of difficult extraction
Large body habitus
History of failed extraction
Structural issues with the tooth from caries or previous root canal therapy
Complex roots
Bulbous roots
Hypercementosis
Clinical suspicion of ankylosis or dense alveolar bone
––excessive damage is occurring to the surrounding hard and soft tissues due to the level of force required to remove the tooth using simple extraction instruments; or
––the time taken to remove the tooth is greater than expected or the patient is experiencing significant discomfort.
5.1 General Principles of Surgical Extraction
A number of key principles must be followed when planning a surgical extraction:
1)Appreciate the Anatomy of Maxillofacial Neurovascular Structures. The clinical decision to manipulate the hard and soft tissues of the oral cavity can significantly increase the risk associated with an oral procedure. During ‘simple’ extractions, there are no vital structures that are likely to be encountered in the routine removal of a tooth from the oral cavity. When soft tissues are cut or elevated, however, care must be taken to reduce the risk of stretching or transecting neurovascular bundles in the vicinity of the surgical site. Arterial vessels abound and have a highly unpredictable course within the face, and failure to account for their location, or to stay in the appropriate tissue plane, can lead to significant blood loss. Using surgical burs to drill bone without a clear estimation of its structural integrity or that of its surrounding structures can lead to unexpected nerve injury, oroantral communication, or intraoperative bony fracture.
2)Understand the Principles of Soft Tissue Flap Design. The key one being access: the success or failure of a procedure, and its difficulty, can be entirely dependent on the soft tissue flap used. The specific design of the flap is of less importance than the principles on which it is based – principles that support sufficient access, minimal soft tissue handling and inadvertent trauma, and neat, tension-free apposition of the flap at the conclusion of surgical extraction.
https://t.me/DentalBooksWorld

5.2 Practical Aspect of Surgical Extractio 69
3)Use the Correct Burs and Instruments. The traditional dental handpieces and instruments are not sufficient to perform surgical extraction. Purpose-designed instruments are required for safe and careful soft tissue manipulation and dissection, as outlined in Chapter 3. Similarly, traditional highand slow-speed handpieces attached to a pneumatic dental setup are not suitable for surgical procedures and may cause serious injury to the patient.
4)Recognise the Indication for Surgical Extraction. In order to perform successful surgical extraction, it may be prudent to ask: ‘Why could this tooth not be removed using simple extraction techniques?’ The answer to this question will always provide the framework through which a surgical approach can be planned. For example, awareness that a tooth cannot be removed due to impaction in bone prepares the practitioner to use a soft tissue flap and bone removal techniques to access it for extraction. Similarly, noting preoperatively the presence of splayed roots without a clear vector for extraction informs the practitioner that sectioning of the roots may be required.
5)Manage the Outcomes of Surgical Extraction. Surgery, by its nature, implies an increased manipulation of the tissues in order to achieve the desired outcome. Manipulation of soft tissues through flap raising at the start of a procedure should be followed by adequate approximation of the same tissues at the end of the procedure. Failure to do so can result in persistent haemorrhage from the surgical site, large wound dehiscences, infections, and a poor postoperative result.
5.2 Practical Aspects of Surgical Extraction
Mucoperiosteal flaps involve elevation of the ‘full thickness’ of oral tissues abutting the maxilla and mandible. All tissues (mucosa, submucosa, muscle, periosteum) are raised in a single layer, following the cleavage plane formed between bone and periosteum. This form of soft tissue flap, whilst not the only type, is the most common, safe, and versatile method of accessing the hard tissues for completion of surgical extractions.
A well-designed soft tissue flap can provide excellent access for immediate bone removal and tooth sectioning during dentoalveolar surgical procedures. However, a poorly designed one – not following proper principles – can lead to increased difficulty of dental extraction in the short term and, more importantly, significant damage to the periodontium and gingiva over the long term. Flap necrosis and gingival recession can be a costly and difficult problem to correct as a result of poor soft tissue management.
1)Use as Large an Incision as Necessary. The key principle of flap design is to provide access to the relevant underlying structures. In situations where it may be reasonably expected that more access will be required, the flap should be designed to allow for this.
2)Provide a Broad Soft Tissue ‘Base’ to Maintain Tissue Vascularity to the Tip of the Flap and Ensure the Width of the Flap is Twice as Long as Its Height. Flaps with a narrower pedicle may undergo avascular necrosis at the crestal areas, resulting in large periodontal defects.
3)Place the Incision Over Sound Bone Without Bony Prominences. Bony prominences create tension at wound edges, which may promote wound breakdown and dehiscence.
4)Avoid Placing the Incision Directly Over an Area that May Be a Bony Defect By the End of the Procedure. It is not uncommon that a large defect will exist at the end of bone removal and dental extraction. Flaps heal poorly if the wound edges are not against a stable bony surface, due to increased tension at the suture site causing localised ischaemia.
https://t.me/DentalBooksWorld