

Listing 7.12: Output of the debug IP packet command on Raul.
ip: s=192.168.30.30, d=192.168.50.50, len 100, rcvd 4 ip: s=192.168.50.50, d=192.168.30.30, len 100, sending
!
ip: s=192.168.30.30, d=192.168.50.50, len 100, rcvd 4 ip: s=192.168.50.50, d=192.168.30.30, len 100, sending
!
ip: s=192.168.30.30, d=192.168.50.50, len 100, rcvd 4 ip: s=192.168.50.50, d=192.168.30.30, len 100, sending
!
ip: s=192.168.30.30, d=192.168.50.50, len 100, rcvd 4 ip: s=192.168.50.50, d=192.168.30.30, len 100, sending
Another troubleshooting command to issue is the show IP access−lists command, which will display each access list configured on the router; if the optional log parameter is specified in the configuration of the access list, the show IP access−lists command will display the number of matches the access list has encountered. Issuing the show IP access−lists command on Raul displays the number of packets that have matched access list 101:
Raul#sh access−lists Extended ip access list 101
permit ip host 192.168.30.0 host 192.168.50.0 log (13222 matches)
permit ip host 192.168.20.0 host 192.168.40.0 log
Configuring Extended TCP Access Lists
In the preceding section, you learned how to configure IP−specific access lists. The Cisco IOS also gives security administrators the ability to configure extended access lists using more specific protocol−dependent options for filtering packets; for example, you can configure TCP access lists. The steps for configuring extended TCP access lists are the same as the steps for configuring extended IP access lists with the exception of the additional parameters that TCP extended access lists permit:
1. Use the following command to define the extended TCP access list:
access−list <access−list−number> <deny | permit> tcp − <source source−wildcard> <operator port> <destination − destination−wildcard> <operator port> <established> − <precedence precedence−value> <tos tos−value> <log>
2. Use this command to select the input interface under which the access list will be applied:
interface <interface name> <interface number>
3. Use the following command to apply the access list to the interface:
ip access−group <access−list−number> <in | out>
In the command in Step 1, the operator parameter specifies a condition of qualifications for packets that match the source and destination of the access list. The possible values for the operator include less than (lt), greater than (gt), equal (eq), not equal (nq), and an inclusive range (range). The port parameter specifies a number from 0 to 65535 or a name that represents a TCP port number. The established parameter is TCP−specific and indicates an established session if the TCP packet has the ACK or RST bit set. The established option should be used if you have implemented an inbound access list to prevent TCP sessions from being established into your
247
network, but you must ensure that the access list will allow legitimate response packets back to your inside hosts from hosts with which the inside network users have attempted to establish a session.
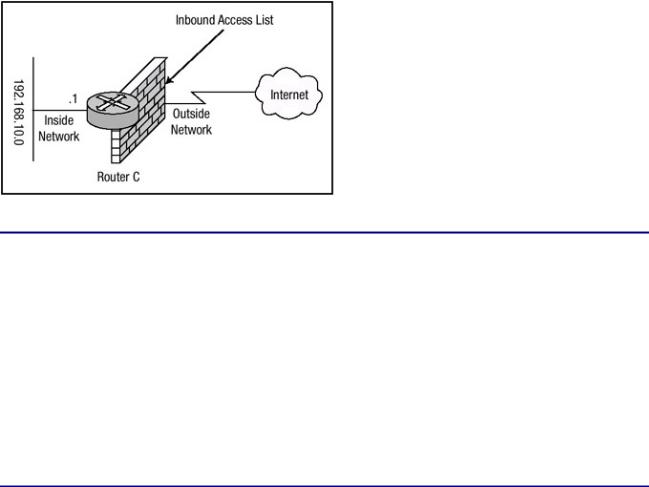
The simple network that is shown in Figure 7.6 will be used in this example. Router C should be configured to deny all inbound connection requests to the 192.168.10.0 network. However, it should also be configured to allow responses to connection requests that were initiated from the inside network to pass through the access list. Listing 7.13 shows the configuration of Router C to accomplish this.
Figure 7.6: TCP access list for Router C.
Listing 7.13: TCP established configuration of Router C.
hostname Router−C
!
interface FastEthernet0/0
ip address 192.168.10.1 255.255.255.0 no ip directed−broadcast
!
interface Serial/0
ip address 172.16.200.1 255.255.255.0 ip access−group 101 in
no ip directed−broadcast
!
ip route 0.0.0.0 0.0.0.0 172.116.200.2
!
access−list 101 permit tcp any 192.168.10.0 0.0.0.255 − established log
access−list 101 deny ip any any log
In Listing 7.13. Router C is configured to permit packets regardless of the source address if the packets' destination is in the 192.168.40.0 subnet and the ACK or RST bit is set within the packet. The next line of the configuration is not needed due to the implicit deny any, but it is included so that any packet that fails to meet the requirements of the first access list statement can be logged. Of note also is that the access list is bounded to the external Serial interface of Router C for packets that are incoming on that interface.
To test the configuration, you can establish a Telnet session from a host on the 192.168.10.0 network to a host on the external network of Router C. On Router C, use the debug IP packet detail command to monitor packets that are coming into or leaving Router C. Here is the Telnet request from 192.168.10.212:
C:\>telnet 172.16.146.73
Connecting to 172.16.146.73...open
248

Examining the debug output on Router C, you can see that the request is considered valid because the flag fields the access list is configured to look for are set. Listing 7.14 shows the output of the debug command on Router C.
Listing 7.14: Established TCP connection output.
Router−C#debug ip packet detail
ip packet debugging is on (detailed)
.....
ip: s=192.168.10.212, d=172.16.146.73, len 44, sending
TCP src=11001, dst=23, seq=1697250670, ack=0, win=4128 SYN IP: s=172.16.146.73, d=192.168.10.212, len 44, rcvd 4
TCP src=23, dst=11001, seq=1724867633, ack=1697250671, − win=4128 ACK SYN
!
ip: s=192.168.10.212, d=172.16.146.73, len 40, sending TCP src=11001, dst=23, seq=1697250671, ack=1724867634, − win=4128 ACK
!
ip: s=192.168.10.212, d=172.16.146.73, len 52, sending TCP src=11001, dst=23, seq=1697250671, ack=1724867634, − win=4128 ACK PSH
!
ip: s=192.168.10.212, d=172.16.146.73, len 40, sending TCP src=11001, dst=23, seq=1697250683, ack=1724867634, − win=4128 ACK
!
IP: s=172.16.146.73, d=192.168.10.212, len 52, rcvd 4 TCP src=23, dst=11001, seq=1724867634, ack=1697250671, − win=4128 ACK PSH
!
ip: s=192.168.10.212, d=172.16.146.73, len 43, sending TCP src=11001, dst=23, seq=1697250683, ack=1724867646, − win=4116 ACK PSH
!
Note Because of the format limitations of this book, some lines of the code in Listing 7.14 have been broken with a hyphen.
The highlighted lines display that the ACK or RST bit is set on the packets from 172.16.146.73 to 192.168.10.212. The initial TCP access list configuration defined the log parameter to the end of the access list. The following example shows the output from the log parameter, which generates an informational log message regarding any packet that matches the parameters of the extended TCP access list. Notice that the response packets from 172.16.146.73 match all parameters of access list 101, and is therefore, permitted:
%SEC−6−IPACCESSLOGP: list 101 permitted tcp 172.16.146.73(23)−> − 192.168.10.212(11001), 1 packet
!
%SEC−6−IPACCESSLOGP: list 101 permitted tcp 172.16.146.73(23)−> − 192.168.10.212(11001), 24 packets
Note Because of the format limitations of this book, some lines of code listed above have been broken with a hyphen.
The show IP access−lists command is another troubleshooting command you can issue. It will display each access list configured on the router, and because the optional log parameter was specified in the configuration of the access list, the command will display the number of matches that the access list has encountered. Issuing the show IP access−lists command on Router C
249

displays the number of packets that have matched access list 101:
Router−C#show access−lists
Extended ip access list 101
permit tcp any 192.168.10.0 0.0.0.255 established log(427 − matches)
deny ip any any log(11924 matches) Router−C#
Configuring Named Access Lists
Because of the numeric limitations of numbered standard and extended access lists, in IOS release 11.2, Cisco included a feature known as named access lists, which extend the numeric limit of numbered access lists. To configure a named access list, follow these steps:
1. Use the following configuration command to define a named access list:
ip access−list <standard | extended> name
The standard command option configures a standard access list and the extended command option configures an extended access list. The name parameter defines the name of the access list. The name of the access list cannot contain a space and must begin with a letter, not a number.
2. Use this command to define the filter rules for a standard named access list:
<deny | permit> source source−wildcard
Use this command to define the filter rules for an extended access list:
<deny | permit> <protocol> <source source−wildcard> − <destination destination−wildcard> <precedence precedence> − <tos tos> log
3.Use the following command to select the input interface under which the access list will be applied:
interface <interface name> <interface number>
4.Use this command to bind the access list to the interface and to apply the filter to packets entering into or exiting the interface:
ip access−group name {in | out}
In the beginning of "Immediate Solutions," I began with a basic standard access list configuration. In Listing 7.1 and Listing 7.2. Routers Raul and Chris were configured to provide packet filtering using standard numbered access lists. You can also configure routers to use named access lists to provide packet filtering. In Listing 7.15, Raul is configured to permit traffic from only the 192.168.20.0 network and deny traffic from all other networks. Router Chris will be configured in Listing 7.16 to permit traffic from only 192.168.40.0 and deny traffic from all other networks. Instead of using a standard numbered access list, this time I will use a standard named access list. Refer back to Figure 7.4 for a description of the network that will be used to configure the routers.
Listing 7.15: Named access list configuration of Raul.
hostname Raul
!
250

interface FastEthernet1/0
ip address 192.168.10.2 255.255.255.0 no ip directed−broadcast
ip access−group permit−20 in
!
interface FastEthernet2/0
ip address 192.168.40.1 255.255.255.0 no ip directed−broadcast
!
interface FastEthernet3/0
ip address 192.168.50.1 255.255.255.0 no ip directed−broadcast
!
ip route 192.168.20.0 255.255.255.0 192.168.10.1 ip route 192.168.30.0 255.255.255.0 192.168.10.1
!
ip access−list standard permit−20 permit 192.168.20.0 0.0.0.255 deny any
Listing 7.16: Named access list configuration of Chris.
hostname Chris
!
interface FastEthernet0
ip address 192.168.10.1 255.255.255.0 no ip directed−broadcast
ip access−group permit−40 in
!
interface Ethernet1
ip address 192.168.20.1 255.255.255.0 no ip directed−broadcast
!
interface FastEthernet1
ip address 192.168.30.1 255.255.255.0 no ip directed−broadcast
!
ip route 192.168.40.0 255.255.255.0 192.168.10.2 ip route 192.168.50.0 255.255.255.0 192.168.10.2
!
ip access−list standard permit−40 permit 192.168.40.0 0.0.0.255 deny any
You can issue the show access−lists command on Chris to verify the proper configuration of the access list:
Chris#show access−lists
Standard ip access list permit−40
permit 192.168.40.0, wildcard bits 0.0.0.255 deny any
You can also use the show IP interface command to verify the access list. Issuing this command displays any and all access lists that are configured on an interface. Issuing the command on Chris displays the output listed in Listing 7.17.
Listing 7.17: Output of the show IP interface command on Chris.
Chris#sh ip int e0/0
251