


Chapter 10
Windows: updating the DNS cache
A frequently recurring question on the openvpn-users mailing lists is related to the DNS name resolution on Windows after the VPN connection is established. If the OpenVPN server pushes out a new DNS server, then this is automatically picked up by the OpenVPN client, yet name resolution does not always work right after establishing the connection. This has little to do with OpenVPN and more to do with the way the Windows DNS caching service works. As this question comes up quite regularly, a new directive register-dns was added in
OpenVPN 2.1.3. When this directive is specified, OpenVPN updates the Windows DNS cache and registers the VPN IP address in the Windows DNS tables. As this feature appeared only recently, this recipe will also show how the Windows DNS cache can be updated using a script when the VPN connection is established. Some users disable the DNS caching service altogether, which seems to have a little impact on the operating system, except for a small performance penalty when using a slow network.
Getting ready
Set up the client and server certificates using the first recipe from Chapter 2, Client-server IP-only Networks. For this recipe, the server computer was running CentOS 5 Linux and OpenVPN 2.1.1. The client computer was running Windows XP SP3 and OpenVPN 2.1.3. Keep the server configuration file, example10-2-server.conf, from the recipe Linux: using pull-resolv-conf at hand, as well as the client configuration file, basic-udp-client.ovpn, from the Chapter 2 recipe Using an 'ifconfig-pool' block at hand.
How to do it...
1.Start the server:
[root@server]# openvpn --config example10-2-server.conf
2.Add a line to the basic-udp-client.ovpn configuration file: register-dns
Save this configuration file as example10-6.ovpn.
273

OS Integration
3.Start the OpenVPN client.
The OpenVPN GUI status window will show that the Windows service dnscache is restarted:
4.After the VPN connection is established, verify that the name resolution is using the VPN-supplied DNS server using, for example, the nslookup command.
How it works...
When the VPN connection is established, the OpenVPN client software sends a DHCP packet to the TAP-Win32 adapter with the IP address, default gateway, and the other network-related information, such as a new DNS server. This information is picked up by the operating system but the local DNS caching service is not notified immediately. The newly-introduced register-dns directive executes the following commands:
net stop dnscache net start dnscache ipconfig /flushdns ipconfig /registerdns
By forcing a restart of the DNS caching service, the DNS server supplied by the VPN connection is used immediately.
 274
274

Chapter 10
There's more...
Prior to OpenVPN 2.1.3, it was necessary to update the Windows DNS cache using an up script. The client configuration file needed the following directives:
script-security 2 system
cd |
"c:\\program\ files\\openvpn\\config" |
up |
"%windir%\\system32\\cmd.exe /c example10-6.bat" |
And a batch file example10-6.bat containing:
@echo off
net stop dnscache net start dnscache
Windows: running OpenVPN as a service
One of lesser-known features of the Windows version of OpenVPN is its ability to run it as a service. This allows OpenVPN to start and establish a VPN connection without a user logging in on the system. The OpenVPN service is installed by default, but is not started automatically.
In this recipe, we will show how the OpenVPN service can be controlled using the OpenVPN GUI application and how to perform troubleshooting on the service.
Getting ready
In this recipe, the server computer was running CentOS 5 Linux and OpenVPN 2.1.1. The client computer was running Windows XP SP3 and OpenVPN 2.1.3. Keep the configuration file, basic-udp-server.conf, from the Chapter 2 recipe Server-side routing at hand, as well as the client configuration file basic-udp-client.ovpn from the Chapter 2 recipe Using an ifconfig-pool block.
How to do it...
1.Start the server:
[root@server]# openvpn --config basic-udp-server.conf
275
OS Integration
2.Before starting the OpenVPN GUI application on the client side, we first launch the Windows registry editor regedit. Find the key HKEY_LOCAL_MACHINE\ SOFTWARE\OpenVPN-GUI
Take note of the config_dir registry key, which is normally set to
C:\Program Files\OpenVPN\config
3.Set the registry key allow_service to 1. Also, take note of the registry key log_dir, which is normally set to C:\Program Files\OpenVPN\log.
4.Now, browse to the registry key HKEY_LOCAL_MACHINE\SOFTWARE\OpenVPN and check the config_dir and log_dir keys again. They should be pointing to the same directories as for the OpenVPN GUI application.
5.Close the registry editor.
 276
276

Chapter 10
6.Launch the OpenVPN GUI. Right click on the icon in the taskbar. A new menu option will have appeared:
But do not start the service yet.
7.First, modify the client configuration file basic-udp-client.ovpn by changing the lines:
cert |
"c:/program |
files/openvpn/config/client2.crt" |
key |
"c:/program |
files/openvpn/config/client2.key" |
to:
cert |
"c:/program |
files/openvpn/config/client1.crt" |
key |
"c:/program |
files/openvpn/config/client1.key" |
The client certificate client2.key from Chapter 2, Client-server IP-only Networks, is protected by a password, whereas the client1.key file is not. Save the configuration file as example10-7.ovpn.
8.Move all other .ovpn files to another directory to make sure this is the only .ovpn in the config directory.
9.Now, start the OpenVPN service. After a while, the VPN connection will be established, as can be seen on both the client and the server in the log files.
277

OS Integration
How it works...
A Windows service is launched at system startup before a user is logged on. The OpenVPN service scans the directory pointed to by the registry key: HKEY_LOCAL_MACHINE\ SOFTWARE\OpenVPN\config_dir
This starts an OpenVPN process for each file with the extension .ovpn in that directory. The output of each of these processes is logged on to the log directory pointed to by the registry key:
HKEY_LOCAL_MACHINE\SOFTWARE\OpenVPN\log_dir
Here, the log file name is the same as the configuration name, but now with the extension
.log. For this recipe, the configuration file was:
C:\Program Files\OpenVPN\config\example10-7.ovpn
And the log file was:
C:\Program Files\OpenVPN\log\example10-7.log
There is no need to launch the OpenVPN GUI to start these connections, but the GUI application does offer a convenient method of managing the OpenVPN service, if the right registry key is added.
There's more...
There are a few important notes when using the OpenVPN service, which are outlined here.
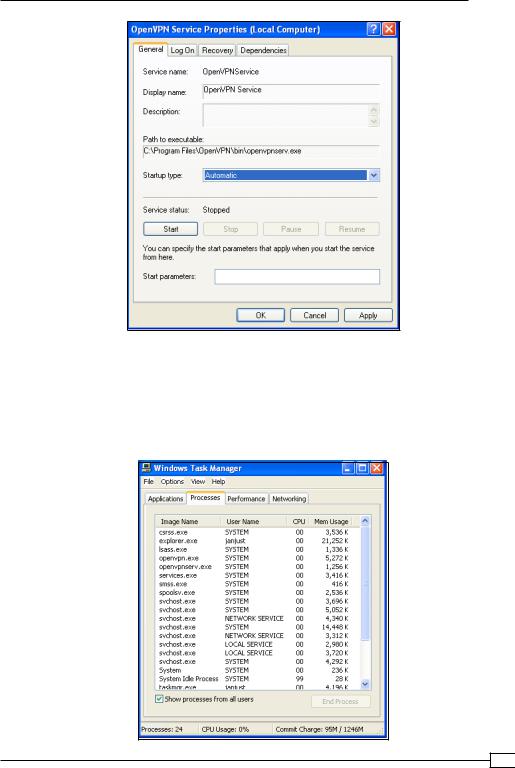
Automatic service startup
To make the OpenVPN service start at system startup, open the Services administrative control panel by going to Control Panel | Administrative Tools | Services. Double-click on the OpenVPN Service to open the properties and set the Startup type to Automatic:
 278
278
Chapter 10
Click on OK and close the Services administrative control panel. Reboot Windows and verify on the server side that the client is connecting at system startup.
OpenVPN User name
When the OpenVPN service is used, the corresponding OpenVPN processes are normally run under the account SYSTEM, as can be seen in the following screenshot:
279