


5
Two-factor Authentication with PKCS#11
In this chapter, we will cover:
Initializing a hardware token
Getting a hardware token ID
Using a hardware token
Using the management interface to list PKCS#11 certificates
Selecting a PKCS#11 certificate using the management interface
Generating a key on the hardware token
Private method for getting a PKCS#11 certificate
Pin caching example
Introduction
In this chapter, we will focus on the support for two-factor authentication for OpenVPN. Two-factor authentication is based on the idea that in order to use a system (like a VPN), you need to provide two things:
something you know that is a password
something you possess that is a smartcard or hardware token

Two-factor Authentication with PKCS#11
Starting with version 2.1, OpenVPN supports two-factor authentication by providing PKCS#11 support on Windows, Mac OS X, and Linux. PKCS#11 is an industry standard for communicating with smartcards or hardware tokens, and there are both open source and commercial drivers available. The major difficulty when supporting two-factor authentication is the software support on different platforms. While most hardware token vendors provide drivers for Microsoft Windows, there are far fewer cards and tokens supported on Linux. For
this chapter, we have made use of an Aladdin eToken Pro USB hardware token (http://www. aladdin.com), which is well supported on Windows, Mac OS X, and Linux, allowing a user to transparently switch between different operating systems using the same hardware token.
The first recipe in this chapter will go into the details of initializing a hardware token on Linux. If this first recipe cannot be completed successfully (or if no suitable third-party PKCS#11 library is available for Linux), then the token can be considered "not supported on Linux". However, the remaining recipes of this chapter can still succeed on other platforms.
Please note that OpenVPN depends purely on a working PKCS#11 driver. When selecting a hardware device, it will be important to verify whether the device is supported on the platforms needed, not if it will work with OpenVPN itself.
It should be noted that most issues that come up when configuring OpenVPN to use a hardware token on Linux are related to the poor support of these tokens on Linux.
Initializing a hardware token
In this recipe, we initialize an Aladdin eToken PRO 32K hardware token on Linux using the proprietary driver software from Aladdin (pkiclient). Initialization consists of the following steps:
1.Format the hardware token
2.Copy a private key to the token
3.Copy the corresponding public X509 certificate to the token
This recipe does not use OpenVPN at all, but it is a required step for the remaining recipes of this chapter.
Getting ready
Install PCSC-lite 1.4.4 or higher, OpenSC 0.11.4 or higher, and the Aladdin pkiclient driver. For this recipe, the computer used was running Fedora 12 Linux, PCSC-lite 1.5.2, OpenSC 0.11.12, and PKI Client 5.00.
 128
128
Chapter 5
Set up the client and server certificates using the first recipe from Chapter 2, Client-server IP-only Networks. Keep the client certificate and private key files client1.crt and client1.key at hand.
How to do it...
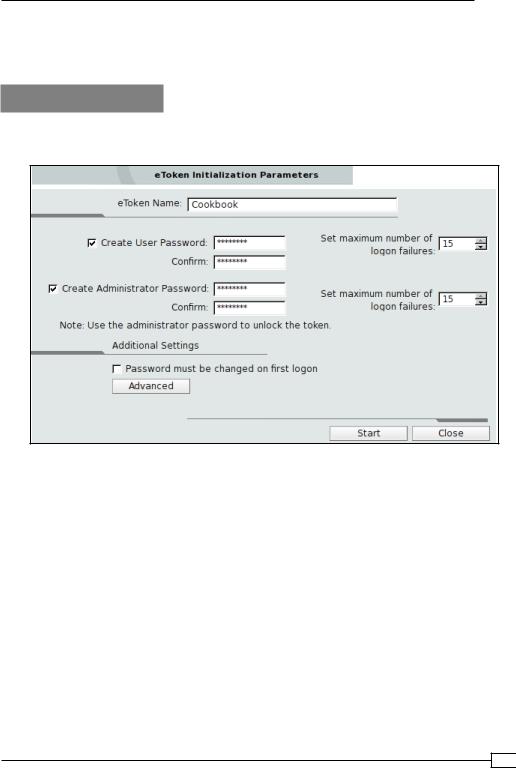
1.First, bring up the eToken PKI Client properties window and click on Initialize eToken. This will bring up the following dialog box:
2.Choose a user password and an administrator password. The user password is used by end-users to access the hardware token, whereas the administrator password can be used for administrative tasks, such as resetting the user password.
3.Deselect Password must be changed on first logon, then click on Start.
The token will now be initialized, wiping out all previous contents. This initialization phase is normally the crucial phase in determining whether a token is supported on Linux.
After this step has completed successfully, close the PKI Client Properties window and continue in a terminal window.
4.Convert the private key client1.key to DER format and copy it to the token: $ openssl rsa -in client1.key -out client1key.der -outform der $ pkcs11-tool --module /usr/lib64/libeTPkcs11.so \
-w client1key.der --type privkey –-login \ --id 20100703 --label "Client1"
129

Two-factor Authentication with PKCS#11
Please enter User PIN: [enter pin]
Generated private key:
Private Key Object; RSA
label: |
Client1 |
ID: |
20100703 |
Usage: |
decrypt, sign, unwrap |
The parameters label and id should be the same for both the private key and the certificate. Note the path of the PKCS#11 library, /usr/lib64/libeTPkcs11.so, which indicates that this recipe was run on a 64-bit machine. For a 32-bit architecture, the library path would have been usr/lib/libeTPkcs11.so.
5.Next, convert the certificate client1.crt to DER format and copy it as well:
$ openssl x509 -in client1.crt -out client1cert.der -outform der $ pkcs11-tool --module /usr/lib64/libeTPkcs11.so \
-w client1cert.der --type cert –-login \ --id 20100703 --label "Client1"
Please enter User PIN: [enter pin] Generated certificate:
Certificate Object, type = X.509 cert
label: Client1 ID: 20100703
6.Finally, we verify that the files have been copied successfully to the token: $ pkcs11-tool --module /usr/lib64/libeTPkcs11.so -O --login
Please enter User PIN: [enter pin] Private Key Object; RSA
label: |
Client1 |
ID: |
20100703 |
Usage: |
decrypt, sign, unwrap |
Certificate |
Object, type = X.509 cert |
label: |
Client1 |
ID: |
20100703 |
Both the private key and the certificate are on the token.
How it works...
After the initialization phase, we manipulate the token using the pkcs11-tool tool from the OpenSC package. This tool offers a command-line interface to manipulate a hardware token using an external PKCS#11 module. In this recipe, the PKCS#11 module is supplied by the Aladdin pkiclient driver software.
 130
130