

Chapter 9
Analyzing performance using tcpdump
In this recipe, we will analyze the performance of an OpenVPN setup using the tcpdump utility. It is also possible to use the Wireshark utility, which is available for Linux, Windows, and Mac OS X. While this recipe does not cover any new OpenVPN functionality, it is useful to show how such an analysis can be made.
Getting ready
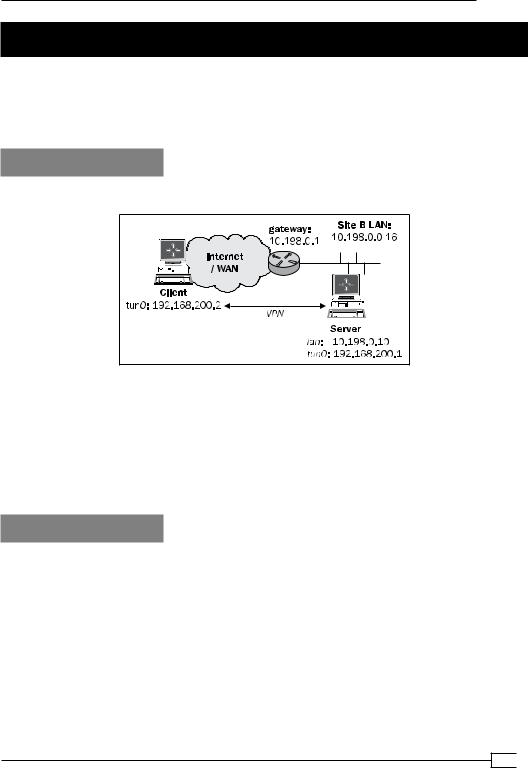
We use the following network layout:
Install OpenVPN 2.0 or higher on two computers. Make sure the computers are connected over a network. Set up the client and server certificates using the first recipe from Chapter 2,
Client-server IP-only Networks. For this recipe, the server computer was running CentOS 5 Linux and OpenVPN 2.1.1. The client was running Fedora 13 Linux and OpenVPN 2.1.1.
Keep the configuration file example9-6-server.conf from the recipe Tuning UDP based connections at hand, as well as the client configuration, example9-6-client.conf, from the same recipe.
How to do it...
1.Start the server:
[root@server]# openvpn --config example9-6-server.conf
2.Next, start the client:
[root@client]# openvpn --config example9-6-client.conf
3.On the server, run tcpdump to watch for the incoming packets on the network interface (not the tunnel interface itself):
[root@server]# tcpdump -nnl -i eth0 udp port 1194
This instructs tcpdump to listen on the local network interface for all UDP traffic on port 1194, which is the OpenVPN default.
253

Performance Tuning
4.From the client, ping the server's VPN IP address with two different sizes:
[client]$ ping –c 2 –s 1300 192.168.200.1 [client]$ ping –c 2 –s 1400 192.168.200.1
The following packets are seen in the tcpdump screen:
The first ICMP packets are sent unfragmented, as they are smaller than 1400 bytes. The second set of encrypted ICMP packets is larger than the fragment size (1400) and hence are split into two parts.
How it works...
The OpenVPN configuration directive: fragment 1400
causes all the encrypted packets that are larger than 1400 bytes to be fragmented. When watching the encrypted traffic, this can be verified by pinging the OpenVPN server. Note that packets which need to be fragmented are fragmented evenly: all packets have the same size.
Also, note that the following command causes the encrypted packet to be larger than 1400 bytes:
[client]$ ping –c 2 –s 1400 192.168.200.1
The encryption needed for the secure tunnel adds extra overhead to the packets that are transmitted. This is one of the root causes for a performance penalty when using VPN tunnels
(not just OpenVPN) compared to non-encrypted traffic. In most networks, this overhead is not noticed, but it always exists.
See also
Chapter 9's recipe Tuning UDP-based connections in this chapter, which explains how to use the fragment directive.
 254
254

10
OS Integration
In this chapter, we will cover:
Linux: using NetworkManager
Linux: using pull-resolv-conf
Mac OS: using Tunnelblick
Windows Vista/7: elevated privileges
Windows: using the CryptoAPI store
Windows: updating the DNS cache
Windows: running OpenVPN as a service
Windows: public versus private network adapters
Windows: routing methods
Introduction
In this chapter, we will focus on how to use OpenVPN on the most-used client operating systems: Linux, Mac OS X, and Windows. For each operating system, an entire chapter could be written to describe the intricacies of running OpenVPN in both the client and server mode, but as space is limited, we will focus only on the interaction of the OpenVPN client with the OS. The purpose of the recipes in this chapter is to outline some of the common pitfalls when running OpenVPN on a particular platform. The recipes focus mainly on the configuration
of OpenVPN itself, not on how to integrate a working VPN setup into the rest of the network infrastructure.
OS Integration
Linux: using NetworkManager
When Linux is used as a desktop operating system, the network configuration is configured using the Linux NetworkManager in most of the cases. This package allows a non-root user to start and stop the network connections, connect and disconnect from wireless networks, and also to set up several types of VPN connections, including OpenVPN. In this recipe,
we will show how to configure an OpenVPN connection using the GNOME variant of the NetworkManager.
Getting ready
Set up the client and server certificates using the first recipe from Chapter 2, Client-server IP-only Networks. For this recipe, the server computer was running CentOS 5 Linux and OpenVPN 2.1.1. The client was running Fedora 13 Linux and OpenVPN 2.1.1. This version of Linux comes with NetworkManager 0.8, including the NetworkManager-openvpn plugin. The NetworkManager-openvpn plugin is not installed by default and needs to be explicitly added to the system. This version is highly recommended when setting up an OpenVPN connection. Versions of the NetworkManager older than 0.7.0 have very limited
OpenVPN support and a different configuration file syntax. Keep the configuration file, basic-udp-server.conf, from the Chapter 2 recipe Server-side routing at hand.
How to do it...
1.Start the NetworkManager configuration screen by right-clicking on the
NetworkManager icon in the taskbar and selecting Edit Connections. A Window will pop up.
2.Choose the tab VPN to set up a new VPN connection.
 256
256
Chapter 10
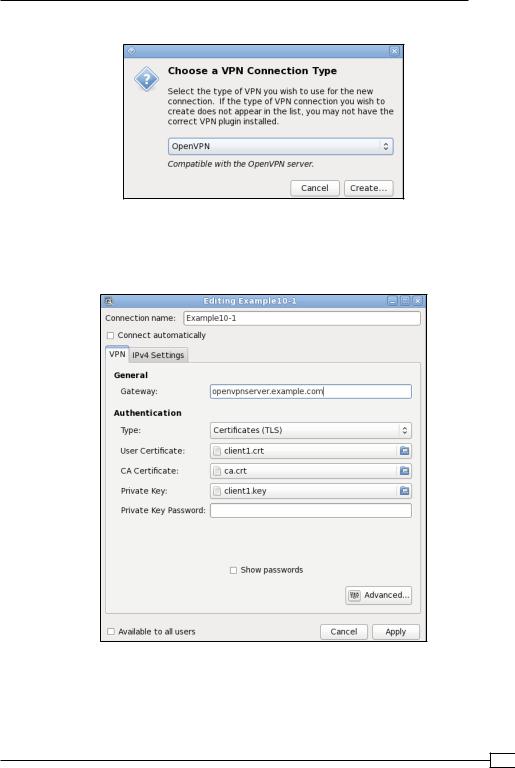
3. Click on the Add button to bring up the next screen:
4.Select the VPN type OpenVPN and click on the Create button. If the VPN connection type OpenVPN is not available, then the NetworkManager-openvpn plugin is
not installed.
5.Fill in the details of the VPN tab of the next window:
The Gateway is the hostname or IP address of the OpenVPN server. The Type of authentication is Certificates (TLS). Then, for the User Certificate, CA Certificate and Private Key browse to the directory where the client files client1.crt, ca.crt, and client1.key are located respectively. Fill in the Private Key Password, if required. Do not click on the Apply button just yet, click on Advanced instead.
257
OS Integration
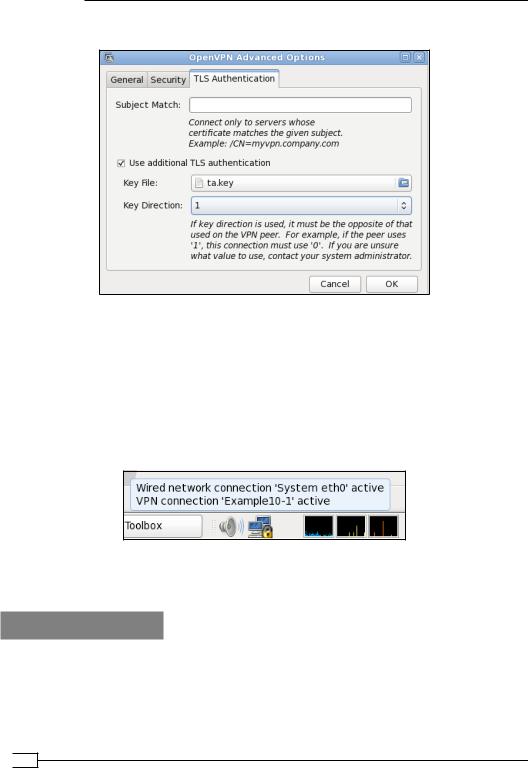
6. In the next window, go to the tab TLS Authentication:
Select Use additional TLS authentication and browse to the location of the ta.key file. Choose 1 for the key direction.
7.Click on OK when done, then click on Apply to save the new VPN connection.
8.Next, start the server:
[root@server]# openvpn --config basic-udp-server.conf
9.And finally, on the client, start the VPN connection by clicking on the
NetworkManager icon, choosing VPN Connections, and selecting Example10-1:
You can verify whether the VPN connection is established correctly by pinging the VPN server IP.
How it works...
The NetworkManager-openvpn plugin is a GUI for setting up an OpenVPN client configuration file. All the settings made are the equivalent of setting up the client configuration file as done in the Chapter 2 recipe Server-side routing.
 258
258

Chapter 10
Note that older versions of the NetworkManager-openvpn plugin do not support the complete feature set of OpenVPN.
There's more...
The NetworkManager-openvpn plugin supports some advanced configuration settings:
Setting up routes using NetworkManager
The NetworkManager-openvpn plugin can also be used to set up VPN-specific routes. Open the main VPN configuration screen again, and go to the tab IPv4 Settings. Click on the Routes button on this screen:
259

OS Integration
A new window will appear:
Routes pushed by the server can be overruled using the Ignore automatically obtained routes. The behavior of server directive push "redirect-gateway" can be overruled by checking the Use this connection only for resources on its network checkbox.
DNS settings
The NetworkManager-openvpn plugin also updates the /etc/resolv.conf file if the
OpenVPN server pushes out DNS servers using the following directive:
push "dhcp-option DNS a.b.c.d"
Scripting
Note that NetworkManager does not allow scripting or plugins on the client side, as they are a security risk when configured by a non-root user.
Linux: using 'pull-resolv-conf'
One of the most common pitfalls when setting up a VPN connection on Linux is when the OpenVPN server pushes out new DNS settings. In the previous recipe, we saw that the NetworkManager-openvpn plugin also updated the system configuration file that
contained the DNS setting, /etc/resolv.conf. If the command line is used this is not done automatically. By default, OpenVPN comes with two scripts to add and remove DNS servers from the /etc/resolv.conf file. This recipe will show how to use these scripts.
 260
260

Chapter 10
Getting ready
We use the following network layout:
I |
Set up the client and server certificates using the first recipe from Chapter 2, Client-server IP-only Networks. For this recipe, the server computer was running CentOS 5 Linux and OpenVPN 2.1.1. The client was running Fedora 13 Linux and OpenVPN 2.1.1. Keep the configuration file basic-udp-server.conf from the Chapter 2 recipe Server-side routing at hand, as well as the client configuration file, basic-udp-client.conf, from the same recipe.
How to do it...
1.Append the following line to the basic-udp-server.conf file: push "dhcp-option DNS 10.198.0.1"
Here, 10.198.0.1 is the address of a DNS server on the VPN server LAN. Save it as example10-2-server.conf.
2.Start the server:
[root@server]# openvpn --config example10-2-server.conf
3.Similarly, for the client, add the following lines to the basic-udp-client.conf file:
script-security 2
up "/etc/openvpn/cookbook/client.up" down "/etc/openvpn/cookbook/client.down"
Save it as example10-2-client.conf.
261