


1
Point-to-Point Networks
In this chapter, we will cover:
Shortest setup possible
OpenVPN secret keys
Multiple secret keys
Plaintext tunnel
Routing
Configuration files versus the command-line
IP-less configurations
Complete site-to-site setup
3-way routing
Introduction
The recipes in this chapter will provide an introduction into configuring OpenVPN. The recipes are based on a point-to-point style network, meaning that only a single client can connect at a time.
A point-to-point style network is very useful when connecting to a small number of sites or clients. It is easier to set up, as no certificates or Public Key Infrastructure (PKI) is required. Also, routing is slightly easier to configure, as no client-specific configuration files containing
--iroute statements are required.

Point-to-Point Networks
The drawbacks of a point-to-point style network are:
The lack of perfect forward secrecy— a key compromise may result in a total disclosure of previous sessions
The secret key must exist in plaintext form on each VPN peer
Shortest setup possible
This recipe will explain the shortest setup possible when using OpenVPN. For this setup two computers are used that are connected over a network (LAN or Internet). We will use both a TUN-style network and a TAP-style network and will focus on the differences between them.
A TUN device is used mostly for VPN tunnels where only IP-traffic is used. A TAP device allows full Ethernet frames to be passed over the OpenVPN tunnel, hence providing support for non-IP based protocols such as IPX and AppleTalk.
While this may seem useless at first glance, it can be very useful to quickly test whether
OpenVPN can connect to a remote system.
Getting ready
Install OpenVPN 2.0 or higher on two computers. Make sure the computers are connected over a network. For this recipe, the server computer was running CentOS 5 Linux and OpenVPN 2.1.1 and the client was running Windows XP SP3 and OpenVPN 2.1.1.
How to do it...
1. We launch the server (listening)-side OpenVPN process for the TUN-style network:
[root@server]# openvpn --ifconfig 10.200.0.1 10.200.0.2 \ --dev tun
The above command should be entered as a single line. character '\' is used to denote the fact that the command continues on the next line.
2. Then we launch the client-side OpenVPN process:
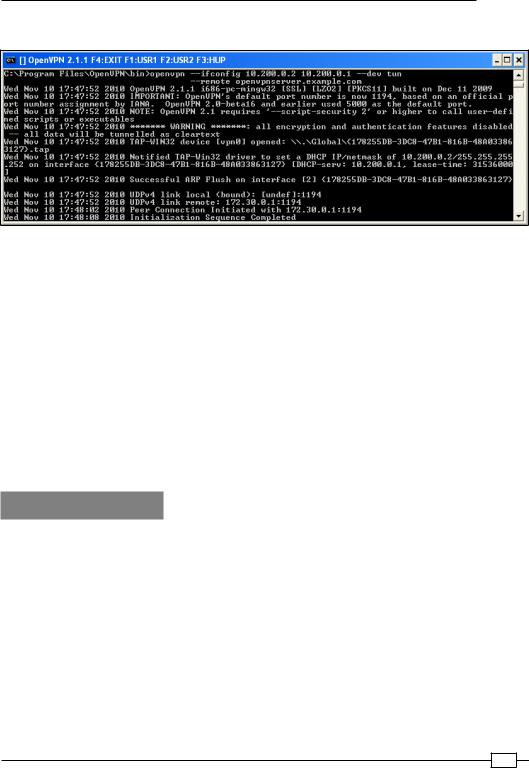
[WinClient] C:\>"\Program Files\OpenVPN\bin\openvpn.exe" \ --ifconfig 10.200.0.2 10.200.0.1 --dev tun \
--remote openvpnserver.example.com
Chapter 1
The following screenshot shows how a connection is established:
As soon as the connection is established, we can ping the other end of the tunnel.
3.Next, we stop the tunnel by pressing the F4 function key in the Command window and we restart both ends of the tunnel using the TAP device:
4.We launch the server (listening)-side OpenVPN process for the TAP-style network:
[root@server]# openvpn --ifconfig 10.200.0.1 255.255.255.0 \ --dev tap
5.Then we launch the client-side OpenVPN process:
[WinClient] C:\>"\Program Files\OpenVPN\bin\openvpn.exe" \ --ifconfig 10.200.0.2 255.255.255.0 --dev tap \
--remote openvpnserver.example.com
The connection is established and we can again ping the other end of the tunnel.
How it works...
The server listens on UDP port 1194, which is the OpenVPN default port for incoming connections. The client connects to the server on this port. After the initial handshake, the server configures the first available TUN device with IP address 10.200.0.1 and it expects the remote end (Peer address) to be 10.200.0.2.
The client does the opposite: after the initial handshake, the first TUN or TAP-Win32 device is configured with IP address 10.200.0.2. It expects the remote end (Peer address) to be
10.200.0.1. After this, the VPN is established.
In case of a TAP-style network, the server configures the first available TAP device with the IP address 10.200.0.01 and netmask 255.255.255.0. Similarly, the client is configured with
IP address 10.200.0.2 and netmask 255.255.255.0.

Point-to-Point Networks
Notice the warning:
******* WARNING *******: all encryption and authentication features disabled -- all data will be tunnelled as cleartext
Here, the data is not secure: all the data that is sent over the VPN tunnel be read!
There's more...
Using the TCP protocol
In the previous example, we chose the UDP protocol. For this example, it would not have made any difference if we had chosen the TCP protocol, provided that we do that on the server side (the side without --remote):
[root@server]# openvpn --ifconfig 10.200.0.1 10.200.0.2 \ –-dev tun --proto tcp-server
And also on the client side:
[root@server]# openvpn --ifconfig 10.200.0.2 10.200.0.1 \ --dev tun --proto tcp-client
Forwarding non-IP traffic over the tunnel
It is now possible to run non-IP traffic over the tunnel. For example, if AppleTalk is configured correctly on both sides, we can query a remote host using the aecho command:
aecho openvpnserver
22 bytes from 65280.1: aep_seq=0. time=26. ms
22 bytes from 65280.1: aep_seq=1. time=26. ms
22 bytes from 65280.1: aep_seq=2. time=27. ms
A tcpdump -nnel -i tap0 shows that the type of traffic is indeed non-IP based AppleTalk.
OpenVPN secret keys
This recipe uses OpenVPN secret keys to secure the VPN tunnel. It is very similar to the previous recipe but this time a shared secret key is used to encrypt the traffic between the client and the server.
 10
10

Chapter 1
Getting ready
Install OpenVPN 2.0 or higher on two computers. Make sure the computers are connected over a network. For this recipe, the server computer was running CentOS 5 Linux and OpenVPN 2.1.1 and the client was running Windows XP SP3 and OpenVPN 2.1.1.
How to do it...
1.First, we generate a secret key on the server (listener):
[root@server]# openvpn --genkey --secret secret.key
2.We transfer this key to the client side over a secure channel (for example, using scp).
3.Next, we launch the server (listening)-side OpenVPN process:
[root@server]# openvpn --ifconfig 10.200.0.1 10.200.0.2 \ --dev tun --secret secret.key
4. Then, we launch the client-side OpenVPN process:
[WinClient] C:\>"\Program Files\OpenVPN\bin\openvpn.exe" \ --ifconfig 10.200.0.2 10.200.0.1 \
--dev tun --secret secret.key \ --remote openvpnserver.example.com
The connection is established:
How it works...
This example works exactly as the very first: the server listens to the incoming connections on
UDP port 1194. The client connects to the server on this port. After the initial handshake, the server configures the first available TUN device with IP address 10.200.0.1 and it expects the remote end (Peer address) to be 10.200.0.2. The client does the opposite.
11 