- •Credits
- •About the Author
- •About the Reviewers
- •www.PacktPub.com
- •Table of Contents
- •Preface
- •Introduction
- •Shortest setup possible
- •OpenVPN secret keys
- •Multiple secret keys
- •Plaintext tunnel
- •Routing
- •Configuration files versus the command-line
- •Complete site-to-site setup
- •3-way routing
- •Introduction
- •Setting up the public and private keys
- •Simple configuration
- •Server-side routing
- •Routing: subnets on both sides
- •Redirecting the default gateway
- •Using an 'ifconfig-pool' block
- •Using the status file
- •Management interface
- •Proxy-arp
- •Introduction
- •Simple configuration—non-bridged
- •Enabling client-to-client traffic
- •Bridging—Linux
- •Bridging—Windows
- •Checking broadcast and non-IP traffic
- •External DHCP server
- •Using the status file
- •Management interface
- •Introduction
- •Certificate generation
- •xCA: a GUI for managing a PKI (Part 1)
- •xCA: a GUI for managing a PKI (Part 2)
- •OpenSSL tricks: x509, pkcs12, verify output
- •Revoking certificates
- •The use of CRLs
- •Checking expired/revoked certificates
- •Intermediary CAs
- •Multiple CAs: stacking, using --capath
- •Introduction
- •Initializing a hardware token
- •Getting a hardware token ID
- •Using a hardware token
- •Selecting a PKCS#11 certificate using the management interface
- •Generating a key on the hardware token
- •Private method for getting a PKCS#11 certificate
- •Pin caching example
- •Introduction
- •Using a client-side up/down script
- •Windows login greeter
- •Using client-connect/client-disconnect scripts
- •Using a 'learn-address' script
- •Using a 'tls-verify' script
- •Using an 'auth-user-pass-verify' script
- •Script order
- •Script security and logging
- •Using the 'down-root' plugin
- •Using the PAM authentication plugin
- •Introduction
- •Cipher mismatches
- •TUN versus TAP mismatches
- •Compression mismatches
- •Key mismatches
- •Troubleshooting MTU and tun-mtu issues
- •Troubleshooting network connectivity
- •How to read the OpenVPN log files
- •Introduction
- •The missing return route
- •Missing return routes when 'iroute' is used
- •Source routing
- •Routing and permissions on Windows
- •Troubleshooting client-to-client traffic routing
- •Understanding the 'MULTI: bad source' warnings
- •Failure when redirecting the default gateway
- •Introduction
- •Optimizing performance using 'ping'
- •OpenSSL cipher speed
- •Compression tests
- •Traffic shaping
- •Tuning UDP-based connections
- •Tuning TCP-based connections
- •Analyzing performance using tcpdump
- •Introduction
- •Linux: using NetworkManager
- •MacOS: using Tunnelblick
- •Windows Vista/7: elevated privileges
- •Windows: using the CryptoAPI store
- •Windows: updating the DNS cache
- •Windows: running OpenVPN as a service
- •Windows: public versus private network adapters
- •Windows: routing methods
- •Introduction
- •Including configuration files in config files
- •Details of ifconfig-pool-persist
- •Connecting using a SOCKS proxy
- •Connecting via an HTTP proxy
- •Connecting via an HTTP proxy with authentication
- •Using dyndns
- •IP-less setups (ifconfig-noexec)
- •Introduction
- •Inline certificates
- •Connection blocks
- •Port sharing with an HTTPS server
- •Routing features: redirect-private, allow-pull-fqdn
- •OCSP support
- •New for 2.2: the 'x509_user_name' parameter
- •Index

4
PKI, Certificates, and
OpenSSL
In this chapter, we will cover:
Certificate generation
xCA: a GUI for managing a PKI (Part 1)
xCA: a GUI for managing a PKI (Part 2)
OpenSSL tricks: x509, pkcs12, verify output
Revoking certificates
The use of CRLs
Checking expired/revoked certificates
Intermediary CAs
Multiple CAs: stacking, using --capath
Introduction
This chapter is a small detour into the Public Key Infrastructures (PKIs), certificates, and openssl commands. The primary purpose of the recipes in this chapter is to show how the certificates, which are used in OpenVPN, can be generated, managed, viewed, and what kind of interactions exist between OpenSSL and OpenVPN.

PKI, Certificates, and OpenSSL
Certificate generation
This recipe will demonstrate how to create and sign a certificate request using plain openssl commands. This is slightly different from using the easy-rsa scripts, but very instructive.
Getting ready
Set up the easy-rsa certificate environment using the first recipe from Chapter 2, Client-server IP-only Networks, by sourcing the vars file. This recipe was performed on a computer running Fedora 12 Linux but it can easily be run on Windows or MacOS.
How to do it...
Before we can use plain openssl commands to generate and sign a request, there are
a few environment variables that need to be set. These variables are not set in the vars file by default.
1.Add the missing environment variables: $ cd /etc/openvpn/cookbook
$ . ./vars
$ export KEY_CN=dummy $ export KEY_OU=dummy $ export KEY_NAME=dummy
$ export OPENSSL_CONF=/etc/openvpn/cookbook/openssl.cnf
Note that the openssl.cnf file is part of the easy-rsa distribution and should already be present in the directory /etc/openvpn/cookbook.
2.Next, we generate the certificate request without a password. This is achieved by adding the option -nodes to the openssl req command:
$ openssl req -nodes -newkey rsa:1024 -new -out client.req \ -subj "/C=NL/O=Cookbook/CN=MyClient"
Generating a 1024 bit RSA private key
.......................................++++++
............++++++
writing new private key to 'privkey.pem'
-----
 104
104

Chapter 4
3.Finally, we sign the certificate request using the Certificate Authority private key: $ openssl ca -in client.req -out client.crt
Using configuration from /etc/openvpn/cookbook/openssl.cnf Enter pass phrase for /etc/openvpn/cookbook/keys/ca.key: [enter CA key password]
Check that the request matches the signature Signature ok
The Subject's Distinguished Name is as follows countryName :PRINTABLE:'NL' organizationName :PRINTABLE:'Cookbook' commonName :PRINTABLE:'MyClient'
Certificate is to be certified until Jun 15 13:46:40 2020 GMT (3650 days)
Sign the certificate? [y/n]:y
1 out of 1 certificate requests certified, commit? [y/n]y Write out database with 1 new entries
Data Base Updated
How it works...
The first step is always to generate a private key. In this recipe, we generate a private key without a password which is not really secure. A certificate request is signed using the private key to prove that the certificate request and the private key belong together. The openssl req command generates both the private key and the certificate requests in one go.
The second step is to sign the certificate request using the private key of the Certificate Authority (CA). This results in an X.509 certificate file, which can be used in OpenVPN.
A copy of the (public) X.509 certificate is also stored in the /etc/openvpn/cookbook/keys directory. This copy is important if the certificate needs to be revoked later on, so do not remove it from that directory.
There's more...
It is also possible to generate a private key protected by a password ("pass phrase" in OpenSSL terms). In order to generate such a private key, simply remove the -nodes command line parameter:
$ openssl req -newkey rsa:1024 -new -out client.req \ -subj "/C=NL/O=Cookbook/CN=MyClient"
The OpenSSL command will now ask for a passphrase:
Enter PEM pass phrase:
Verifying - Enter PEM pass phrase:
105

PKI, Certificates, and OpenSSL
See also
Chapter 2, Setting up the Public and Private Keys, where the initial setup of the PKI using the easy-rsa scripts is explained.
xCA: a GUI for managing a PKI (Part 1)
In this recipe, we will demonstrate the use of xCA, a graphical tool for managing a public key infrastructure (PKI). xCA—available for Linux, Windows, and Mac OS—is open source software and can be downloaded from http://xca.sourceforge.net. In this recipe, we use the
Windows version of xCA. This recipe is the first of two parts: in this recipe, we create the xCA database and import the CA certificate and private key. In the next recipe, we create a new certificate using the xCA GUI.
Getting ready
Download and install setupj_xca-0.8.1.exe from http://xca.sourceforge.net. This recipe was tested on a PC running Windows XP SP3.
Copy the files ca.key and ca.crt from the easy-rsa certificate environment of the first recipe from Chapter 2, Client-server IP-only Networks, to the Windows PC.
How to do it...
1.Start xCA and create a new database using File | New Database. Choose a path for the new xCA database file and click on the OK button.
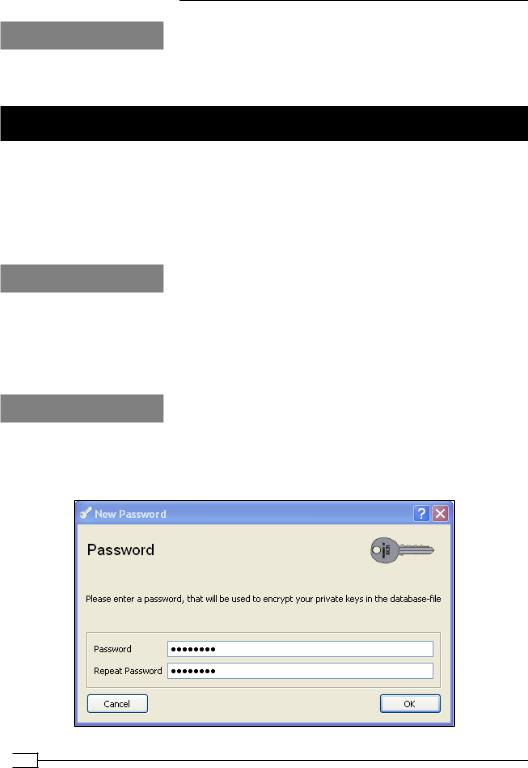
2.Next, choose a password for the database:
 106
106

Chapter 4
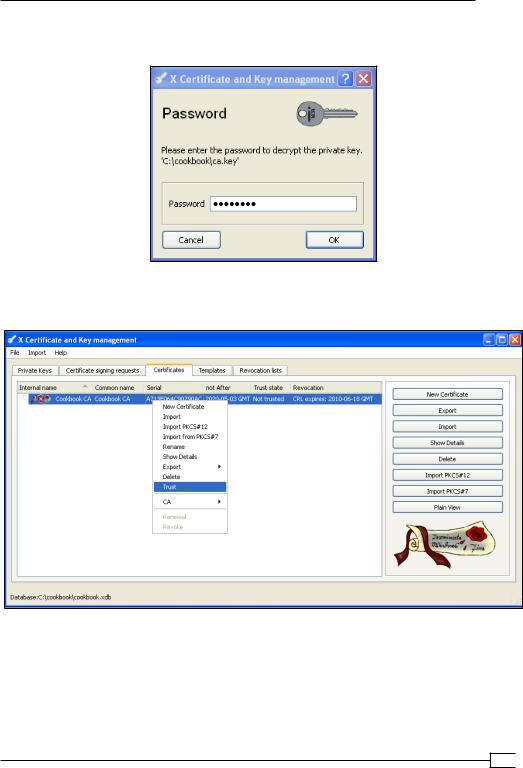
3.In the tab, Private key, click on Import to import the ca.key file. You will be asked to type in the password that was used to encrypt the CA private key:
4.Click on the tab Certificates and click on Import again. Now, import the ca.crt file. After the ca.crt file has been properly installed, right-click on it and select Trust:
107
