

Beginning Visual Basic 2005 Express Edition - From Novice To Professional (2006)
.pdf60 |
C H A P T E R 2 ■ T H E B A S I C S O F V I S U A L B A S I C |
Now you’ll see why I made you go to all the trouble of properly naming the controls. Type in code so that the okButton_click function looks just like this—I’ll explain what it all means when you are finished:
Private Sub okButton_Click(ByVal sender As System.Object, _ ByVal e As System.EventArgs) Handles okButton.Click
If usernameBox.Text = "apress" And _ passwordBox.Text = "noidea" Then
MessageBox.Show("Welcome! You're logged in")
Else
MessageBox.Show("Sorry, try again")
End If
End Sub
I’ve intentionally formatted the code in this rather obscure way to make it easier to explain and understand.
Take a look at the code and you should already be able to figure out what it’s going to do. That’s one of the beauties of using a highly descriptive and communicative language like Visual Basic.
Go ahead and run the application. Type in anything for the username and password, and then click the OK button to see the login failed message. Then try again but type apress for the username, and noidea for the password. You’ll see a message like the one in Figure 2-11
Figure 2-11. Enter the username and password correctly, and the condition statement displays the right message.
The If statement checks two things. It checks whether the text in the usernameBox is set to apress, and whether the text in the passwordBox is set to noidea. If they are, the welcome message gets displayed. The keyword And makes sure that both parts of the condition are satisfied before the welcome message appears.
If statements are not the only place that conditions are used. Visual Basic supports a number of looping keywords to allow you to run blocks of code over and over. For example, in a business application you may need to run over a set of numbers repeatedly until a specific condition is met.

C H A P T E R 2 ■ T H E B A S I C S O F V I S U A L B A S I C |
61 |
The loops that Visual Basic supports are While loops (which run while a condition is met), Do...Until loops (which run until a condition is met) and For loops (which run a specific number of times). I won’t go into a detailed example here, but just to give you the inside track, a While loop might look like this:
While passwordBox.Text <> "noidea"
TryAgain()
End While
The <> symbol means “is not equal to.” Obviously, TryAgain() in this example would probably be some subroutine that prompts the user to reenter the password, with the loop running over and over until the password is correctly entered. For loops are a little more complex:
For index As Integer = 1 To 10
Next
Here the loop runs 10 times. It starts out by declaring a variable (index) to keep track of the number of times the loop has run, and then runs, setting index to every number from 1 to 10 inclusive. When it’s done, any line of code following Next is run.
Summary
I wanted in this chapter to give you a quick tour of the Visual Basic language and the kinds of things you can do with it. The programmers among you will by now have had a lot of your questions answered, but also a lot more will have come up. For example, what about interfaces and structures, abstract classes, reference types and value types, scoping, and so on?
The newcomers among you will also have a lot of questions, I’m sure. This chapter covered a lot of the very basics of Visual Basic, but I intentionally avoided a great many details. It would take an entire book to cover the language and what you can do with it (this book in fact), but Visual Basic is one of those languages where it can be tricky to explain any one thing without introducing a whole bunch of others.
So, in in Chapter 3 you’ll dig a lot deeper, starting out with working with data in your programs, revisiting control structures, and looking at some of the nuances and trip wires Visual Basic brings with it when working with these things. So consider what you just read as a video walk-through of just what the theme park holds. In the next chapter you’ll get to go on some of the rides.

C H A P T E R 3
■ ■ ■
Working with Variables
Now that the whirlwind tours are out of the way, it’s time to drill into the details of Visual Basic 2005 Express. The fundamental thing that every single line of code you write will ever do is work with data—not the big scary database kind of data, but small lumps of data. If you’re adding a screen to your program to handle logging in, for example, you’ll want to work with the username and password that the user enters. That’s the kind of data I’m talking about.
The proper name for this kind of stuff is variables. Variables are places in your program code that you create to store and work with data while your program is running (as opposed to databases, which store data for as long as you need them to). In this chapter you’ll take a look at just how to set up and use variables. Instead of getting too technical, I’m going to focus on the stuff that you’ll want to do every day. For example, how do you store a number and work on it? What about text? How do you convert one type of data to another (numbers to text and vice versa, for example)?
The topics we’ll cover in this chapter are the fundamentals of Visual Basic, the foundations, if you like, on which you’ll build your future magnificent applications.
The Basic Basics
In the whirlwind tour in Chapter 2 I touched on the concept of object-oriented programming. It rears its head even here, but in a good way. You see, every type of data you work with has a class defined for it in the .NET class library, and as you saw in the previous chapter, classes come with handy methods that let you do things.
Every class in the .NET Framework is based on, directly or indirectly, one specific class called System.Object. It all comes back to the topic of inheritance, which I touched on briefly in the preceding chapter. You are a unique individual, as am I, but we are both human. You could say then that we inherit all the traits every other human being has, and then add to those our own unique properties and abilities. I could also say that I indirectly inherit the traits of any other human because there’s a lot between me and the basic
63

64 |
C H A P T E R 3 ■ W O R K I N G W I T H V A R I A B L E S |
definition of a human. Given that I’m a dark-haired English guy with a penchant for technology, you could say that my inheritance chain looks like this:
Human Man EnglishMan DarkHaired Nerd Pete
I am thus indirectly based on a human. Every other object in that chain is also based on a human, but at each stage of the chain more and more unique attributes are added, finally ending up with little old me.
In the .NET Framework every class has at its very core the System.Object class. What this means is that everything System.Object can do, every single class in the .NET Framework can also do. It’s kind of like saying that because humans can walk on two legs, see with two eyes, hear with two ears, and hug with two arms, so can pretty much every other human subclass (like me).
Why is this important, I hear you scream. Well, System.Object brings with it a couple of handy functions, such as ToString(). Take a look at this.
Try It Out: System.Object Stuff
Start up a new console application and then key in some code to set up variables to hold a bunch of different types of data. Because I haven’t covered just how to do that in any real amount of detail just yet, go ahead and copy the following code so that your Main() subroutine looks like mine:
Sub Main()
Dim anInteger As Integer = 12
Dim aDouble As Double = 12.34
Dim name As String = "Pete"
Dim theTime As DateTime = DateTime.Now()
End Sub
Don’t worry too much about what some of the code means at this point. All will become clear a little later in this chapter.
Next, define a new subroutine called ShowMe() that looks like this (add it beneath the Main() subroutine):
Sub ShowMe(ByVal anObject As Object)
Console.WriteLine(anObject.ToString())
End Sub
Can you see where this is going yet? ShowMe() takes a single object as a parameter. Because every type of data you work with in VB Express derives from Object, you can pass literally any kind of data to this. In addition, every type in VB Express has a ToString() method (because the base System.Object class has one), so ShowMe() can get any object to convert itself to a string (lump of text) and write it out to the console.
It gets even better than that. In the call to Console.WriteLine() in the preceding code, you didn’t actually have to put ToString() on the end of the object you passed in. System.Object has a ToString()
C H A P T E R 3 ■ W O R K I N G W I T H V A R I A B L E S |
65 |
method, which in turn means every class you’ll ever use or create has one too. This in turn allows the .NET Framework developers at Microsoft to make handy assumptions. If you don’t pass a string to the WriteLine() method, the code inside that method will call ToString() on whatever you pass to
it. For example Console.WriteLine(myObject) produces the same result at runtime as
Console.WriteLine(myObject.ToString()). I like to put ToString() on code like this
because it makes it clear to me and anyone else reading the code that I am actually after the string version of my object.
Go ahead and add the missing lines of code to the Main() subroutine to call the ShowMe() function:
Sub Main()
Dim anInteger As Integer = 12
Dim aDouble As Double = 12.34
Dim name As String = "Pete"
Dim theTime As DateTime = DateTime.Now()
ShowMe(anInteger)
ShowMe(aDouble)
ShowMe(name)
ShowMe(theTime)
Console.ReadLine()
End Sub
Sub ShowMe(ByVal anObject As Object)
Console.WriteLine(anObject.ToString())
End Sub
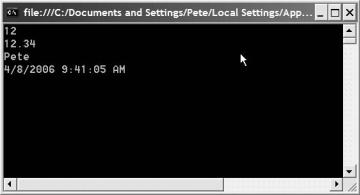
Run the program now and you’ll see the console window in Figure 3-1.
Figure 3-1. All variables can be treated as objects—handy, isn’t it.

66 |
C H A P T E R 3 ■ W O R K I N G W I T H V A R I A B L E S |
This is just shown to demonstrate the fundamental concept that everything is an object. I wouldn’t recommend you go around writing a bunch of methods like ShowMe(), though, that take Objects as parameters. There’s quite a performance hit when you do this, and it all has to do with something called boxing and unboxing, which I’ll cover in Chapter 4 when I discuss classes and objects in more detail.
For now, let’s look at the most common specific data types that you’ll be working with.
Numbers
When I was a kid, a number was a number. Simple as that. When I went to college, they melted my brain with terms like “integer,” “real and complex numbers,” and “floating point.” I didn’t pay attention of course, but soon wished I had.
VB Express has two categories of numbers that it can deal with, and no less than 10 variations of them. You won’t need to memorize exactly how they all work, and so I’m not going to go into excruciating detail on all 10. It’s handy to get an overview of the most common ones in each category, though.
Integers
Integers are whole numbers. They have nothing after the decimal point, and no fractional bits: 1; 2; 3; 50,000,000; 123,878,127; –6687—those are all integers. You’ll find that unless you write code for a bank, integers are probably the most common type of number variable you’ll ever work with in your code.
Declaring and using an integer is simple. For example:
Dim anInteger As Integer = 12
That’s really all there is to it.
Integer Types
In VB Express, there are several integer types, and the only real difference between them is the range of numbers that each can hold. They are (from smallest to biggest) Sbyte,
Byte, Char, Short, Integer, Uinteger, Long, Ulong, Single, Double, and Decimal. The Sbyte,
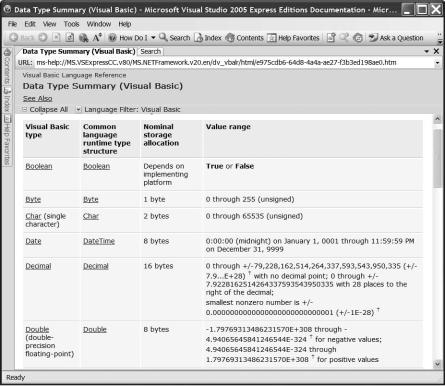
Ushort, Uinteger, and Ulong types can hold only positive numbers (the U prefix stands for “unsigned”). Rather than having me regurgitate the Microsoft documentation, take a look at the online help and search for “Data Type Summary” to see a complete list of the sizes and ranges of numbers these can hold (see Figure 3-2).
C H A P T E R 3 ■ W O R K I N G W I T H V A R I A B L E S |
67 |
Figure 3-2. Search the online help for “Data Type Summary” to get a complete list of the types and the kinds of data each can hold.
Operators
Of course, simply having a variable to store data in is no good if you can’t do anything with that data. To operate on data in a variable, you need to use an operator. On the whole these are pretty straightforward: + adds, - subtracts, / divides, and * multiplies. There are a couple of odd ones, though, and a few things to be careful of.
First the odd ones. You can add and subtract two numbers in a quite simple way:
Dim a As Integer = 1
Dim b As Integer = 2
Dim c As Integer = a + b
You can of course just use the numbers in your code if you so desire:
Dim result = 1000 – 457
68 |
C H A P T E R 3 ■ W O R K I N G W I T H V A R I A B L E S |
A lot of times you’ll just want to add a value to something already inside in a variable. You could do so like this :
loginAttempts = loginAttempts + 1
But a much cleaner way to write this is by using the VB += operator:
loginAttempts += 1
This basically says, “Add 1 to whatever is already inside loginAttempts and store the result back into loginAttempts.”
Now, although VB provides * for multiplication and / for division, you may be surprised to learn that there’s another operator called Mod, which is a modulus. It gives you the remainder of a division. You’ll take a look at this in the next “Try It Out.”
This brings up an interesting point. Since integers can hold only whole numbers, what happens with division? Let’s take a quick look and explore some other subtleties along the way.
Try It Out: Math with Integers
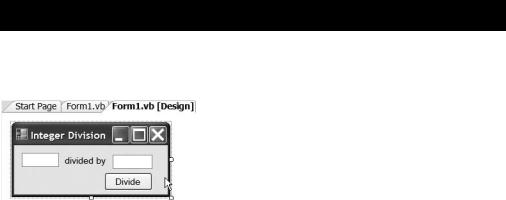
Start up a new Windows application project and drop some controls on the form so that it looks like the one in Figure 3-3.
Figure 3-3. Make your “division” form look like this with some judicial waving of the mouse.
Set the name of the first text box (by using the Name property in the Properties window) to divisorBox. Set the Name of the second textbox to dividendBox. Don’t worry about setting a name for the button.
The first thing you’re going to want to do is put whatever the user enters into some integer variables. Doubleclick the button to open up the code editor for its Click event, and type in just two lines of code to make it look like this (I’ve highlighted the lines you have to add):
Private Sub Button1_Click(ByVal sender As System.Object, _
ByVal e As System.EventArgs) Handles Button1.Click
Dim divisor As Integer = divisorBox.Text
Dim dividend As Integer = dividendBox.Text
End Sub
C H A P T E R 3 ■ W O R K I N G W I T H V A R I A B L E S |
69 |
The old hands among you may have expected to see a bug here. After all, a text box holds text, and an integer is a number. So, how can we possibly copy the contents of a text box into an integer variable? Really, you can’t. Visual Basic is a smart enough language, though, that it will do the conversion from text to an integer for you. Personally, I prefer to actually write the code to do the conversion; that way I can be sure that I know what’s going on.
Change your code to look like this:
Private Sub Button1_Click(ByVal sender As System.Object, _
ByVal e As System.EventArgs) Handles Button1.Click
Dim divisor As Integer
Dim dividend As Integer
divisor = Integer.Parse(divisorBox.Text) dividend = Integer.Parse(dividendBox.Text)
End Sub
Everything in .NET is an object, and objects come with methods that you can use. In the case of an integer, one very handy method is Parse(). Simply pass this method a piece of text, and if that text contains nothing but an integer number, the result will be an integer number, which in this case you can store in your variables.
Let’s keep going and add a new integer variable to store the result of the division:
Private Sub Button1_Click(ByVal sender As System.Object, _
ByVal e As System.EventArgs) Handles Button1.Click
Dim divisor As Integer
Dim dividend As Integer
divisor = Integer.Parse(divisorBox.Text) dividend = Integer.Parse(dividendBox.Text)
Dim result As Integer
result = divisor / dividend
End Sub
Finally, display the result in a message box:
MessageBox.Show(result)
Now you can run the application without any problems. Go ahead and press F5 to run it. Then enter 5 in the first box and 3 in the second before clicking the Divide button to see the result, shown in Figure 3-4.