

Beginning Visual Basic 2005 Express Edition - From Novice To Professional (2006)
.pdf120 |
C H A P T E R 4 ■ C L A S S E S A N D O B J E C T O R I E N T A T I O N I N V I S U A L B A S I C 2 0 0 5 |
But what if you wanted to give the user the flexibility to set the FullName property and then automatically have it set up the surname and forename values inside the class? Realistically that would be unwise—it’s adding code that you don’t really need into the class. You should have either a writeable property or that SetName() method, not both. For the sake of a full example, though, we’ll go ahead and do just that. We’ll stretch our coding legs a little here and use some of the methods on the string to split a larger string into two parts.
I’ll walk you through this step-by-step, so drink that coffee and keep up.
First, remove the word ReadOnly, and add Set to the property:
Public Property FullName() As String
Get
Return _forename + " " + _surname
End Get
Set(ByVal value As String)
End Set
End Property
Like Get, Set is a method. The difference of course is that Get returns a value (it’s a function), and Set expects one and returns nothing (it’s a subroutine). You automatically get a parameter that you can use in your property Set code called value. This is the value that the user of your class is trying to set into the property.
What you need to do is take this value and get the forename and surname from it. One way to do this is to find the first space in the words, because the surname and forename are always separated by a space. That’s not going to work, though, for “John Wilkes Booth” or “Lee Harvey Oswald.” A better way to do it would be to “split” the string based on spaces:
Set(ByVal value As String)
Dim parts() As String = value.Split(" ")
End Set
It looks terribly complex, but it’s really not. In the case of this Set, value will be a String, and String has a method on it called Split(). The Split() method returns an array of strings (after it has split one string into many, you need a place to store the many different words that result).
Split() expects to be passed a list of all the possible things that could be used to split the string. We’re interested only in spaces. We pass just one value into Split()—a space.
C H A P T E R 4 ■ C L A S S E S A N D O B J E C T O R I E N T A T I O N I N V I S U A L B A S I C 2 0 0 5 |
121 |
So, the result of calling Split() will be that you get an array of strings, called names, that hold the various names in FullName. If you had tried to set the property to John Wilkes Booth, you would have an array of three strings, the first item being John, the second Wilkes, and the third Booth.
We’re interested in only the first and last entries, so all that’s required now is a couple of lines to get just those two entries:
Set(ByVal value As String)
Dim parts() As String = value.Split(" ")
_forename = parts(0)
_surname = parts(parts.Length - 1)
End Set
You just set the _forename member to the first item in the array (remember, the first item in an array is always numbered 0), and set the _surname member to the last item in the array (if you have an array of 10 strings, the last item is item number 9). Even if the user just entered a single name (Jason, for example), Split() would still return a single element array.
That’s all there is to it. All that remains is to change the code in Module1.vb to test it out:
Sub Main()
Dim scientist As New Person() scientist.SetName("Albert", "Einstein")
Console.WriteLine("Fullname = {0}", scientist.FullName)
Dim badguy As New Person() badguy.FullName = "John Wilkes Booth"
Console.WriteLine("Fullname = {0}", badguy.FullName)
Console.ReadLine()
End Sub
Notice that you’re intentionally setting FullName to a three-part name. When you run the program, though, you’ll find that only the forename and surname are used, just as we had hoped. You can see the new output in Figure 4-17.

122 |
C H A P T E R 4 ■ C L A S S E S A N D O B J E C T O R I E N T A T I O N I N V I S U A L B A S I C 2 0 0 5 |
Figure 4-17. Notice how John Wilkes Booth is now split into John Booth, and all you did was set a value into a property.
Scoping
There are three VB keywords that I haven’t spent a lot of time explaining but that you’ve seen quite a few times: Public, Private, and Shared. These are all vital keywords that provide you with even more flexibility in how you design the structure of your programs, and more specifically your classes. However, it’s really hard to explain what they are and what they do if you haven’t been introduced to classes, methods, variables, and properties.
This explanation is going to be a little dry, but it’s essential to understanding scoping. Hang in there.
Public
Take a look at a stereo in a car. The stereo is a box embedded in a bigger system (the car itself), which exposes an interface in the form of buttons, slots, a read-out, and maybe one or two knobs. All these things are exposed by the object for you, the user, to interact with. They are known as the public interface. Properties, and methods within objects that are public, are part of the class’s interface. A simple class for a car stereo with the public interface may look like this:
Public Class CarStereo
Public CurrentTime As Date
Public NowPlaying As String
Public Sub SetStation(ByVal stationNumber As Integer)
End Sub
C H A P T E R 4 ■ C L A S S E S A N D O B J E C T O R I E N T A T I O N I N V I S U A L B A S I C 2 0 0 5 |
123 |
Public Sub StoreStation(ByVal stationNumber As Integer)
End Sub
Public Sub TuneRadio(ByVal frequency As Double)
End Sub
Public Sub TurnOn()
End Sub
Public Sub TurnOff()
End Sub
Public Sub ChangeVolume(ByVal level As Integer)
End Sub
End Class
As you can see, this is a simple class with a bunch of public methods and properties to enable users of objects from this class to use it.
Now, because these things are public, they can all interact with each other. For example, calling SetStation() would undoubtedly do something to update the NowPlaying property.
Private
Behind the sleek user interface of any car stereo is a complex set of chips, circuits, and wires that make the stereo do its job. You, the user, don’t need to see these things—the public interface of the class provides you with a simple way to control them. However, there will be stuff behind the scenes that all code in the class needs to work with. By expanding the definition of the class, you get this:
Public Class CarStereo
Public CurrentTime As Date
Public NowPlaying As String
Public Sub SetStation(ByVal stationNumber As Integer)
End Sub
124 |
C H A P T E R 4 ■ C L A S S E S A N D O B J E C T O R I E N T A T I O N I N V I S U A L B A S I C 2 0 0 5 |
Public Sub StoreStation(ByVal stationNumber As Integer)
End Sub
Public Sub TuneRadio(ByVal frequency As Double)
End Sub
Public Sub TurnOn()
End Sub
Public Sub TurnOff()
End Sub
Public Sub ChangeVolume(ByVal level As Integer)
End Sub
Private _tuner As Tuner
End Class
Public Class Tuner
Public Frequency As Double
Public FM As Boolean
Public Sub ChangeFrequency()
End Sub
Public Sub Play()
End Sub
Private Sub ConnectToSpeaker()
End Sub
End Class
Just as your car’s dashboard is made up of various objects, each with its own function, so too is your car stereo. It has a tuner embedded inside, for example, to tune to different radio stations. A tuner is not something anyone would normally want to use outside of the box, but it is a vital component, so in the new code notice how a new class is created, but it’s private. This means that only code that lives inside the same namespace (CarStereo, if you take a look at the top of the source) can use the Tuner class. It’s private to that namespace.
C H A P T E R 4 ■ C L A S S E S A N D O B J E C T O R I E N T A T I O N I N V I S U A L B A S I C 2 0 0 5 |
125 |
The tuner is a private variable within the Stereo class as well. It’s used by most of the other methods, especially the public ones, within the Stereo, but it’s not exposed as a public part of the interface to the stereo’s user.
You’ll also notice that the Tuner has a private method of its own, called ConnectToSpeaker(). The stereo box itself doesn’t need to know how the Tuner makes noise; it just wants it to do so. The Tuner then has a private method just for hooking up its own output to the stereo’s speaker.
Shared
Shared methods are where my stereo analogy falls down a little. Everything you’ve seen so far in this walk-through is collectively called instance members. You need to create an instance of a class (an object) in order to use instance members, and even then there may be restrictions (Public can be used by anyone, Private cannot). Shared methods, on the other hand, are known as class members. These are methods and properties/variables that can be used without actually generating an object. In addition, shared methods can be public or private. A brochure for stereos, for example, may tell you about the stereo but until you go and buy one (and turn the class into an object), you can’t access the instance members. The brochure, then, could be thought of as being a shared method of the class.
Shared methods in particular are very useful when you need a block of code that you can call over and over but that doesn’t really apply to an instance of a class. A good example (which you’ll come across later in the book) is getting connection info to talk to a database. This is typically a string that’s stored in a config file (a text file) that the application needs to read in order to be able to connect to the database. The signature of the method, at least, would look like this:
Public Class DatabaseStuff
Public Shared Function GetConnectionString() As String
End Function
End Class
This looks pretty much like any other method definition, doesn’t it, with the obvious addition of the word Shared. What this means is that the method can be called like this:
Dim dbString As String = DatabaseStuff.GetConnectionString()
Notice that instead of creating an object from the class first, and prefixing the name of the method with the name of the object, you can just use the class name, in this case DatabaseStuff. No instantiation required.
This is called a shared method. You’ll see a lot more about shared methods throughout the rest of the book, in large part because the starting point for every .NET application is a shared method called Main() that you’ve seen a few times now.

126 |
C H A P T E R 4 ■ C L A S S E S A N D O B J E C T O R I E N T A T I O N I N V I S U A L B A S I C 2 0 0 5 |
DON’T USE SHARED METHODS EVERYWHERE
At my last job, a company director felt the need to get involved in coding on an internal project. He’d had a lot of experience with classic ASP and Visual Basic, but this was to be his first .NET project.
I kick-started his work and gave him a brief hands-on walk-through of things he should know. Included in that demo, I created a shared method to grab a database connection string, just as I’ve just shown you.
I next saw his code about a month later, and to my horror found he had about 30 classes in his project with every single method being a shared method. This is bad. Don’t do it.
If you use shared methods all the time, you aren’t giving .NET a chance to clean up memory from unused objects (because you are never creating objects, just calling class methods on classes). The net result is that your program bogs down and starts to get slow. More to the point, by using shared methods you are forgoing all the benefits that object-oriented programming can bring you, such as inheritance and encapsulation of data and functionality.
Using shared methods everywhere is an easy trap to fall into if you come from a classic VB background, so be aware of it and try to use them sparingly.
Summary
As usual, we’ve covered a lot in this chapter—more than I had originally planned, in fact. But, it’s all vitally important. Visual Basic 2005 is an object-oriented programming language and so everything you do will make use of the OOP facilities the language provides. By using these tools effectively and really working in a true OOP style, your programs can become a lot easier to maintain, extend, and work on than their non-object-oriented cousins. But, you’ll notice that so far you haven’t really looked at just what is a good way to use these facilities to design a great OOP app. The bad news is that I don’t really have the time or scope to do that in this book. Throughout the rest of this book and especially
in the next chapter (where you’ll look at some of the more advanced OOP features of Visual Basic 2005), I’ll try to coax you toward the good habits and away from the bad. But it’s well worth picking up one or two other books after you have Visual Basic 2005 figured out to get a good grip on just what is, and what isn’t, good OOP design.

C H A P T E R 5
■ ■ ■
More-Advanced Object
Orientation
By now you should have a good grip on the structure of the code that goes into a Visual Basic 2005 application. The preceding chapter in particular brought together the elements that make the most fundamental building blocks of all the code that you’ll write: classes.
There’s more to it than that, though, including the “design” point of view. In this chapter you’ll take a look at key features of OOP, including inheritance and interfaces, and something very scary sounding, but quite painless, called virtual methods and abstract classes. You’ll also take a peek at some of the things going on behind the scenes when you use objects, particularly when you start passing them around between methods.
After a brief interlude in the next chapter, we’ll move our focus more toward building functional and useful Windows applications, so I’ll try my best here to not only get you up to speed on these slightly more advanced OOP concepts, but also give you some pointers on the whys and wherefores of OOP and Visual Basic 2005. Just why do we do something one way and not another? Just why do we have all these neat, but initially confusing, features such as inheritance?
Inheritance
I drive a well-worn Jeep. My dad drives an even more loved Ford, the UK equivalent of a Ford Taurus. Both these objects have something in common; at their very core, they are cars. I can jump in my Dad’s car and know that the controls all work the same as in my Jeep, and in fact the same as in any other car. Similarly, my Dad can jump in my Jeep and know that it too does everything a car should do, but with the added ability to move troops, guests, or hoards of squealing children through muddy bogs and ravines.
Both the Ford and my Jeep “inherit” functionality from a base class: the Car. Look around the room you’re in and you’ll see a myriad of other examples of inheritance in the real world. The notebook I’m writing this on is a computer, but with the added advantage that it’s portable. My chair has the same functions as any other chair in the world, but with
127
128 |
C H A P T E R 5 ■ M O R E - A D V A N C E D O B J E C T O R I E N T A T I O N |
the added bonus of a bendy back and wheels. My dogs, Mac and Tosh, are just like any other dogs in the world, but with additional functionality geared toward yipping and drooling.
Inheritance lets you specialize objects to a specific purpose. Perhaps you want a text box that accepts only numbers, and that beeps whenever the user presses a key. That can be achieved by creating a new TextBox class that automatically inherits all the functionality of the standard text box class. That way you get the “base” class to handle all the drawing of the control and its contents, but provide your own custom code to handle beeping and numeric-only entry.
Let’s start out with a simple (and a little dull—sorry) example of just how to do the inheritance thing.
Try It Out: Inheritance
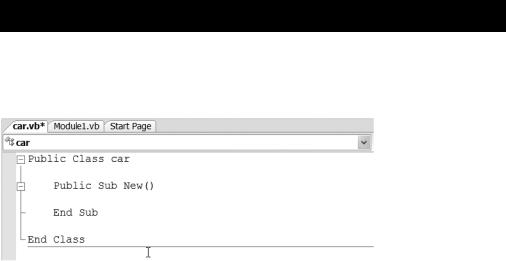
To keep things simple for now, start up a new console application and add a new class to it called Car.vb. When the code editor appears, add in the constructor, just as in Figure 5-1. (You recall that you can do this by just clicking in the drop-down list at the top right of the code editor and choosing New.)
Figure 5-1. Add a new class called Car.vb to the solution.
Still in the code editor for the Car class, add Drive() and Brake() methods as I’ve highlighted in the following code:
Public Class Car
Public Sub New()
End Sub
C H A P T E R 5 ■ M O R E - A D V A N C E D O B J E C T O R I E N T A T I O N |
129 |
Public Sub Drive()
Console.WriteLine("We're now whizzing down the road")
End Sub
Public Sub Brake()
Console.WriteLine("The car comes to a screeching stop")
End Sub
End Class
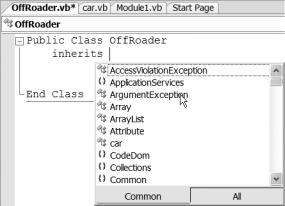
Now add another class to the project, this time called OffRoader.vb. Because an off-roader (4 x 4, SUV, call it what you will) inherits all the basic functionality of a car, you need to set up this new class to inherit from the base Car class. You do this simply by typing Inherits on the first blank line in the class. This opens an IntelliSense drop-down list for inheritance, as you can see in Figure 5-2.
Figure 5-2. Typing the Inherits keyword tells Visual Basic 2005 Express that you want to inherit another class. IntelliSense helps you choose the class.
Choose Car from the list, or just type in Car, and your class will look like this:
Public Class OffRoader
Inherits Car
End Class