

Beginning Visual Basic 2005 Express Edition - From Novice To Professional (2006)
.pdf40 |
C H A P T E R 2 ■ T H E B A S I C S O F V I S U A L B A S I C |
The Sub line in the screen shot is so long that it extends off the right-hand side of the editor. To view the whole line of code, you would need to scroll the editor to the right by using the scrollbar at the bottom. However, the code before the screen shot splits that long line of text in two, and if you look closely you’ll notice that the first line ends with an underscore symbol.
In Visual Basic each line is treated as a command. When you are finished entering a command, you hit the Enter key. The Visual Basic compiler is smart enough to know that when it reaches the end of a line, that command is finished and the next physical line in the code starts something new. Sometimes this is a pain. For example, if you do have a long line of code such as the one at the start of the preceding subroutine, splitting the code over two lines can be handy. The underscore symbol is used for that purpose. By placing an underscore at the end of the line, you are telling the Visual Basic compiler “I’m not finished yet—the next line continues this one.” I have used the underscore throughout the book because the width of the book’s pages places a limitation on the length of the code lines.
Subroutines and their cousins, functions, are the lifeblood of your programs. Let’s dive in and take a closer look at what they do and how they work.
There used to be a time when if you wanted to write a computer program, you’d just sit down and key in reams of code with little to no structure to it. Today things are different. Program code is broken down into classes, and within those classes into functions and subroutines (collectively known as methods).
Subroutines let us group blocks of code into a common place, a subroutine. Instead of performing each individual step each time we need to do something, we can just call the subroutine. Think of it as making coffee. You don’t go to your favorite coffee house and tell the guy at the counter, “Grab some milk, make it really hot and fluffy, grab some beans…” Instead you just say, “One skinny decaf semi-skinned latte and a doughnut please,” and they know exactly what to do. The guy at the counter knows how to perform the function “one skinny decaf semi-skinned latte with a doughnut.” That subroutine has a bunch of steps to it, but in our coarsely grained world, we the customers don’t really care what they are. That’s how programmers like to think too.
Strictly speaking, ordering a cup of coffee is actually a function. Think of subroutines as orders you give at a coffee shop, expecting no result. For example, telling the guy at the counter you will be using a credit card is a subroutine. He might take some steps to prepare for receiving your credit card, but you don’t get anything out of him other than that. Functions return something to you. Ordering a cup of coffee and doughnut is a function because when all the steps are complete, the guy behind the counter will hand over the goods along with a cheesy smile.
The distinction is typically so subtle that when subroutines and functions live inside of a class, we call both of them methods.
C H A P T E R 2 ■ T H E B A S I C S O F V I S U A L B A S I C |
41 |
Try It Out: Creating Methods
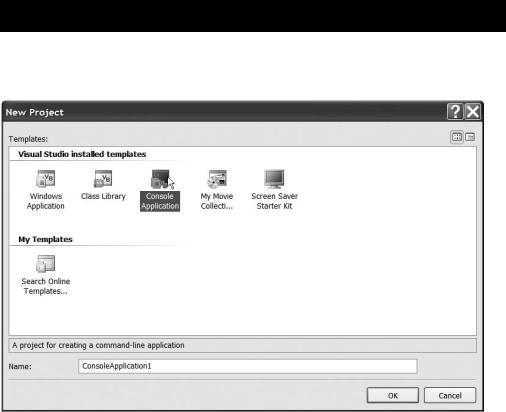
Start up a new console application, by choosing New Project from the File menu. When the New Project dialog box appears, choose Console Application and click OK. You can see the New Project dialog box in Figure 2-4.
Figure 2-4. You can create a console application by choosing Console Application as the project type when starting up a new project.
When the code editor appears, type in code so that the Main() subroutine looks like this:
Sub Main()
For x As Integer = 1 To 10
Console.WriteLine("Counting up : {0}", x)
Next
For y As Integer = 10 To 1 Step -1
Console.WriteLine("Counting down: {0}", y)
Next
Console.ReadLine()
End Sub
42 |
C H A P T E R 2 ■ T H E B A S I C S O F V I S U A L B A S I C |
It’s not too hard a program to read, even if you’re not totally comfortable with Visual Basic. But subroutines could make it even easier to follow.
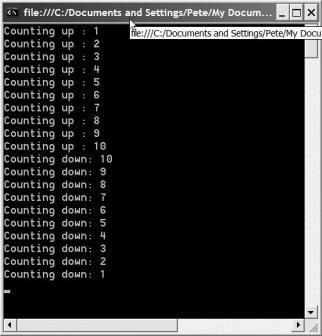
Run the program and you’ll see a console window appear that simply shows the numbers from 1 to 10, then from 10 to 1. Finally, the program waits for you to hit the Enter key on the keyboard before it finishes (whenever the Main() subroutine finishes, so too does your program). You can see the program’s output in Figure 2-5.
Figure 2-5. The console window shows the output of a console application.
Given what the program does (counts up, counts down, and waits for input), it would be a lot easier to read and understand if you broke those three operations out into separate subroutines. Let’s go ahead and do that now.
C H A P T E R 2 ■ T H E B A S I C S O F V I S U A L B A S I C |
43 |
The first block of code you’ll tackle is the bit that counts up. So, you’ll create a new subroutine called CountUpwards(). Make the highlighted changes to the source code:
Module Module1
Sub Main()
For x As Integer = 1 To 10
Console.WriteLine("Counting up : {0}", x)
Next
For y As Integer = 10 To 1 Step -1
Console.WriteLine("Counting down: {0}", y)
Next
Console.ReadLine()
End Sub
Sub CountUpwards()
End Sub
End Module
Next, cut and paste (not copy and paste) the first For...Next block down into the new subroutine:
Sub Main()
For y As Integer = 10 To 1 Step -1
Console.WriteLine("Counting down: {0}", y)
Next
Console.ReadLine()
End Sub
Sub CountUpwards()
For x As Integer = 1 To 10
Console.WriteLine("Counting up : {0}", x)
Next
End Sub
44 |
C H A P T E R 2 ■ T H E B A S I C S O F V I S U A L B A S I C |
So, now you have a new subroutine that counts up from 1 to 10. You need to call it though. You need a new line of code in the Main() subroutine that can actually hand over control to the new subroutine. This is easy. When you wrote Console.ReadLine(), for example, you were calling a subroutine (method) called ReadLine. So, all you need to do to call a new subroutine is type its name on a line in your code. Our new subroutine is called CountUpwards(), so the change you need to make is fairly straightforward:
Sub Main()
CountUpwards()
For y As Integer = 10 To 1 Step -1
Console.WriteLine("Counting down: {0}", y)
Next
Console.ReadLine()
End Sub
Sub CountUpwards()
For x As Integer = 1 To 10
Console.WriteLine("Counting up : {0}", x)
Next
End Sub
It’s customary, though not required, to suffix the name of the subroutine you are calling with parentheses. When you get used to reading code, you’ll find that doing this makes it obvious where you are calling subroutines, and where you are dealing with something else.
Go ahead repeat what you just did, creating a new subroutine called CountDownwards(), and move the second For...Next block into that new subroutine. When you’re finished, your code will look like this (I’ve highlighted the changes for you):
Module Module1
Sub Main()
CountUpwards()
CountDownwards()
Console.ReadLine()
End Sub
Sub CountUpwards()
For x As Integer = 1 To 10
Console.WriteLine("Counting up : {0}", x)
Next
End Sub
C H A P T E R 2 ■ T H E B A S I C S O F V I S U A L B A S I C |
45 |
Sub CountDownwards()
For y As Integer = 10 To 1 Step -1
Console.WriteLine("Counting down: {0}", y)
Next
End Sub
End Module
If you run the program now, you’ll find that it works just the same as before. The only difference is in how you have structured the code. Rather than having one long Main() subroutine, you broke it into three subroutines. Why? Well, other than the benefit of getting some experience under your belt in writing your own subroutines, this process made the Main() subroutine a lot easier to understand. Rather than having a bunch of technical code in there, the Main() function looks like this now:
Sub Main()
CountUpwards()
CountDownwards()
Console.ReadLine()
End Sub
It’s dead easy to look at that and know what the program is going to do, even if you are new to Visual Basic. There are other benefits to refactoring the code like this. If there is a bug in the program, perhaps in how it counts upward, it’s easy to identify quickly just which subroutine is likely to have the error. You can even easily rearrange the order that the program does things, perhaps to make it count down first, and then up. Go ahead and try moving the lines of code in the Main subroutine around to see what I mean. Now imagine if you had tried to do the same things when the Main subroutine contained all that longhand code for the two loops.
Obviously this is a contrived example, just so that I can get my point across, but you should recognize just how useful subroutines can be if you were writing a much larger and far more complex program.
Take a look at the source for a brand new console application once again:
Module Module1
Sub Main()
End Sub
End Module
Whenever you run a program, the computer needs to know just where to start; if you have a bunch of forms in your application, each with a selection of event handlers and other functions, the computer has no real way of knowing the starting point. That’s where the Main() subroutine comes into play (whenever you see me name a function from now on, you’ll notice me put () after it–this shows that I’m talking about a function as opposed to something else).

46 |
C H A P T E R 2 ■ T H E B A S I C S O F V I S U A L B A S I C |
All .NET programs contain a single Main() function, and this is where the program starts. When you create a Windows Forms application, you don’t get to see the Main() subroutine yourself. Instead, VB Express creates it for you and hides it behind the scenes. You then tell VB Express which form you want to start your application with, and it amends the hidden Main() subroutine accordingly.
So, when you run a program you are effectively saying “Do everything that the Main() subroutine tells you to do”. Of course, Main() is just one function, and with any nontrivial program it makes sense to have a few others—doing so simplifies the structure of the code, makes it easier for you to read, and decreases the likelihood of making quite so many mistakes.
Types
Now take a look at the source for a brand new form in a Windows application again. If you want to follow along, you can see this for yourself by creating a new Windows application, clicking in the form, and then pressing F7 to show the source code for it:
Public Class Form1
End Class
Notice how there is no Main() subroutine, but there is something called a class, in this case a class called Form1.
Visual Basic is an object-oriented language, and types, like the preceding class, are absolutely vital to everything you do in any serious VB program. So you’ll be working with classes a lot, almost exclusively in fact, throughout the rest of the book.
Instead of focusing on what a program is supposed to do and how it is supposed to do it, object-oriented programming lets you focus on the objects that your program needs to work with. You then add methods to the objects to essentially turn them into selfcontained black boxes of functionality. A class is the type from which an object is created.
Okay, that’s as clear as mud. Think of it this way. A billionaire is someone who has far too much money for their own good. A billionaire, then, is a type, or class, of person. Bill Gates is an object of that class. So, class defines the characteristics of something (a dog hasfour legs, a car has four wheels, a billionaire has a small continent for a vacation home), and an object is an instance of that class (Mac, my attack spaniel, is an object of the dog class).

C H A P T E R 2 ■ T H E B A S I C S O F V I S U A L B A S I C |
47 |
As you’ve probably figured out from the preceding code, you define a class simply with the Visual Basic keyword Class followed by a name for the class (Dog, Cat, Billionaire, InsanelyJealousAuthor, and so on). Everything that is a part of the class then goes inside the class block (the stuff between the line with the word Class on it and the line that says
End Class).
But that doesn’t really explain how to actually create an object from a class, does it. Let’s take a look at some code.
Try It Out: Creating and Using a Class
Create a new console application, just as before. If you don’t want to save the project, don’t worry about giving it a name, just accept the standard one.
What you’ll do in this program is hold some information about my two dogs and be able to display that information in the console window. Without classes and objects, this program would have taken one of two forms. You’d either create a whole bunch of variables (don’t worry, I’ll get into what variables are shortly), or create a couple of arrays (lists of variables, which I’ll cover later as well). The code would get pretty long and messy.
With an object-oriented programming language such as Visual Basic, you can tackle the program by defining a Dog class. Let’s go ahead and add code into the code editor. The first thing you need to do is create the class itself:
Module Module1
Sub Main()
End Sub
End Module
Class Dog
End Class
As you can see, defining a class is really pretty easy stuff. In a much bigger application than this, you’d define the class in its own .vb file within the project, just to keep things simple and easy to navigate, rather than having a mass of code all bunched into a single source file.
48 |
C H A P T E R 2 ■ T H E B A S I C S O F V I S U A L B A S I C |
The next thing you’re going to need to do is add some fields to the Dog class. Fields on classes are similar to the properties you’ve already seen on controls when creating an application’s Windows-based user interface. The big difference of course is that you need to create those fields yourself. It’s quite painless, though. Go ahead and add a couple of fields to store information about the dog’s name and breed in the class, like this:
Class Dog
Public Name As String
Public Breed As String
End Class
Okay, now I can talk about variables a little bit (much more to come later—they’re quite an important deal). The fields you’ve added here are really just variables. The Public part simply says that this is a “visible”, or public, field of the Dog class. The two fields are both string fields, which means that they are going to hold text and alphanumeric data as opposed to numbers. The final part of the field declarations just gives the two fields names; in the first case, Name, and in the second case, Breed.
So, you have a Dog class that can store data about the dog (the dog’s name and breed), but no functionality that actually does anything. Time to write a method (remember what I said earlier—subroutines inside classes are usually called methods):
Class Dog
Public Name As String
Public Breed As String
Public Sub ShowInfo()
Console.WriteLine("{0} is a {1}", Name, Breed)
End Sub
End Class
This is a pretty simple method. It makes a call out to Console.Writeline() and outputs the contents of our two fields. That’s really where the {0} and {1} symbols come in. You can pass a list of things to WriteLine(), and it will replace those {} symbols with the items from the list, in this case Name and
Breed.
Now that you have a Dog class, all that remains is to create a couple of dog objects from it.
Creating an object from a class is straightforward. Let’s add a line of code to the Main() subroutine to do just that:
Sub Main()
Dim mac As New Dog()
End Sub
C H A P T E R 2 ■ T H E B A S I C S O F V I S U A L B A S I C |
49 |
To create an instance of a class (when you make an object, we say that you are creating an instance of a class), you use the Dim keyword. Back in ancient times (the late 60s) when BASIC was first invented, Dim meant ”dimension.” You were asking the BASIC system to dimension a block of memory to store your new data. It doesn’t really mean that these days, but it’s accepted that Dim means make something new. In our case we’re making an object called mac that is a New Dog.
After you’ve created an object, you can start working with its methods and properties, just as if you were working with properties on a control in a Windows Forms application. Add some more lines to set the object’s name and breed:
Sub Main()
Dim mac As New Dog() mac.Name = "Mac"
mac.Breed = "Fluffy attack spaniel"
End Sub
Remember how you set up the Name and Breed fields to hold strings? That’s why the values that you put into those fields in our code here are contained within double quotation marks.
Let’s create a second dog object, and then get them both to show some information about themselves by calling the ShowInfo() method you defined inside the Dog class:
Sub Main()
Dim mac As New Dog() mac.Name = "Mac"
mac.Breed = "Fluffy attack spaniel"
Dim tosh As New Dog() tosh.Name = "Tosh"
tosh.Breed = "Uber dumb muppet spaniel"
mac.ShowInfo()
tosh.ShowInfo()
Console.ReadLine()
End Sub
The program is complete. If you run it now, you’ll see a console window like the one in Figure 2-6.