

Beginning Visual Basic 2005 Express Edition - From Novice To Professional (2006)
.pdf10 |
C H A P T E R 1 ■ W E L C O M E T O V I S U A L B A S I C E X P R E S S |
Figure 1-9. The Hello, World program, running for the first time
If you try making the window smaller or larger, you’ll find that the text always remains in the same position and could even vanish if you made the window small enough. That needs to change. Close the window (by clicking its Close icon—the X ) and you’ll be returned to the VB Express IDE.
At this point, even in classic Visual Basic, you’d have to do a bunch of typing to get that text to stay centered on the form. Not so anymore. Click on the label once to make sure it’s selected and then take another look at the Properties window.
First, scroll up to find the property called AutoSize. This is set to True, which means that the label will always be just big enough to hold all the text inside. No bigger, no smaller. Double-click the word True next to the property name to set it to False.
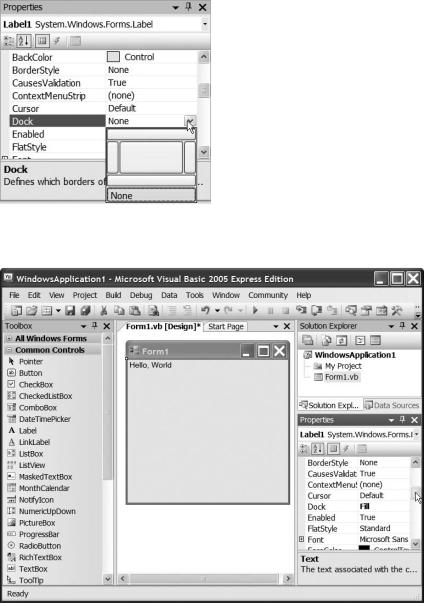
Now find the Dock property. Dock lets you lock a control, like our label, to a specific position on the form. You want the label to always be the same size as the form. If you click on the word None next to the Dock property name, you’ll see a down arrow appear. Click it, and you’ll see a Dock property editor appear as in Figure 1-10.
Each box in the editor represents a position inside the form. Click on the middle one to make the label fill the entire form. You should see the Dock property value change to the word Fill, and the label will grow to take up the entire form. You can see this in Figure 1-11.
C H A P T E R 1 ■ W E L C O M E T O V I S U A L B A S I C E X P R E S S |
11 |
Figure 1-10. The Dock property editor
Figure 1-11. The label should now fill the form (if you look closely, you’ll see a subtle border inside the form itself).
Now all that remains is to align the text properly within the now massive Label control. This is achieved in much the same way as setting up the Dock property. Find the TextAlign property, and just as you did with the Dock property, click the property value and then click the arrow that appears, as in Figure 1-12.

12 |
C H A P T E R 1 ■ W E L C O M E T O V I S U A L B A S I C E X P R E S S |
Figure 1-12. The TextAlign property editor works in a similar way to the Dock property editor.
Again, click the middlemost button to center the text in the control, and then press F5 to run the program once again. This time the text remains centered, no matter how big or small you make the form. You just did, with a few mouse clicks, what traditionally would have taken quite some code to achieve.
It’s a very simple example, but it does show how Visual Basic 2005 Express is totally geared toward making your life easier as a developer.
When you’re finished exploring the example, close it from the File menu by selecting File Close Solution. A dialog box appears, asking whether you want to Save or Discard the project. Click Discard (unless of course you really want to save it to your disk for posterity).
ALREADY USED .NET?
If you’ve used .NET before, you’ll know that creating simple projects to try things out was something of a pain. You’d create a new Windows application, for example, and call it WindowsApplication1, and Visual Studio would save that to your hard disk. This meant of course that if you created a bunch of simple example programs to test things out, you’d end up with a bunch of unused directories and files on your hard disk.
The Express tools and Visual Studio 2005 get around that problem with temporary projects. Any project you create is classed as a temporary project and will be discarded when you close it or shut down the IDE, unless you explicitly save it.
When using temporary projects, you can create as many test programs as you like without worrying about cluttering up your hard disk.

C H A P T E R 1 ■ W E L C O M E T O V I S U A L B A S I C E X P R E S S |
13 |
FOR THE VISUAL BASIC DEVELOPERS
If you did press Save instead of Discard at the end of the preceding “Try It Out,” you would have noticed that you were asked just two things: what you want to call the project, and where you want it stored. This is completely different from Visual Basic, in which saving a project resulted in a series of dialog boxes appearing and asking you to name every file in the project and the project itself.
The reason for this can be found in the Solution Explorer. When you first create a project, you are asked to give it a name. This name appears in the Solution Explorer. Similarly, each file you create is also assigned a name, which you can change by right-clicking the file in the Solution Explorer and choosing Rename. For example, our form from the earlier “Try It Out” is a file called Form1.vb.
When you save a project in Express, a directory is created for the project based on its name, and all the files in the project are saved into that directory by using the names shown in the Solution Explorer. Isn’t that so much easier?
Exploring the IDE a Little More
I’ve just scratched the surface of what the Visual Basic 2005 Express IDE can do for you. This is only Chapter 1, after all. So, let’s take a minute to look at some of the other cool features it has before you dive into a much bigger “Try It Out” example.
At the start of this section I mentioned that your IDE might look a little different from mine. Let me show you why (even if you have used Visual Studio before, keep watching— this is pretty cool).
Each of the things around the form editor (the Properties window, the Toolbox, and so on) is actually a docked window. You can make them hide and appear on demand, you can undock them and leave them floating around on the desktop, and you can even stick them to different edges of the IDE.
Try it—grab the title of the Properties window and drag it left. The screen changes to look like the one in Figure 1-13.
Notice all the arrow shapes. These let you tell VB Express exactly where you want the window that you’re dragging around docked. Simply drag over the appropriate arrow, and hey, presto, the window docks. Prior to this marvelous invention, I always found docking and moving windows to be a real pain in the neck; I could never position the floating window in just the right place for it to dock to where I really wanted it to end up.
You’ve probably already noticed that there are more windows docked around the edges of the IDE than just the Solution Explorer and the Properties window. In fact, if you tell the IDE to display every possible window, you soon end up with a huge mess of tabs everywhere. VB Express, like its big brother Visual Studio, has a ton of windows that you can use to gain different views into your application and the things going on with it.

14 |
C H A P T E R 1 ■ W E L C O M E T O V I S U A L B A S I C E X P R E S S |
Figure 1-13. The new docking arrows make it simple to put a floating window exactly where you want it.
You can see the full list of windows by clicking the View menu at the top of the IDE, as shown in Figure 1-14.
Figure 1-14. The full list of windows in Visual Basic 2005 Express

C H A P T E R 1 ■ W E L C O M E T O V I S U A L B A S I C E X P R E S S |
15 |
Rather than bore you to tears explaining each one in excruciating detail, Table 1-1 summarizes what each window does. You’ll look in more detail at each of them as you come across them throughout the book.
Table 1-1. The Full List of Standard Windows Available in Visual Basic 2005 Express
Window Name |
Description |
Code |
Shows you the actual Visual Basic code behind a form. When writing |
|
programs in VB Express, you’ll find yourself switching between the form |
|
designer and the code behind the form a lot. |
Designer |
You’ve seen the designer already. The designer is the view you’ll use to |
|
drag controls from the Toolbox onto your forms to build up your |
|
application’s user interface. |
Database Explorer |
When you start programming database-aware applications, the Database |
|
Explorer comes into play, showing you the tables, stored procedures, and |
|
other artifacts inside the database you’re working with. |
Solution Explorer |
The Solution Explorer, as you’ve seen, shows you all the files in your |
|
project. A solution, though, can contain more than one project, and in |
|
that case the Solution Explorer will show you every single project in the |
|
solution, and all the files in each project. |
Object Browser |
As you’ll see throughout the rest of this book (and in the “Try It Out” |
|
shortly), everything you do when creating programs in VB Express |
|
revolves around using objects. The Object Browser shows you just which |
|
ones are available to you (think of it as a glimpse into the .NET LEGO box) |
Error List |
Inevitably as you start to work on your own programs (and even when |
|
working through some of the examples in this book), you’ll make mistakes |
|
that will show up as errors when you try to run the program. When that |
|
happens, the Error List automatically comes into view, letting you double- |
|
click on each error to automatically jump to the corresponding problem in |
|
the code. |
Properties |
The Properties window gives you a way to customize the look and feel, |
|
and behavior, of the various components of your program and its user |
|
interface. |
Toolbox |
The Toolbox is a dynamic window in that its contents change based on |
|
what you are doing. If you are designing a form for your application’s user |
|
interface, for example, the Toolbox shows you all the various user |
|
interface controls that you can drop onto the form to customize it. |
Document Outline |
The Document Outline window gives you a great way to keep track of |
|
everything on your forms as you build them. For example, if you add a |
|
group box to the form, and then a button inside the group box, the |
|
Document Outline window will show a nice hierarchical tree indicating |
|
exactly which controls and UI elements contain which other UI elements. |
Output |
When you compile and run a program, this window shows you the output |
|
of the Visual Basic compiler. It can also be used by your own program to |
|
output debugging information while it’s running. |
Continued

16 C H A P T E R 1 ■ W E L C O M E T O V I S U A L B A S I C E X P R E S S
Table 1-1. Continued
Window Name |
Description |
Task List |
The Task List is a flexible window, showing you the errors that occurred at |
|
compile time, as well as tasks that you have added yourself. You can |
|
actually write little notes into your application to remind you to do things, |
|
and these appear in the Task List window. |
Start Page |
This window displays the start page, the view that you see when you first |
|
start VB Express. The Start Page window shows you news and other |
|
interesting tidbits from the Microsoft Express communities. |
Web Browser |
VB Express includes a built-in web browser, and that is just what the Web |
|
Browser window is. This is a great tool for quickly looking something up |
|
on the Internet if you come across some problems in your code. It’s also |
|
the window that’s used to display the online help system. |
Find Results |
Your programs can get huge. If VB Express had a search tool like that in |
|
Microsoft Word, finding things would be a nightmare (you’d have to keep |
|
repeatedly clicking through a Find dialog box to get to just the thing you |
|
really need). Instead then, VB Express has a Find Results window that |
|
shows you every match that a Find finds. Just double-click an entry in the |
|
Find Results window to jump right to the located element. |
|
|
As you work through the next “Try It Out,” use the View menu to display some of the windows in Table 1-1 and watch how they update as you work through the example.
The main toolbar of the IDE also provides you quick access to some of the most common windows. The View icons are at the right-hand end of the toolbar, as shown in Figure 1-15.
Figure 1-15. Icons on the main toolbar provide quick access to some of the most common windows.
Simply hover the mouse over an icon to see a ToolTip appear, explaining what the button does.
Working with the Editors
You already experienced working with the form designer in the previous “Try It Out.” Let’s take a more detailed look before you dive into the next “Try It Out.”
Most of the nontrivial programs you’ll work on will have more than one form and definitely more than one source code file. It’s not uncommon, therefore, to have many editors

C H A P T E R 1 ■ W E L C O M E T O V I S U A L B A S I C E X P R E S S |
17 |
open at once. VB Express shows each currently open “document” as a tab across the top of the main editor window, as in Figure 1-16.
Figure 1-16. When the editor has more than one document open, tabs at the top of the editor window let you quickly select which document to jump to.
You can switch between the various open documents either by clicking the tab you want or by holding down the Ctrl key and pressing Tab. When you do that, a dialog box appears, as in Figure 1-17, showing you all the open documents and windows in the IDE.
Figure 1-17. Holding down the Ctrl key and then pressing Tab shows you which documents and windows are currently open in the IDE.
If you keep tapping the Tab key while holding down the Ctrl key, you’ll find that the highlight moves between each document in the Open Files list. Alternatively, while still

18 |
C H A P T E R 1 ■ W E L C O M E T O V I S U A L B A S I C E X P R E S S |
holding down the Ctrl key, you can click the document or window that you want to activate, or even use the arrow keys on the keyboard.
VB Express also offers you a stunning amount of flexibility in how you can configure the editors (form editor, code editor, and so on) to suit you best. For example, I develop on a machine with two monitors, and I like to have a form or source code displayed on one monitor, and another source file on a separate monitor. This is really easy to set up in VB Express. Just right-click one of the editor tabs, and a context menu appears, as you can see in Figure 1-18.
Figure 1-18. Right-clicking an editor tab pops up a context menu.
If you then select New Vertical Tab Group, the editor splits in two vertically (I would have preferred Microsoft to call this New Horizontal Tab Group, because it creates a new group of tabs listed horizontally across the top of the screen). You can see this in
Figure 1-19.
So, on my machine I simply make VB Express span both monitors, create a new vertical tab group, and then click and drag the divider bar that splits the editor window in two until I have each half of the editor taking up exactly one monitor.
If you really wanted to go crazy with this, you could keep creating new vertical and horizontal groups and end up with a bunch of source files on display at once. Realistically though, even on two monitors, that makes the display very cramped indeed (I yearn for a couple of Apple Cinema 23-inch flat screen monitors, but until I get them, I’ll just relegate this feature to the “neat to have” box).

C H A P T E R 1 ■ W E L C O M E T O V I S U A L B A S I C E X P R E S S |
19 |
Figure 1-19. Creating a new vertical tab group splits the current editor view in half, vertically.
As I said, this is a “neat to have” feature, but it doesn’t really offer developers like you that much in the way of productivity benefits. IntelliSense on the other hand does.
All versions of Microsoft’s “Visual” development tools have had IntelliSense for years. In fact, even Microsoft’s Office tools now have IntelliSense, but that’s really only because office workers using Excel and Word get jealous when they see all the cool toys that we developers have to play with.
IntelliSense basically is a way for Visual Basic 2005 Express to guess what it is you’re trying to do and offer assistance as you write your program code. It’s awesome. In fact, in VB Express it’s beyond awesome thanks to another neat technology called code snippets, which you’ll look at shortly.
Try It Out : Using IntelliSense
Create a new project in Visual Basic 2005 Express by selecting File New Project from the menu bar, or by pressing Ctrl+N.
When asked what kind of project to create, select Console Application and click the OK button in the dialog box. A console application has no windows-based user interface and simply runs in a text window. This interface is ideal for giving you a flavor of how IntelliSense and the other code development features of the IDE work.
After a short pause, the project will be created and your IDE will look very similar to the one in Figure 1-20.