

Beginning Visual Basic 2005 Express Edition - From Novice To Professional (2006)
.pdf170 |
C H A P T E R 6 ■ H A N D L I N G E X C E P T I O N S |
Summary
Exceptions do happen in programs. Sometimes you’ll even expect one to happen, and at other times you’ll need to code for the worst, just in case something goes wrong.
VB’s Try...Catch...Finally block lets you catch and work with the exceptions, bubbling them up to other code if necessary.
This pretty much concludes our tour of the major language features of Visual Basic 2005. There are still nuances to learn, but they are out of the scope of a beginner’s book. You’re sure to pick them up as you work through the rest of the book, building real Windows applications, and as you start to work on your own programs.
So without further ado, let’s dive into the rest of the treats Visual Basic 2005 Express has to offer so you can start to learn how to really use the tool to write great applications.

C H A P T E R 7
■ ■ ■
How Visual Basic 2005 Express
Helps You Code
You’ve hopefully already noticed that Visual Basic 2005 Express provides quite a few tools and neat IDE tricks to help you develop your applications. Before you dive into learning all about writing Windows applications, now would be a good time for me to introduce each of these features properly. These features, if you master them, can make you incredibly productive at your development work. A chap on the team I’m currently working on, for example, has memorized every single shortcut key within Visual Studio 2005 and can crank out code at a blinding pace. Whether that’s a good thing remains to be seen, but as you’ll see there are plenty of features given to you in VB Express to help you be really productive.
Building a User Interface
Microsoft likes to say that Visual Studio 2005 (and that includes Visual Basic 2005 Express) provides a great “design experience.” What they mean is, Visual Basic 2005 Express includes a bunch of tools to make life for the user-interface builder a heck of a lot easier than it used to be. Some of us, for example, still remember a time when it took about 50 lines of meticulously crafted code just to get a window to appear with the words “Hello, World” inside it. In VB Express this can be achieved without manually typing in any code at all.
171
172 |
C H A P T E R 7 ■ H O W V I S U A L B A S I C 2 0 0 5 E X P R E S S H E L P S Y O U C O D E |
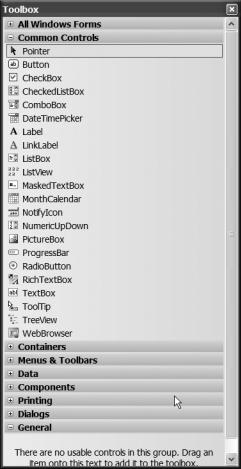
The key to this ease is, of course, the Toolbox, shown in Figure 7-1.
Figure 7-1. The Toolbox is the source of all the elements of your user interfaces.
The Toolbox contains the controls that you will want to use to build your user interfaces. You’ve come across it already in the few samples in previous chapters that required you to build a Windows user interface. All you need to do is click and drag a control from the Toolbox onto the windows in your project. You can also double-click anything in the Toolbox, and it will magically appear on the current project window. It’s worth bearing in mind, though, that the Toolbox is context sensitive; it will show only the tools that apply
C H A P T E R 7 ■ H O W V I S U A L B A S I C 2 0 0 5 E X P R E S S H E L P S Y O U C O D E |
173 |
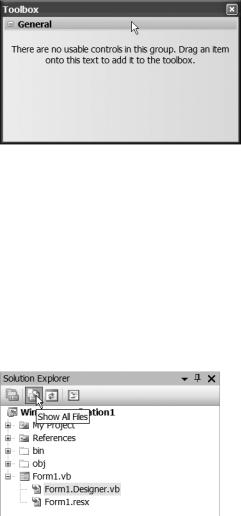
to what you’re currently working on. For example, when you work on source code in the code editor, the Toolbox looks like the one in Figure 7-2.
Figure 7-2. The Toolbox changes based on the work you are currently doing within VB Express.
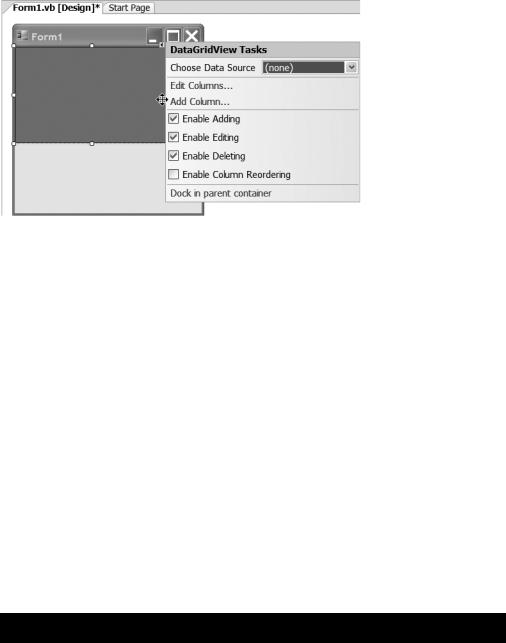
So, what really happens when you drag and drop something from the Toolbox onto a window? Well, code happens. Out of sight, Visual Basic 2005 Express creates a variable in your class (remember, a form or window is really a class) of the type of control that you select, and then goes ahead and sets up property values to size and position the control, as well as to set the properties you define in the Properties window. If you want to see the code that VB Express creates, just click the Show All Files button in the Solution Explorer. You can see this button in Figure 7-3.
Figure 7-3. The Show All Files button shows you all the files that VB Express creates behind the scenes. Handy for digging around.
Let’s go ahead and take a peek behind the scenes.

174 |
C H A P T E R 7 ■ H O W V I S U A L B A S I C 2 0 0 5 E X P R E S S H E L P S Y O U C O D E |
Try It Out: Exploring the Behind-the-Scenes Code
Fire up a new Windows project in VB Express; then drag and drop a Button control from the Toolbox to the window in your application. You’ll end up with the Visual Basic 2005 Express form editor looking similar to Figure 7-4.
Figure 7-4. Drag and drop a button onto a form. Behind the scenes, VB Express generates code in response.
With that done, click the Show All Files button and you’ll see your Solution Explorer change, as in Figure 7-5.
Figure 7-5. When you click the Show All Files button, new files appear in the Solution Explorer.

C H A P T E R 7 ■ H O W V I S U A L B A S I C 2 0 0 5 E X P R E S S H E L P S Y O U C O D E |
175 |
Notice that a plus sign appears next to your form name in the Solution Explorer. Click the plus sign and you’ll see the source file that VB Express has been working on behind the scenes, a file called Form1.Designer.vb. It’s a partial class just like the others you looked at back in Chapter 5. Double-click that file to view the code.
The method that will be of most interest to you is the InitializeComponent() method. It starts off like this:
Private Sub InitializeComponent()
Me.Button1 = New System.Windows.Forms.Button Me.SuspendLayout()
'
'Button1
'
Me.Button1.Location = New System.Drawing.Point(39, 90) Me.Button1.Name = "Button1"
Me.Button1.Size = New System.Drawing.Size(214, 45) Me.Button1.TabIndex = 0
Me.Button1.Text = "Button1" Me.Button1.UseVisualStyleBackColor = True
Notice the button stuff. You dragged and dropped a button on the form, and VB Express created a member in the class called Button1. What you see here is a bunch of code setting up the Location, Name, Text, and Size properties of the button. In short, this code sets up the button exactly where you have positioned it on the form, at the size you set, with any other properties you set.
Obviously, the more controls you add to the form, and the more properties that you set on those controls, the bigger and more complex this code gets. But you never have to see this code or work with it. It’s nicely hidden away in a partial class, letting you focus on the real code in the main class file.
Using Property Smart Tags
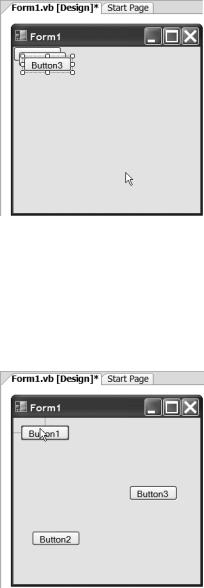
Talking of properties, now is a good time to introduce the property smart tags feature. Start up a new Windows project, if you don’t already have one open, and drag and drop a DataGridView control onto the form (you can find that control in the Data section of the Toolbox). What you’ll see will look like Figure 7-6.
The smart tag (the small arrow attached to the top right of the control) can be clicked to quickly access common properties and property-editing tasks associated with the control. In the case of a DataGridView for example, most people want to set up the grid’s columns and general appearance, and also specify whether the grid should allow sorting, paging, and so on.
176 |
C H A P T E R 7 ■ H O W V I S U A L B A S I C 2 0 0 5 E X P R E S S H E L P S Y O U C O D E |
Figure 7-6. Controls now have smart tags attached to them to provide you with quick and easy access to common properties and property-editing tasks for that control.
Click in the center of the grid to select it and press the Del key to get rid of it. Then drop a simple text box onto the form. Notice that even a control as simple as the humble text box also has smart tags attached, although the text box’s smart tag does nothing more than let you specify that the box will hold multiple lines of text.
Experiment with dropping controls onto a form at your leisure to see which do and which do not support smart tag property editing.
Aligning Controls
I used to have a hard time making my Windows user interfaces look good. How big should the controls be? How much space should I put between them and between controls and the edge of my window? These are important questions, and it took a while to figure out how to consistently produce the right results so that my Windows applications looked professional, or at least had some semblance of professionalism to them.
Microsoft realized this of course, and Visual Basic 2005 Express comes with a handy set of automatic tools to make life simple.
Try It Out: Aligning Controls
Start up a new Windows project (if you already have one open, don’t worry about getting rid of it—a great feature of VB Express is in-memory projects that you don’t have to save and that don’t litter your hard disk with files you don’t need).
C H A P T E R 7 ■ H O W V I S U A L B A S I C 2 0 0 5 E X P R E S S H E L P S Y O U C O D E |
177 |
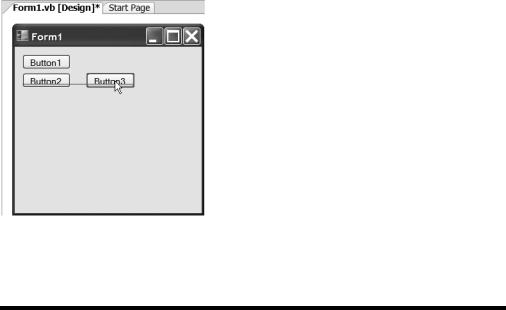
When the form appears, double-click the Button control in the Toolbox three times, so that you create three different buttons on your application’s form. The form will look like mine in Figure 7-7.
Figure 7-7. Double-click the Button control three times to create three buttons on your application’s form.
Drag the buttons so that they are spread all over the form, nicely spaced out. Now move one toward the topleft corner of the form. As you near the corner, you’ll see guidelines appear, helping you position the button at exactly the correct, recommended distance from the top and left of the form, as you can see in Figure 7-8.
Figure 7-8. As you move the controls around, you’ll notice guidelines appear to help you posi-
tion the button precisely the right distance from the edges of your form.
178 |
C H A P T E R 7 ■ H O W V I S U A L B A S I C 2 0 0 5 E X P R E S S H E L P S Y O U C O D E |
When you have both the left and top guides in view, release the left mouse button to drop the Button control. Now grab another Button control and drag it underneath the one you just positioned. This time different guides appear to show you the correct distance to place the control from the one above it, as well as where to position it so that its left or right edge is aligned.
Grab that third button and move it to the right of one of the others. Notice that yet another guide appears, this time aligning the text in the buttons (see Figure 7-9). You can still use the guides to align the tops or bottoms of the Button controls, but you can also align based on the control’s textual contents, and all without you having to do a thing.
Figure 7-9. Guides even let you align the contents of controls to each other.
You’ll come to love the guides over time.
C H A P T E R 7 ■ H O W V I S U A L B A S I C 2 0 0 5 E X P R E S S H E L P S Y O U C O D E |
179 |
Setting Tab Orders
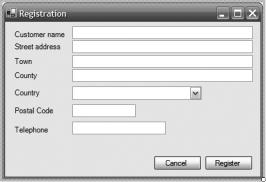
Imagine that you had a form like the one in Figure 7-10.
Figure 7-10. All forms require some attention to navigation order, especially when they get a little complex like this one.
That’s a pretty complex form. Now imagine that you came across this form in an application you had installed—perhaps it’s part of a registration dialog for an application you adore. Out of the box there are a few assumptions you and any other user would make about how this form works. Perhaps the biggest assumptions are that when you start editing the form, the cursor will start in the topmost text box, and that pressing Tab will take you down through all the text boxes in the form until you reach the bottom one. You would quickly lose faith in the program if pressing the Tab key moved you all over the form in a seemingly random order.
When you design your user interfaces, Visual Basic 2005 Express provides you with help in specifying the tab order of the controls on forms.
Take a look at the View menu (see Figure 7-11).