

Beginning Visual Basic 2005 Express Edition - From Novice To Professional (2006)
.pdf100 |
C H A P T E R 4 ■ C L A S S E S A N D O B J E C T O R I E N T A T I O N I N V I S U A L B A S I C 2 0 0 5 |
Constructors are really quite similar to standard subroutines, except that they don’t return any value. So this means that you can define a bunch of constructors as long as they all have different “signatures.” You’ll look at this in a lot more detail later in the chapter, but just to give you a taste, let’s go ahead and create an additional constructor and see how it’s used.
Click the TestClass tab at the top of the IDE to bring the TestClass.vb source back into view. Right underneath the constructor you wrote a short while ago, add another one (you’ll need to type this one in entirely by hand):
Public Class TestClass
Public Sub New()
Console.WriteLine("TestClass just got instantiated")
End Sub
Public Sub New(ByVal name As String)
Console.WriteLine("Instantiated by {0}", name)
End Sub
End Class
This constructor has a different signature in that it takes a single string parameter while the old one takes no parameters at all.
Click the Module1.vb tab to return to the main code, and then write some code to use this constructor:
Module Module1
Sub Main()
Console.WriteLine("About to create an instance of TestClass")
Dim newClass As New TestClass()
Dim anotherClass As New TestClass("Me")
Console.WriteLine("All done!")
Console.ReadLine()
End Sub
End Module
C H A P T E R 4 ■ C L A S S E S A N D O B J E C T O R I E N T A T I O N I N V I S U A L B A S I C 2 0 0 5 |
101 |
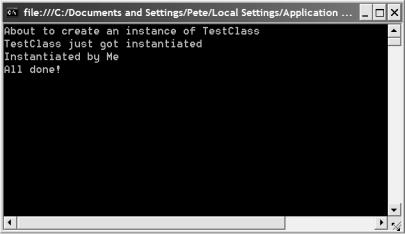
You may have noticed, by the way, that this code is in a module, not a class. I'll talk about modules a little later. For now, just think of them buckets used to hold shared code. If you run the program now, you’ll see that the console shows output from the new constructor (see Figure 4-6).
Figure 4-6. Adding constructors allows you additional control over what happens when objects are created.
So now you can control what happens when an object gets created from one of your classes. But what about when an object gets destroyed? For example, in the code so far, at the end of the program the object is no longer needed and so it gets destroyed. It’s sometimes useful to have additional code run when that happens. For example, when you know a little more about .NET, you may have allocated memory in that class that you need to return to Windows when the object dies. Alternately, you might have some connections open to files, websites, or even databases that need closing. That’s where finalizers come in.
Although a class can have many constructors (as long as they all have different signatures), a class can have only one finalizer. The finalizer is a special subroutine called Finalize, and you can add it to the class by selecting it from the drop-down again, just as when you created your first constructor earlier.
Let’s add a finalizer to TestClass to make it tell us when it dies.

102 |
C H A P T E R 4 ■ C L A S S E S A N D O B J E C T O R I E N T A T I O N I N V I S U A L B A S I C 2 0 0 5 |
Back in the TestClass.vb source, select Finalize from the declarations drop-down, and then add some code to the finalizer, like this:
Public Class TestClass
Public Sub New()
Console.WriteLine("TestClass just got instantiated")
End Sub
Public Sub New(ByVal name As String)
Console.WriteLine("Instantiated by {0}", name)
End Sub
Protected Overrides Sub Finalize()
Console.WriteLine("TestClass object just died")
MyBase.Finalize()
End Sub
End Class
Run the program now and watch the console very closely as you hit the Enter key to stop the program. The two finalizer messages will flash onto the console for a mere fraction of a second as the program stops running.
This is actually better than the equivalent C# program. In C#, the program would crash, highlighting an important lesson about finalizers (they are called destructors in C#) and how garbage collection works in .NET.
You need to be careful about adding finalizers to your classes because you really don’t have any control over just when those finalizers are run. The reason is that .NET’s garbage collector (the behind-the-scenes bit of techno-wizardry that frees up memory used by objects when they are no longer needed) is nondeterministic. It runs when it can but offers you no guarantees as to when that will be, or what resources will be available to your code when it does run. In this example, the garbage collector kicks in when the program finishes, and is getting ready to clean up the two objects you created in your Main() function. However, at that point, the Console object has already been removed. Your finalizer then tries to use it and gets a nasty slap on the wrist. (This is of course a highly simplified view of how garbage collection works, but it should suffice for most of you for now.)

C H A P T E R 4 ■ C L A S S E S A N D O B J E C T O R I E N T A T I O N I N V I S U A L B A S I C 2 0 0 5 |
103 |
For this reason most people avoid using finalizers in their classes, preferring instead to add a method to the class called CleanUp() or FinishUp() or something similar that they call by hand. That way, any code you have in there to close down connections, output statuses, and so on, runs when you want it to run, giving you more control over just what facilities are still available to that code at runtime. In fact, there’s an even better way in
.NET. If you implement the IDisposable interface (we cover interfaces later in the book), you can add a Dispose() method to the class. You can be certain that if you implement this interface, Dispose() will absolutely get killed when you are done using an object.
I’ve touched on methods in the previous chapters. Let’s take a more detailed look.
Methods
Methods are what breathe life into your classes. It’s great that you can add constructors and finalizers to a class to get the class to do things when it’s instantiated and destroyed, but it doesn’t really move code-based objects into the same realm as objects in the world around us. We need our objects to do things!
Methods allow us to add functionality to a class. For example, if I were writing a Car class in a video game, I’d probably want functions in that class to start the car, put it in gear, accelerate, brake, turn, and stop.
When you add a method to a class, there are really only three things that you need to think about: what kind of data does it return, what’s its name, and what’s its signature. The first two are fairly obvious. Signature is the number and type of parameters passed to the method. For example, if you had a method that added two numbers and returned the result, the signature would be two number parameters (probably either integers or doubles).
The return type can be absolutely any type that you could define a variable from, including other classes. The example of a method that adds two numbers returns either an Integer or a Double. It could equally well return a SumResult, which could be a special class you defined to hold the result of mathematical sums.
FUNCTIONS AND METHODS
I have a bad habit of using the words “function” and “method” interchangeably. A function, strictly speaking, is a block of code with a name that can be called, and that returns a value. In VB, these are usually defined with the Function keyword you saw earlier. C programs, for example, consist of little more than a big bunch of functions.
When object-oriented programming came along, some way was required to differentiate between a function or subroutine outside of a class, and a function or subroutine inside of a class. The latter was called (and is now known as) a method. Because everything you do in Visual Basic 2005 ultimately lives inside a class, I tend to refer to everything (subroutine or function) as a method.
104 |
C H A P T E R 4 ■ C L A S S E S A N D O B J E C T O R I E N T A T I O N I N V I S U A L B A S I C 2 0 0 5 |
Let’s go ahead and look at a simple example.
Try It Out: Methods
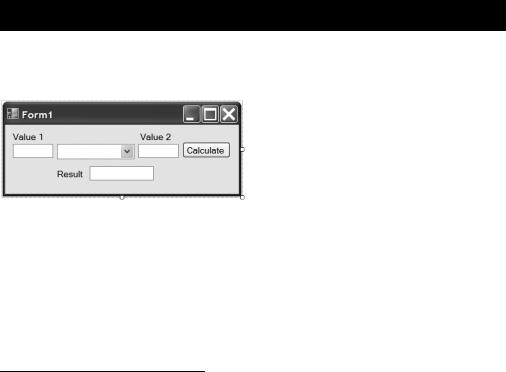
Let’s make a trivial calculator just to show how to work with methods in a class. Start up a new Windows application and drop controls on the form so that it looks like mine in Figure 4-7.
Figure 4-7. Drop some controls on the form and resize it so that it looks like this.
If you can’t guess already, the way that this is going to work is that you’ll enter values in the two text boxes, choose something to do to them (add, subtract, and so on) from the combo box, and then click the Calculate button to calculate a result. In order for your code to work the same as mine, you’ll need to change some properties on the controls, specifically the Name properties. Set the Name properties as shown in Table 4-1.
Table 4-1. Name Properties of the Controls
Control |
Name Property |
First text box |
value1Box |
Second text box |
value2Box |
Third text box |
resultBox |
Combo box |
operation |
Button |
calculateButton |
|
|
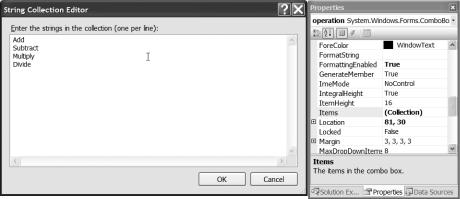
Before you drop down into the code, you need to add some values to that combo box so that the user has something to choose at runtime. Click on the combo box on the form and take a look at the Properties window (if you can’t see it, press F4 to bring it into view). If you scroll down the Properties list, you’ll eventually find one called Items. Click that property and you’ll see a button appear with three dots (…). Click it to open the String Collection Editor. You can see this and the property in question in Figure 4-8.
C H A P T E R 4 ■ C L A S S E S A N D O B J E C T O R I E N T A T I O N I N V I S U A L B A S I C 2 0 0 5 |
105 |
Figure 4-8. Click the button in the Items property of the combo box to open the String Collection Editor.
Add four items as shown (it’s important to keep the text of the items exactly as I have in the screen shot— you’ll see why in a minute). Also change the DropDownStyle property of the control to DropDownList.
Now you can start on some code. Add a new class to the project. Name it Calculator.vb—this class will hold all the methods that bring your somewhat simple calculator to life. After the class has been added to the project, you should see the GUI editor disappear to be replaced with the code editor for the class.
Just as you added items into the combo box list, you’re going to need four methods: one for adding, one for subtracting, another for division, and a final one for multiplication. These are all quite simply methods that perform a calculation and return a value, so go ahead and key them in all at once. I’ve highlighted the code you need to add in the following listing:
Public Class Calculator
Public Function Add(ByVal value1 As Double, ByVal value2 As Double) _ As Double
Return value1 + value2 End Function
Public Function Subtract(ByVal value1 As Double, ByVal value2 As Double) _ As Double
Return value1 - value2 End Function
106 C H A P T E R 4 ■ C L A S S E S A N D O B J E C T O R I E N T A T I O N I N V I S U A L B A S I C 2 0 0 5
Public Function Multiply(ByVal value1 As Double, ByVal value2 As Double) _ As Double
Return value1 * value2 End Function
Public Function Divide(ByVal value1 As Double, ByVal value2 As Double) _ As Double
Return value1 / value2 End Function
End Class
All the methods here have different names but the same signature. Notice how each method takes two Double parameters, for example. Also, when defining the signature for a method, you’ll notice that the code doesn’t just list two doubles as the signature. Each parameter to the method is given a name. This name can then be used inside the method to refer to the actual value passed in, just as if you’d declared a couple of variables. So, taking a look at the Add() method, you take in two doubles, called value1 and value2, and use those to return their sum.
The keyword Return is used to pass a value back out of the method. In the case of these simple methods, you want to tell the Calculator class to do something (add, subtract, multiply, or divide) and then get the result of that calculation “returned” to you. Notice also how each method is a function that returns a Double:
Public Function Divide(ByVal value1 As Double, ByVal value2 As Double) _ As Double
(I’ve used the _ symbol to split long lines of code so that they fit nicely into the book’s pages.) Adding As Double after the end of the function signature tells Visual Basic that the value you are going to return here is a double, and so the compiler expects to see a Double value following the Return statement. You could have set these up as strings instead, in which case you would need code in the method to convert the result of the calculation from a double to a string.
Double-click Form1.vb in the Solution Explorer to drop back into the form editor, and then double-click the Calculate button on the form to drop into the code editor to hook up the Click event for that button.
I cover events and everything else to do with GUI programming in Chapter 8, but there’s something interesting to note here. Take a look at the screen shot in Figure 4-9.

C H A P T E R 4 ■ C L A S S E S A N D O B J E C T O R I E N T A T I O N I N V I S U A L B A S I C 2 0 0 5 |
107 |
Figure 4-9. Double-clicking a control drops you into the code editor for its default, or standard, event. This event is itself a method.
At their simplest level, events are methods that VB knows about, but which you fill in the code for. So when the button gets clicked at runtime, its Click event fires and VB looks for one or more methods to run as a result. In Figure 4-9 you can see this. The button’s Click event is a subroutine called
calculateButton_Click, which is passed two objects as its signature. I won’t go into detail on what those objects are or what they mean just yet, but the point is that just as every piece of code you write in VB lives in a class, every single line of functioning code you write in your classes lives in methods. That includes code to respond to things happening on Windows Forms.
Back to the code. Let’s bring together everything you’ve done so far in the book—from creating variables to making decisions, to creating objects and actually calling methods on them—to fill in the code for this click event handler.
Because all the methods that you are going to call to make the calculations expect to be passed Double values, the first thing you need to do is extract the data from the text boxes on the form and convert it to doubles. For this you’ll need a couple of variables, plus of course one for the result:
Private Sub calculateButton_Click(ByVal sender As System.Object, _ ByVal e As System.EventArgs) _
Handles calculateButton.Click
Dim value1 As Double = Double.Parse(value1Box.Text)
Dim value2 As Double = Double.Parse(value2Box.Text)
Dim result As Double = 0.0
End Sub
108 |
C H A P T E R 4 ■ C L A S S E S A N D O B J E C T O R I E N T A T I O N I N V I S U A L B A S I C 2 0 0 5 |
So, here you’ve set up three variables—value1, value2, and result—and you’ve given them initial values. I should point out that we’re assuming ideal conditions here and that the user really is going to enter something that should convert into a double. If they don’t, we’re in trouble. There is a VB method to get around this problem called TryParse(), but for our example it overcomplicates the code. Go ahead and look up TryParse() in the online help, and we’ll also touch on it later.
You’ll recall from the preceding chapter that all the number data types (Double, Integer, and so on) have a Parse() method that you can call to translate a string into a number. Because the text boxes hold text (strings), you use Double.Parse() here to convert the text the user enters into numbers that you can store in your variables.
The next thing you need to do is use your new Calculator class to create an object that you can call methods on. That’s quite easy to do:
Dim value1 As Double = Double.Parse(value1Box.Text)
Dim value2 As Double = Double.Parse(value2Box.Text)
Dim result As Double = 0.0
Dim calc As New Calculator()
A variable is set up to hold the object of type Calculator. You then use New Calculator() to create an object and run the standard constructor. I didn’t actually get you to write a constructor into the class, so all this will do is create a new object but not run any special code when that object comes to life.
With the object created, all that remains is to figure out just which method to call on it. You’ll use a Select statement to look at the text in the combo box and decide which action to take:
Private Sub calculateButton_Click(ByVal sender As System.Object, _ ByVal e As System.EventArgs) _
Handles calculateButton.Click
Dim value1 As Double = Double.Parse(value1Box.Text)
Dim value2 As Double = Double.Parse(value2Box.Text)
Dim result As Double = 0.0
Dim calc As New Calculator()
C H A P T E R 4 ■ C L A S S E S A N D O B J E C T O R I E N T A T I O N I N V I S U A L B A S I C 2 0 0 5 |
109 |
Select Case operation.Text Case "Add"
result = calc.Add(value1, value2) Case "Subtract"
result = calc.Subtract(value1, value2) Case "Multiply"
result = calc.Multiply(value1, value2) Case "Divide"
result = calc.Divide(value1, value2) End Select
resultBox.Text = result.ToString()
End Sub
The Select statement takes a look at the current text in the combo box (the currently selected item) and then decides which method to call on your new calc object. The result of the method call is stored in the result variable, which at the very end is copied back into the Result text box on the form.
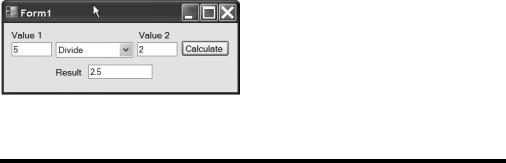
Run the application now to see it in action. Just enter some values (numeric) in the first two text boxes, choose an operation from the combo, and then click the Calculate button to call the class and see the result (it should look like Figure 4-10 if all goes well).
Figure 4-10. The calculator application running