

Beginning Visual Basic 2005 Express Edition - From Novice To Professional (2006)
.pdf110 |
C H A P T E R 4 ■ C L A S S E S A N D O B J E C T O R I E N T A T I O N I N V I S U A L B A S I C 2 0 0 5 |
NAMING VARIABLES AND PARAMETERS TO METHODS
You’ll notice that I’ve named the first two variables value1 and value2, which are the same names I gave to the Double parameters of the methods back in the Calculator class. This isn’t a requirement. I could have called them Mickey and Goofy and it wouldn’t have mattered. So long as I pass data types that match a method’s signature to the method, I can call them whatever I want. More on this when we get to scoping later in this chapter, so not long to wait.
Visual Basic 2005, like most other programming languages that support objectoriented programming, allows you to use polymorphism. It’s a strange name, I know, but it’s actually quite a simple concept. Polymorphism allows you to have more than one method in a class with the same name. As long as the signatures on the methods differ, you are free to create as many methods with the same name as you like. It’s a wonderful thing, liberating you to “phrase” your method calls just the way that feels most natural. In some instances, for example, you might need to pass only one parameter to a method, while at other times it makes sense to pass three or four. Polymorphism allows you to define a method for each situation, and it’s used a heck of a lot in the .NET Framework itself.
For a brief demonstration of what it means, run up a new VB Windows Forms project (or the calculator one you just finished working on) and drop into the code editor
by double-clicking the form in the form editor. Now, in the code editor just type in MessageBox.Show( and no more than that. You’ll see an IntelliSense pop-up appear, as in Figure 4-11.
Figure 4-11. IntelliSense is an awesome invention when you’re working with polymorphic methods.

C H A P T E R 4 ■ C L A S S E S A N D O B J E C T O R I E N T A T I O N I N V I S U A L B A S I C 2 0 0 5 |
111 |
With the IntelliSense pop-up displayed, just tap the down arrow on your keyboard. What you are seeing now are all the different variations of the MessageBox.Show() method that Microsoft provides. If you just wanted to display a message box with some text, and aren’t too concerned about icons and such, you’ll find a method signature near the top of the list that takes just a single string parameter. Polymorphism is very handy.
Time to try a quick example (just a short console application this time).
Try It Out: Polymorphic Methods
Start up a new console application in Visual Basic 2005 Express, and when the Solution Explorer appears, add a new class called Names.vb to the project.
What we’d like is for Names objects to say Hello but to use the proper level of respect based on who they are talking to. So go ahead and drop a SayHello() method into the class for normal everyday folks:
Public Class Names
Public Sub SayHello(ByVal person As String)
Console.WriteLine("Hi there {0}", person)
End Sub
End Class
So far, so good. Now, add another SayHello() method in there for addressing royalty:
Public Class Names
Public Sub SayHello(ByVal person As String)
Console.WriteLine("Hi there {0}", person)
End Sub
Public Sub SayHello(ByVal person As String, ByVal title As String) Console.WriteLine("{0} {1}, we are most graced by your presence {0}", _
title, person)
End Sub
End Class
112 |
C H A P T E R 4 ■ C L A S S E S A N D O B J E C T O R I E N T A T I O N I N V I S U A L B A S I C 2 0 0 5 |
Notice that the method has exactly the same name as the previous one, but the signature (the parameters passed into the method) differ. This time two strings are passed in, instead of just one.
Let’s see this in action. Drop back into Module1.vb (you should know how to do that by now—click the tab at the top of the editor, or double-click it in the Solution Explorer) and add a few lines to the Main() function:
Sub Main()
Dim greeter As New Names()
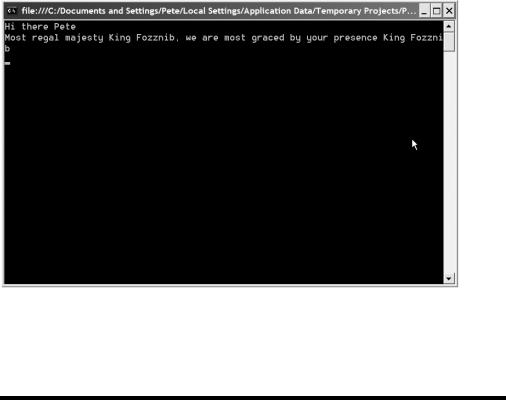
greeter.SayHello("Pete")
greeter.SayHello("Most regal majesty", "King Fozznib")
Console.ReadLine()
End Sub
Run the program and you’ll see the output, as in Figure 4-12.
Figure 4-12. Polymorphic methods can keep the code simple but also add quite some flexibility to your code.
That’s all there is to it.

C H A P T E R 4 ■ C L A S S E S A N D O B J E C T O R I E N T A T I O N I N V I S U A L B A S I C 2 0 0 5 |
113 |
There is one important point to bear in mind. The polymorphic aspect (having more than one method with the same name) depends on the signature of the method. The signature is just the number and types of parameters passed to the method. So, for example, if you have these two methods in your class, then it wouldn’t compile:
Public Sub SayHello(ByVal person As String)
End Sub
Public Sub SayHello(ByVal personsName As String)
End Sub
In this case the signatures are the same. Even though the names of the parameters differ, the types and the number of them don’t. Therefore, VB sees the preceding methods as the same method and thus they’re not polymorphic. Similarly, the following will cause a compiler error:
Public Sub SayHello()
End Sub
Public Function SayHello() As Integer
End Function
In this case the return types are different (since one is a function, and the other is a subroutine that returns nothing), but return types are not part of the method signature and thus again VB sees these two as exactly the same method.
Visual Basic 2005 Express is pretty good at spotting problems like this before you even try to run the program. If you put two methods with the same name in a class without differing signatures, the code editor will give you a hint about the problem, as you can see in Figure 4-13.
Figure 4-13. When you make obvious mistakes in the code editor, Visual Basic 2005 Express will underline the problem and give you a hint when you move the mouse over the offending line of code.

114 |
C H A P T E R 4 ■ C L A S S E S A N D O B J E C T O R I E N T A T I O N I N V I S U A L B A S I C 2 0 0 5 |
Properties and Members
The purest definition of an object says that it is an encapsulation of data, and the functionality to work with that data. So far you’ve looked at functionality only in the form of methods. Where does the data come in? Hopefully you remember all about variables from the preceding chapter. Variables in the class (actually in the class, not inside a method of the class) are how you add data to the class for the methods to work with.
Variables defined in a class, and seen and used only by the methods in that class, are called members. Variables that are defined in the class for all to see are called properties, or fields. You’ve seen how to use them already; when you drop a control onto a form and then set up its name by using the Properties window, what you are actually doing is setting a property inside a class (it’s actually a property on an object, because by dropping the control—the class—on a form, you’ve created an object).
Let’s take a look at a simple console-based example.
Try It Out: Adding Members and Properties to a Class
Start up a new console project, and then immediately add a new class called Person.vb to the project.
First, add some members (hidden, private data) to the class:
Public Class Person
Private _forename As String
Private _surname As String
End Class
There are two things to notice here.
First, the keyword Private. This is covered in a lot more detail in the “Scoping” section later in this chapter. For now, what it means is that this variable, or member, is private to the class. When someone creates an object from this class, they can’t see the two variables you’ve created here. Private members provide a way to store data inside an object that only the class methods can get at and work with.
C H A P T E R 4 ■ C L A S S E S A N D O B J E C T O R I E N T A T I O N I N V I S U A L B A S I C 2 0 0 5 |
115 |
Second, notice how I’ve prefixed the names of the variables with an underscore symbol. This is not a requirement of Visual Basic, but I think it is a good habit to get into. As you write more and more of your own classes and add more and more data into them, it’s quite useful to be able to look at the code and instantly tell whether something you are working with is a property of the class or a private member. Prefixing member names with an underscore helps in this respect. On the other hand, the IDE and IntelliSense are pretty good about showing you what the scope of a variable is, and some people hate the idea of using a scope prefix on their variable names. It’s another area where personal preferences play a big part in how you choose to write your code.
Next, add a property to the class:
Public Class Person
Private _forename As String
Private _surname As String
Public FullName As String
End Class
This time, the member is Public, the same as most of the things you’ve seen declared in classes so far. This means that anyone using the class as an object can also see and interact with this variable, reading data from it and setting data into it just like a property in a control. Before you drop back into Module1.vb and actually use this class, add a method to make the class do something. You’ll just take in a person’s surname and forename and then set up the contents of this property:
Public Class Person
Private _forename As String
Private _surname As String
Public FullName As String
Public Sub SetName(ByVal forename As String, ByVal surname As String) _forename = forename
_surname = surname
FullName = _forename + " " + _surname End Sub
End Class
116 |
C H A P T E R 4 ■ C L A S S E S A N D O B J E C T O R I E N T A T I O N I N V I S U A L B A S I C 2 0 0 5 |
Drop back into the Module1.vb code and you’ll finish up this program to see it working, and more important see how to use a property in your code:
Module Module1
Sub Main()
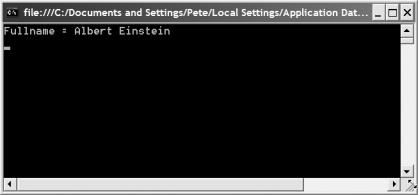
Dim scientist As New Person() scientist.SetName("Albert", "Einstein")
Console.WriteLine("Fullname = {0}", scientist.FullName)
Console.ReadLine()
End Sub
End Module
The first thing you do is create an object (called scientist) from the Person class. Next, the SetName() method is called, passing in a person’s surname and forename. Finally, you use the FullName property on the class to write out the resulting full name to the console. Note that using properties of an object is different from calling methods; when you refer to a property of an object, you don’t follow the name of the property with parentheses. Parentheses on the end of something mean you’re calling a method. A lack of parentheses here means you are using a property instead of calling a method.
Run the application to see the result, which should be completely as expected (you can see the output from my program in Figure 4-14).
Figure 4-14. Properties enable us to get at the “public” data inside an object.

C H A P T E R 4 ■ C L A S S E S A N D O B J E C T O R I E N T A T I O N I N V I S U A L B A S I C 2 0 0 5 |
117 |
THE DIFFERENCE BETWEEN PROPERTIES AND FIELDS
Technically, what we have here is a field. To users of a class, properties and fields appear to work the same way. However, with a property you can also add in code that runs as soon as the property is set or read. You’ll look at that shortly.
It all looks good, but this program has a problem. The interface that you’ve exposed on the class implies that your users should call SetName() to set up the name of the person in question, and that’s the only way it should be done. However, making the FullName variable public (turning it into a field in the class) means that users could write code like this:
scientist.FullName = "Tom Mouse"
Doing that completely bypasses your SetName() method, which could be less than ideal in a real application. The solution is to turn that field into a true property by using getters and setters.
Let’s take a look at turning this field into a proper property by using getters and setters.
Getters and Setters
Ideally, you just want users of your Person class in the preceding example to read the FullName, and not write it or change it. That’s really easy to do.
Try It Out: Adding a Getter to a Property
Load up the preceding example and take a look at the Person.vb source.
Change the property definition by adding the word ReadOnly to it:
Public Class Person
Private _forename As String
Private _surname As String
Public ReadOnly FullName As String

118 C H A P T E R 4 ■ C L A S S E S A N D O B J E C T O R I E N T A T I O N I N V I S U A L B A S I C 2 0 0 5
Public Sub SetName(ByVal forename As String, ByVal surname As String) _forename = forename
_surname = surname
FullName = _forename + " " + _surname End Sub
End Class
That would appear to solve the problem—or does it? You can prefix members and property definitions with the word ReadOnly to stop people setting them, but it causes other problems. Try to run the program and you’ll see what I mean. You’ll see a message box appear as in Figure 4-15.
Figure 4-15. Setting a field to read-only is not always a good idea.
Click the No button, and the error list appears proclaiming that the “ReadOnly variable cannot be the target of an assignment.” Well, duh! We knew that, that’s what we wanted right? Well, no. Double-click that error in the error list, and VB Express will highlight the exact line of code that’s causing the problem (see Figure 4-16).
Figure 4-16. Read-only properties can’t be written by anyone including code in the same class.
C H A P T E R 4 ■ C L A S S E S A N D O B J E C T O R I E N T A T I O N I N V I S U A L B A S I C 2 0 0 5 |
119 |
So, obviously, that’s not the quick and easy solution you need. Getters and setters solve this. Before I show you the code change to make, think about this. At the moment, your SetName() method stores three values: surname, forename, and FullName. Another way to do this would be for the SetName() method to store only the surname and forename, and then have the FullName property itself calculate what it should be when someone asks for it.
First, remove the FullName= line from the SetName() method. It will look like this:
Public Sub SetName(ByVal forename As String, ByVal surname As String) _forename = forename
_surname = surname End Sub
Now, make the following changes to the FullName property:
Public Class Person
Private _forename As String
Private _surname As String
Public ReadOnly Property FullName() As String
Get
Return _forename + " " + _surname
End Get
End Property
Public Sub SetName(ByVal forename As String, ByVal surname As String) _forename = forename
_surname = surname End Sub
End Class
That’s a getter. By adding the word Property to the definition of FullName, Visual Basic instantly popped open a bunch of code to fill in, labeled Get and Set. I deleted the Set because we don’t want to set this property’s value, just get it. Get is a function that returns the data type of the property. So, because our FullName property is a string, Get is a function that returns a string. Now, properties that have a Get function but no Set subroutine are read-only, so I also added the word ReadOnly before the keyword Property; otherwise, the program wouldn’t compile again. You’ll find you can now run the program; it will compile just fine and work just as it did before. It’s a much more “robust” design now, though.
Because you added only a Get, and not a Set, the property is effectively read-only. If you try to add code into Program.cs that sets person.FullName, you’ll get a compile error identical to the preceding one. So this really does solve the problem.