

Beginning Visual Basic 2005 Express Edition - From Novice To Professional (2006)
.pdf260 C H A P T E R 9 ■ W I N D O W S A N D D I A L O G S
Summary
Well, we certainly covered a lot of ground in this chapter. It’s so easy when you start out with Windows programming to take the humble window for granted, but as you’ve seen here there’s a whole lot more to it than meets the eye. In fact, there’s a lot more to it than I could cover here (the idea is to get you up to speed coding, after all, and not to publish the world’s first 10,000-page .NET encyclopedia). Take a look at the online help for the form to see the full list of all its properties, methods, and events, and of course have fun experimenting with the samples in this chapter to further explore the wonderful world of forms and dialogs.

C H A P T E R 1 0
■ ■ ■
Lists
So far you’ve looked at the most common (and simplest) controls that you’re likely to use in your programs. You’ve also explored the capabilities of the form and dialog boxes. Now it’s time to move on to some more-complex controls, namely the list controls.
The list controls (there are five in total, not including the grid, which you’ll look at in Chapter 16) give you a means to display large amounts of data to the user, and give the user a way to select items of data for your code to work with. All of the controls we’ll cover here (the ListBox, ComboBox, CheckedListBox, and TreeView) do pretty much the same thing. They let you display a single item of data in a list—for example, the names of all the files in a certain directory, DVDs in your DVD collection, employees in your company, and so on. As you work through the controls, though, you’ll also notice that each adds capabilities to the basic ListBox control.
A CheckedListBox, for example, displays a list of items but with check boxes beside them to provide an easy way for users to select multiple items. A TreeView, on the other hand, takes the basic concept of a list and then makes it hierarchical, so that list items can contain other list items, much like a table of contents in a book, where each chapter contains sections, and the sections may in turn contain subsections.
By the end of this chapter, you’ll be even further down the road to being able to develop some fairly complex WinForms user interfaces without any help.
So, let’s go.
261
262 |
C H A P T E R 1 0 ■ L I S T S |
The ListBox Control
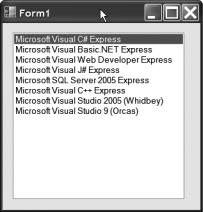
As the name suggests, the ListBox control displays a simple list of items within a box. It’s used a lot in many Windows applications, so I’m sure you’ve come across it before. To jog your memory, take a look at Figure 10-1.
Figure 10-1. A simple ListBox control
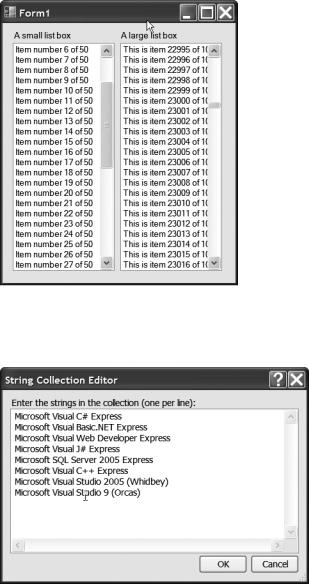
As the number of items in the list grows, a scroll bar appears down the right side of the control to let the user easily move through the items in the list. The size and position of the actual bar within the scroll bar also gives a good indication of just how big the list is. If it’s a very small bar, the list is likely to be quite large. If on the other hand the bar is quite large, the list is going to be quite small. (You can see this in Figure 10-2.)
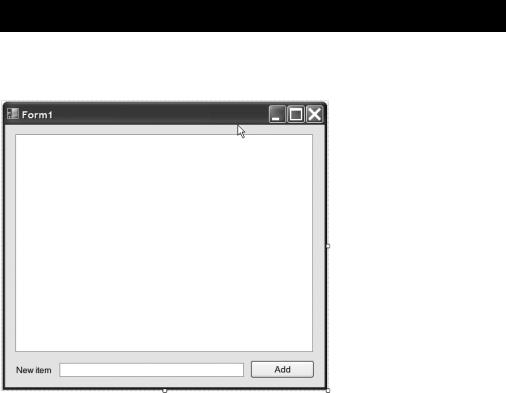
The ListBox control exposes a property called Items that you can use to add items to the list. You can use this property either through code, or even in the Properties window. In the form editor, just drop a ListBox on a form, and then find the Items property and click on the ellipsis button (…) in the property’s input area to open the String Collection Editor dialog in Figure 10-3.
C H A P T E R 1 0 ■ L I S T S |
263 |
Figure 10-2. The size of the drag bar in the scroll bar gives a good indication of the number of items in the list, as well as where you are in moving through it.
Figure 10-3. Clicking the ellipsis button next to the Items property in the Properties window opens up this editor to add items to the list at design time.
264 |
C H A P T E R 1 0 ■ L I S T S |
You can also get at this editor by using the smart tag attached to the list box. Just click on the tag and then click Edit Items from the menu that appears.
The String Collection Editor dialog is great if you know just what the list box contains ahead of time, but more often than not you’ll want to programmatically control the list contents at runtime.
The Items property is actually a Collection, a .NET class that goes beyond what a standard Visual Basic array can do. With a Collection you can easily add and remove items, something that’s tricky to do with a standard array, and even provide methods for sorting and searching within the collection. You’ll look at collections in some detail later in the book, but for now let’s cover the basics as they apply to working with the various list controls.
Try It Out: Adding Items to the ListBox.Items Collection
Start up a new WinForms project and add a list box, label, text box, and button to the form as shown in Figure 10-4.
Figure 10-4. Add controls to your form, like this.
C H A P T E R 1 0 ■ L I S T S |
265 |
Try resizing the list box vertically, and you’ll find that you are somewhat limited. By default, the list box will accept only a horizontal size that allows it to show complete items. For example, there’s a possibility you would set a size that at runtime would mean the bottom item on the list is cut in half. You can get around this limitation by setting the IntegralHeight property of the ListBox to False. This allows you to set any height you want.
Set the Name property of the TextBox to newItemBox, of the Button to addButton, and of the List to demoListBox. I’m sure you can guess what you are going to do here. The user will enter text into the text box, and then click the button to add the text to the list box.
Double-click the button to drop into the code editor, and change the method to look like this (I’ll talk you through it when you’re finished):
Public Class Form1
Private Sub addButton_Click(ByVal sender As System.Object, _
ByVal e As System.EventArgs) Handles addButton.Click
demoListBox.Items.Add(newItemBox.Text) newItemBox.Text = ""
End Sub
End Class
As I mentioned earlier, the Items property on the ListBox is something called a Collection. Collections have an Add() method on them to add new items into the collection. In the case of ListBox.Items, this translates to adding an item into the list box. So, the code just takes the string of text entered into the text box and adds it into the Items collection. When that’s done, the text box is cleared out, ready for the next piece of text to be entered.
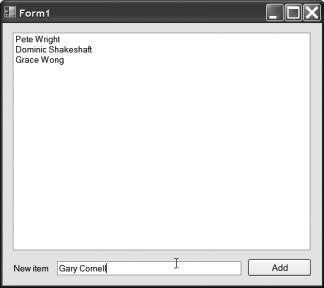
Go ahead and run the program now to see how it works (see Figure 10-5).
266 |
C H A P T E R 1 0 ■ L I S T S |
Figure 10-5. Click the Add button to add the text from the text box into the Items collection of the ListBox.
Easy, isn’t it?
Okay, so now you can add items to a list box. What about deleting items, though, or working with the items themselves in code to find out what’s in the list box?
Working with the items in the list box is very much like working with items in an array. A container exposes elements inside the container in the same way that an array does. So, for example, if you needed to get at the third item in the list box in code, you might write the following:
Dim thirdItem As String = myListBox.Items(2)
Notice that just like an array, the elements are zero based, meaning the first element is number 0, the second is number 1, and so on.
You can find out just how many items are in a list box by looking at the Items.Count property. For example:
Dim itemsInList As Integer = myListBox.Items.Count
Also, just as with an array, you can use a For Each statement to iterate through all the items in the list box. For example:
For Each currentItem As String In myListBox.Items
Console.WriteLine(currentItem)
Next

C H A P T E R 1 0 ■ L I S T S |
267 |
There are two methods available to you if you want to remove items from the list. The first is Items.RemoveAt(). This requires that you know the position of the item you want to delete, something you can find out through the selection properties of the list box (more on those in a minute as well). You simply use
myListbox.Items.RemoveAt(4)
for example, to remove the fifth item (remember, the list is zero based). The second method is Items.Remove(). This requires you to have an object the same as the one you want to delete. For example, if your list contained only strings and you knew that one of them was the word listbox, you could use the following:
myListbox.Items.Remove("listbox")
It gets a little more complicated if you have objects in the list other than simple strings, but more often than not you’ll remove by index with the RemoveAt() method. Let’s see how that works, and also take a look at selecting items in a list box and putting more than just strings into it.
Let’s round out the discussion on the ListBox control with a nice meaty example that also builds on the dialog stuff you did in the preceding chapter. What you’ll do is use a dialog to gather simple employee information, and then populate a list box with the employees the user enters. In addition, you’ll display that employee information when the user clicks on an item in the list box, and also handle deleting of employees.
This will be an unusually big “Try It Out,” the reason being that most of the other list controls work in a similar fashion. In effect then, we’re killing a lot of birds with one stone (apologies to the ornithologists out there).
Try It Out: Adding Other Objects to a List, Selecting, and Deleting
Start up a new WinForms project and then add a new class to the project called Employee.vb. The first thing you’ll do is create a simple Employee class to hold information about the employees in the company. Doubleclick the class to open up the code editor and then add three fields and a ToString() method to the class:
Public Class Employee
Public FirstName As String
Public LastName As String
Public JobTitle As String
Public Overrides Function ToString() As String
Return LastName + ", " + FirstName
End Function
End Class
268 |
C H A P T E R 1 0 ■ L I S T S |
Remember back when we were looking at objects and Visual Basic, I mentioned that all classes are actually subclasses of System.Object? Well, System.Object implements a ToString() method, so that in turn means that every single class you’ll ever use also has a ToString() method. In this code you are overriding the base implementation of ToString() with your own one specific to the Employee class so that at runtime if anyone calls ToString() on an Employee object, they’ll get something meaningful returned.
Normally I wouldn’t bother implementing ToString() on my own classes. But, the ListBox control uses it. You see, you can add any kind of object you like to the ListBox.Items collection. At runtime, when the list needs to be displayed, the code inside the ListBox control calls ToString() on every object in the Items collection and displays the results. Usually when we just add strings to the collection, ToString() just returns the value of the string, and so it appears that ListBoxes just hold text. As you’ll see, though, the ability to add any object to a ListBox makes it a very versatile beast indeed.
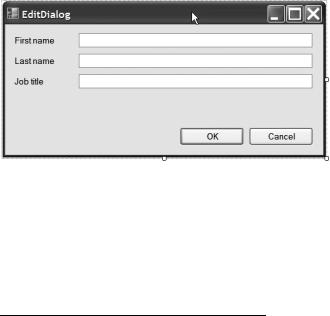
Next, you’ll need to create a dialog in order to add or edit employees. You’ll use one dialog for both functions, which is a lot less complicated than it might sound if you are an ex-VBer.
Add a new form to the project called EditDialog.vb. When the form appears in the designer, drop a few controls on it, just as in Figure 10-6.
Figure 10-6. Drop some controls onto the form to make a generic add and edit employee dialog.
You’ll need to set up quite a few properties on these controls so that the dialog works as a dialog, and so that your code matches mine. Set up the properties as shown in Table 10-1.
Table 10-1. Properties of the Controls on the Dialog
Control |
Property |
Value |
First Name label |
Text |
First name |
Last Name label |
Text |
Last name |
Job Title label |
Text |
Job title |
First Name text box |
Name |
firstName |
Last Name text box |
Name |
lastName |

C H A P T E R 1 0 ■ L I S T S |
269 |
Control |
Property |
Value |
Job Title text box |
Name |
jobTitle |
OK button |
Name |
okButton |
|
Text |
OK |
|
DialogResult |
OK |
Cancel button |
Name |
quitButton |
|
Text |
Cancel |
|
DialogResult |
Cancel |
Form |
AcceptButton |
okButton |
|
CancelButton |
quitButton |
|
|
|
From a user interface (UI) point of view, that’s all you need. The buttons have their DialogResult properties set so that the form can work and behave just as a dialog should, and you have entry areas for the three main properties of the Employee class. The next step is to write some code behind this form.
Here’s the strange bit. Because this is a dialog and will be used just for data entry, you don’t need to code up any events at all to get this form working properly at runtime. What you do need, though, is a way to get an Employee object into and out of the form at runtime, in order to set up the form for an edit and retrieve the data the user entered. Hit F7 to drop into the code view, but outside of any event handler.
The first thing you are going to need is a private member to hold the employee object that the dialog is working on:
Public Class EditDialog
Private _employee As Employee = Nothing
End Class
The next thing you are going to need is a public Employee property so that other code using the dialog can get at the employee data:
Public Class EditDialog
Private _employee As Employee = Nothing
Public Property StaffMember() As Employee
Get
End Get
Set(ByVal value As Employee)
End Set
End Property
End Class
So far, so good. Let’s code up the Set part of the property first, because that’s the easiest. Other code using this dialog will set the StaffMember property only if the dialog is to be used to edit that data. Think about that for a second. If you were adding a new staff member, you wouldn’t want to pass in any employee information