

Beginning Visual Basic 2005 Express Edition - From Novice To Professional (2006)
.pdf360 C H A P T E R 1 4 ■ F I L E S A N D S T R E A M S
In this chapter you’ll explore a couple of very handy classes that the .NET Framework provides for working with files on your computer. You’ll then move into looking at streams and how to read and write files, and even how to read and write data by using streams and computers on the Internet.
I can almost guarantee that you’ll use the information in this chapter pretty soon after you embark on writing programs of your own, so it’s a key chapter.
Working with Files
The System.IO namespace in the .NET Framework holds everything you need to work with files and directories on your computer, as well as streams. We’ll get on to streams in the next section, but first let’s spend some time exploring the classes for working with files and directories.
The FileSystemWatcher Class
One of the most fun classes in this namespace is FileSystemWatcher. As the name indicates, this class can be used to watch for changes in the file system (your hard disk). You can set it up to tell you when files in a certain place, or with a certain name or type, are created, deleted, renamed, or changed. This is great for live backup programs because you can tell FileSystemWatcher to automatically fire when anything changes in one directory and then automatically update another. Another great use is in a networked environment. Let’s say you need to know when someone on the network changes a specific file (perhaps the file contains a list of requirements that you and your team are to develop). The FileSystemWatcher class can be used to alert you when new requirements arrive in much the same way that Microsoft Outlook can alert you when new email arrives.
There are two ways to create and work with a FileSystemWatcher object. The easiest is to simply drag and drop the FileSystemWatcher control onto the form in a Windows Forms project. This gives you easy point-and-click access to all the properties and events of the control. The second way is to simply create the object in code. For example:
Dim watcher As New System.IO.FileSystemWatcher()
Of course, if you add an Imports System.IO; statement to the top of your class, you don’t need to fully specify the namespace along with the class in code:
Dim watcher As New FileSystemWatcher()
C H A P T E R 1 4 ■ F I L E S A N D S T R E A M S |
361 |
We’ll stick with the simpler method of just using the control; after all, Visual Basic 2005 Express provides features that make development easy for a reason.
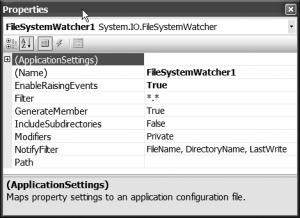
Obviously, FileSystemWatcher is not a visual control, so when you add it to a form it appears in the area underneath the form in the form editor. You can see the properties it exposes in Figure 14-1.
Figure 14-1. Using the FileSystemWatcher control, you can access the properties through the Properties window.
As you can see, there aren’t a great number of properties to worry about. EnableRaisingEvents is a Boolean property that basically turns the control on or off. When you set this property to True, the FileSystemWatcher will start watching for changes and raise events as they occur. You specify just what you are interested in learning about through the Filter and NotifyFilter properties.
Filter takes a standard Windows filename wildcard to specify which files to report on. For example, setting the filter to *.* tells the watcher to report on changes to all files. Similarly, setting it to *.txt tells the watcher to report back only on changes made to text files (files whose filenames end in .txt).
While the Filter specifies the files to watch, NotifyFilter tells the control just which events you are interested in hearing about. NotifyFilter uses the System.IO.NotifyFilters enumeration to specify just what it is you want to see. The enumeration values and what they mean are listed in Table 14-1.
362 C H A P T E R 1 4 ■ F I L E S A N D S T R E A M S
Table 14-1. The NotifyFilters Enumerations That Control How the FileSystemWatcher Object Works
NotifyFilter Enumeration |
Description |
NotifyFilters.Attributes |
Watches for changes to things such as read access, write |
|
access, and so on. |
NotifyFilters.CreationTime |
Watches for changes in creation times of files. This will also |
|
pick up new files. |
NotifyFilters.DirectoryName |
Watches for directory name changes, including new |
|
directories. |
NotifyFilters.FileName |
Watches for filename changes, including new files. |
NotifyFilters.LastAccess |
Watches for when a file is accessed and reports on it. |
NotifyFilters.LastWrite |
Watches for when a file has new data written into it. |
NotifyFilters.Security |
Fires notifications when security settings on a file change. |
NotifyFilters.Size |
Fires notifications when a file size changes. |
|
|
All of these enumeration values can be combined by using the + sign. So, if you wanted to watch for changes in file size, last access time, and last write time, you’d set up the NotifyFilter property like this:
myWatcher.NotifyFilter = NotifyFilters.Size + _ NotifyFilters.LastAccess + _ NotifyFilters.LastWrite
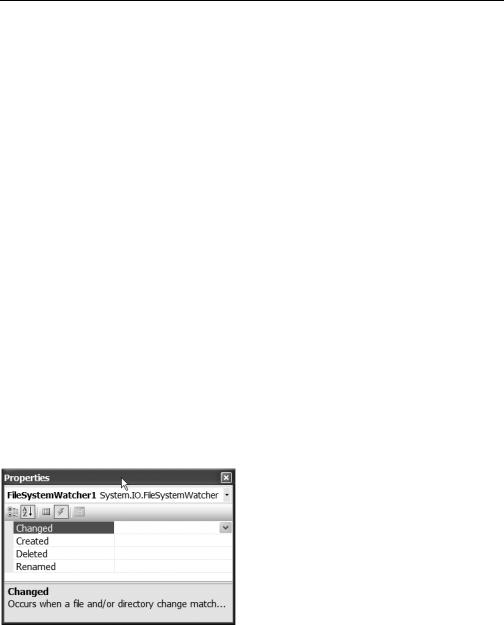
After you’ve set up the control, the next thing you’ll want to do is actually catch the notifications themselves. This is handled through the event model. Take a look at the list of events in the Properties window within the VB Express IDE in Figure 14-2.
Figure 14-2. The FileSystemWatcher is very easy to hook into with just four events.
C H A P T E R 1 4 ■ F I L E S A N D S T R E A M S |
363 |
As you can see, the event model on FileSystemWatcher is very simple; it has just four self-explanatory events. The tricky thing is that these events relate to the filters. So, the Changed event will fire when a file change causes a filter to match. Similarly, Created will fire only when a file is created and that causes a filter to match.
Let’s put all this into action with a short “Try It Out.”
Try It Out: Using the FileSystemWatcher Class
The FileSystemWatcher is phenomenally powerful—and staggeringly simple. In fact, I’ll warn you now that we’ll probably spend more time working on our user interface in this example than we will writing FileSystemWatcher-specific code. It’s a neat demo, though.
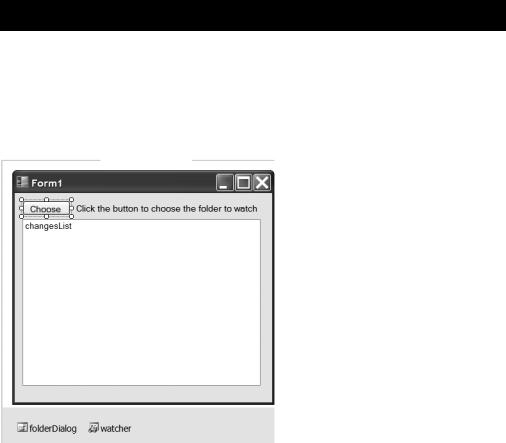
Start up a new Windows Forms application. Then drop FolderBrowserDialog, FileSystemWatcher, label, list box, and button controls onto the form so that it looks like the one in Figure 14-3.
Figure 14-3. Arrange controls on your form like this. Note that FolderBrowserDialog and FileSystemWatcher are nonvisible controls and appear underneath the form in the editor.
Set up the name properties of the controls; the button is called chooseButton, the label is folderLabel, the list box is changesList, the folder browser is folderDialog, and the FileSystemWatcher is simply watcher.
364 |
C H A P T E R 1 4 ■ F I L E S A N D S T R E A M S |
Select the FileSystemWatcher and set the EnableRaisingEvents property to False; this will prevent the object from firing off events before we’re ready.
The way this form is going to work is quite simple. The user will click the Choose button and then choose a folder to watch from the dialog that appears. From that point on, you’ll catch events from the watcher and display information on them in the list box. It may sound like a lot of work, but it really isn’t.
First, let’s go ahead and code up the folder-chooser button. Double-click it to open the code editor at the button’s click event handler, and then key in the following highlighted code:
Private Sub chooseButton_Click(ByVal sender As System.Object, _
ByVal e As System.EventArgs) Handles chooseButton.Click
If folderDialog.ShowDialog() = Windows.Forms.DialogResult.OK Then folderLabel.Text = folderDialog.SelectedPath
watcher.Path = folderDialog.SelectedPath watcher.IncludeSubdirectories = True watcher.Filter = "*.*" watcher.EnableRaisingEvents = True
End If
End Sub
The first thing this code does is open the dialog. Providing the user clicks OK in the dialog, the main code block runs. This copies the selected path into the label on the form (user feedback is all important of course), before diving into setting up the watcher.
Most of the code used here to set up the watcher could have been done by using the Properties window, but I wanted to have it in code so it’s explicitly documented for your future reference. The code copies the selected path into the watcher, and sets up to monitor changes in subdirectories off the changed one and to watch all files with the wildcard of *.*. Finally, we turn the control on.
The next step is to code up the event handlers on the watcher. We’ll do them all at once. Go back to the form designer view and select the watcher control. Then take a look at the events list in the Properties window (which you saw back in Figure 14-2). Now double-click each event in the window. Each time you do this, VB Express will create the event handler stub and drop you down into the code editor. You’ll need to keep switching back to the design view to click through all the events. Ultimately you’ll end up with a block of event handler stubs that look like this:
Private Sub watcher_Changed(ByVal sender As System.Object, _
ByVal e As System.IO.FileSystemEventArgs) Handles watcher.Changed
End Sub
C H A P T E R 1 4 ■ F I L E S A N D S T R E A M S |
365 |
Private Sub watcher_Created(ByVal sender As System.Object, _
ByVal e As System.IO.FileSystemEventArgs) Handles watcher.Created
End Sub
Private Sub watcher_Deleted(ByVal sender As System.Object, _
ByVal e As System.IO.FileSystemEventArgs) Handles watcher.Deleted
End Sub
Private Sub watcher_Renamed(ByVal sender As System.Object, _
ByVal e As System.IO.RenamedEventArgs) Handles watcher.Renamed
End Sub
All that remains now is to add some code to these handlers. The second parameter to each of these handlers lets you find out information about just why the event fired. In particular, they all have a Name property that refers to the name of the file that triggered the event. You can use this to feed data into the list box about the file that triggered the event. Go ahead and add code to the event handlers to do just that:
Private Sub watcher_Changed(ByVal sender As System.Object, _
ByVal e As System.IO.FileSystemEventArgs) Handles watcher.Changed changesList.Items.Add(e.Name + " changed.")
End Sub
Private Sub watcher_Created(ByVal sender As System.Object, _
ByVal e As System.IO.FileSystemEventArgs) Handles watcher.Created changesList.Items.Add(e.Name + " was created.")
End Sub
Private Sub watcher_Deleted(ByVal sender As System.Object, _
ByVal e As System.IO.FileSystemEventArgs) Handles watcher.Deleted changesList.Items.Add(e.Name + " was deleted.")
End Sub
Private Sub watcher_Renamed(ByVal sender As System.Object, _ ByVal e As System.IO.RenamedEventArgs) Handles watcher.Renamed
changesList.Items.Add(e.Name + " was renamed.")
End Sub
366 C H A P T E R 1 4 ■ F I L E S A N D S T R E A M S
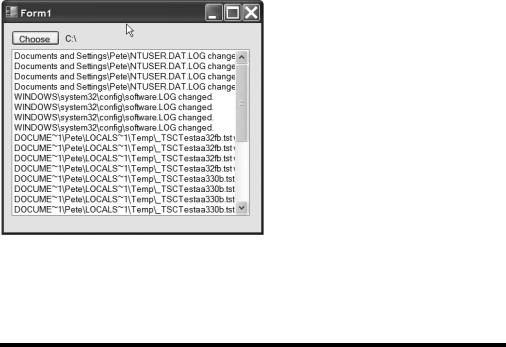
And that’s all there is to it. Each event just dumps out the name of the file that triggered the event along with some text to relay which event fired, and all into the list box. Run the application now. To make sure you see something, point the app at your C:\ folder and then start an application such as Notepad in Windows; you’ll notice that Windows generates a lot of changes to files when you do anything, especially when you run programs. You can see the output in Figure 14-4.
Figure 14-4. Point the program at your C:\ folder and you’ll see a lot of file changes.
So, for a surprisingly small amount of work you now have a great tool for exploring a myriad of things Windows does behind the scenes.
The File and Directory Classes
The System.IO namespace also includes classes for dealing with files and directories on your computer: File and Directory. Actually there are four classes: File, FileInfo,
Directory, and DirectoryInfo. Let me explain.
The File and Directory classes contain shared methods—you can’t create instances of these classes. Obviously what that means is that you don’t have to create instances of those classes to get at methods to do things such as rename, delete, and so on. FileInfo and DirectoryInfo are instance-based classes. You need to create instances of them to use the methods they contain. Which should you use? The short answer is both.
C H A P T E R 1 4 ■ F I L E S A N D S T R E A M S |
367 |
Let’s say you want to find a listing of all the files in a specific directory. The Directory class’s GetFiles() and GetDirectories() methods will do just that. Both these methods will give you an array of strings that you can iterate through with a simple For Each loop. Within that loop you would typically go ahead and create FileInfo or DirectoryInfo objects to let you work with that specific file or directory. The following listing shows
an example:
Imports System.IO
Module Module1
Sub Main()
Dim files() As String = Directory.GetFiles("c:\") For Each filename As String In files
Dim file As New FileInfo(filename) Console.WriteLine( _
"{0} created on {1}, and is a {2} file", _ file.Name, file.CreationTime, _ file.Extension)
Next Console.ReadLine()
End Sub
End Module
Feel free to key this into a console-type project if you want to see it for yourself. (Don’t forget to add the Imports System.IO statement to the top of the source file.) All the code does is grab a list of files by using the shared Directory.GetFiles() method and then iterate through the string array it returns. Inside the loop we create a FileInfo object to get information about each file.
I’m not going to spend a lot of time walking through every method and property on all four classes; most are self-explanatory, and a quick look at the online help or even IntelliSense in the code window will tell you all you need to know to use them. There are a few interesting ones that I will point out, though.
First, both the File and Directory classes contain shared methods to do pretty much anything you could do in Windows Explorer or inside a command prompt. For example, you can create directories by using the CreateDirectory() method, or check whether a file or directory exists by using the Exists() method. If you wanted to move or rename something, both classes expose Move() methods. In fact, the File class also gives you a Copy() method for if you need to copy something.

368 C H A P T E R 1 4 ■ F I L E S A N D S T R E A M S
If you’re feeling really adventurous, the File class even has Encrypt() and Decrypt() methods that will hide important information from prying eyes. These methods use your login account to build the key used to do both the encryption and decryption, so they’re not terribly secure but useful in a pinch at least.
Best of all, though, the File class has ReadAllLines() and WriteAllLines() methods. ReadAllLines() will give you a string array, with each element in the string holding a single line from the file. WriteAllLines() does the reverse, taking a string array you give it and writing them out to a file. Let’s take a look at these in action with a brief console-based “Try It Out.”
Try It Out: Reading and Writing Files with the File Class
Fire up a new console project and add the following line to the top of the Module1.vb file:
Imports System.IO
The first thing you’ll do is create a string array that you want to write out to a file:
Imports System.IO
Module Module1
Sub Main()
Dim lines(9) As String
For i As Integer = 0 To 9
lines(i) = String.Format( _
"This is line number {0}", i)
Next
End Sub
End Module
So far, so good. The next step is to see whether the file you are about to write to already exists. If it does, you’ll get rid of it:
Sub Main()
Dim lines(9) As String
For i As Integer = 0 To 9
lines(i) = String.Format( _
"This is line number {0}", i)
Next
If File.Exists("c:\test.txt") Then
File.Delete("c:\test.txt")
End If
End Sub
C H A P T E R 1 4 ■ F I L E S A N D S T R E A M S |
369 |
Now you can write out the new file contents. This is trivial to do with the File class’s WriteAllLines() method:
Sub Main()
Dim lines(9) As String
For i As Integer = 0 To 9
lines(i) = String.Format( _
"This is line number {0}", i)
Next
If File.Exists("c:\test.txt") Then
File.Delete("c:\test.txt")
End If
File.WriteAllLines("c:\test.txt", lines)
End Sub
Last but not least, you’ll wrap up the program by reading back all the lines from the file and writing them out to the console. Because the File.ReadAllLines() method gives you back an array of strings, you can For Each over them:
Sub Main()
Dim lines(9) As String
For i As Integer = 0 To 9
lines(i) = String.Format( _
"This is line number {0}", i)
Next
If File.Exists("c:\test.txt") Then
File.Delete("c:\test.txt")
End If
File.WriteAllLines("c:\test.txt", lines)
For Each line As String In File.ReadAllLines("c:\test.txt")
Console.WriteLine(line)
Next
Console.ReadLine()
End Sub