

9. Electrical system
9.1 What is the electrical system
Electrical system consists of silicon rectified generator, regulator, starter motor (supplied with diesel engine), battery, lamps, monitoring system for oil pressure, oil temperature and cleanness, low pressure warning device and instrument, etc.
The rated voltage of the system is 24V. Negative pole is grounding. Single line connection is adopted. Refer to Figure 3-31 for electrical diagram.
The battery is 6-Q-195 or Bolder 6-QW-120 maintenance-free type. Two batteries are connected in series, mainly for supplying power to the starter motor. When the engine is running, the generator on engine charges the battery. If the battery can not be charged properly, the battery should be demounted from the vehicle for charging. (Refer to the Instruction for Maintenance of Battery and the Battery Fault Diagnostic Chart)
Battery should be charged according to regulations. Check electrolyte level every 5 or 7 days in summer, and 10 or 15 days in winter. Usually the electrolyte level should be 10 – 15mm higher than accumulator plate. Check to see if the accumulator plate is sulfurized. A layer of white lead sulfate can be seen on the top of the accumulator plate if sulfuration occurs. The sulfurized battery must not be used and should be charged in special way.
The battery should be charged once a month if the vehicle is parked for long period. After work is finished each time, turn off the master power switch to prevent electrical leakage.
See table 3-1 for the power of lighting system.
Power of lighting system Table 3-1
Description |
Working lamp |
Combined headlamp |
Steering lamp |
Brake lamp |
Top lamp |
Indicator |
Instrument lamp |
Power |
50/50W |
50/50W 21W10W |
21W×2 |
21W |
21W×2 |
2W |
2W |
Precaution:
9.1.1 Electrical lock on instrument panel should be turned on before starting, and off after engine is stopped.
9.1.2 Do not turn off the main power switch discretionarily after the engine is normally started, because the no-load voltage of generator may rise suddenly and the electrical device may be burnt.
9.1.3 In following cases, you must switch off the electrical lock and the main power switch to prevent occurrence of accident:
(1) When the contact of starter motor is stuck and the cranking current is out of control;
(2) Grounding is caused at servicing;
(3) Electrical device is short-circuited or grounded.
9.2 Battery
9.2.1 Charging the battery
When the electrolyte specific gravity is lower than 1.2g/cm3 at 25 Celsius or the voltage of single battery is less than 1.75V, recharging is needed. At recharging, the electrolyte should be made of pure water and sulfuric acid that is suitable to battery.
A). Preparation before charging
a. Check to see if the electrolyte and pure water satisfy the battery standards.
b. Take off the filler plug on the battery.
c. Fill electrolyte and pure water to the maximum limit.
B). Connection for charging
a. Connect the positive/negative clamps of charger to the positive/negative terminals of battery. Do not make reverse connection.
b. The number of batteries that can be charged simultaneously is determined according to the power of charger.
c. Be sure that the connection is secure.
C) Ways of charging
There are following ways of charging in terms of the charger type:
a. Constant current charging: Current (I) = Rated capacity/10 (Amperes)
b. Constant voltage charging: Voltage (U) =13.8 -- 14.4 (Volts)
D) Precaution to charging
a. The temperature of liquid in the battery must not exceed 45 degrees Centigrade.
b. Keep good ventilation around the battery.
c. No open flame is permitted near the battery.
E) The length of time for charging is dependent on the status of battery. After charging for 1 or 2 hours, air bubbles will appear in the battery and the ampere setting in the alternator will be decreased. Then set the charging current to 5-10% of the rated capacity (A) and continue charging.
F) How to know if the charging is completed?
a. You will feel warm by touching the case of battery;
b. Much air bubbles appear in the battery;
c. The voltage of single battery is 2.6 – 2.8V and keeps constant in more than 2 hours of testing;
d. The electrolyte specific gravity is 1.260 – 1.280 (25 Degrees Centigrade) and keeps constant in more than 2 hours of testing;
e. Disconnect the alternator and keep the battery stable for 2 hours. If the voltage at terminals of battery is 12.6 – 12.8V, the charging is completed. Tighten the filler plug and clean the case with clean water.
9.2.2 Prevent cracking caused by hitting during mounting and demounting.
9.2.3 The battery case is made of plastic. The compression strength and tensile strength is limited owing to the characteristics of material. Do not over-tighten the bolts of battery since it may damage the sealing and cause leakage. In case cracking is found on asphalt sealing, iron it with heated steel bar after cleaning the outside.
9.2.4 Replenish pure water in the battery in time when necessary so as to prevent the accumulator plate from being exposed and oxidized.
9.2.5 Charge the battery if it is filled with electrolyte and is intended to be stored. Charge it every 1 or 3 months during storage period.

Figure 3-31 Flow chart of battery diagnosis (1)

Figure 3-32 Flow chart of battery diagnosis (2)
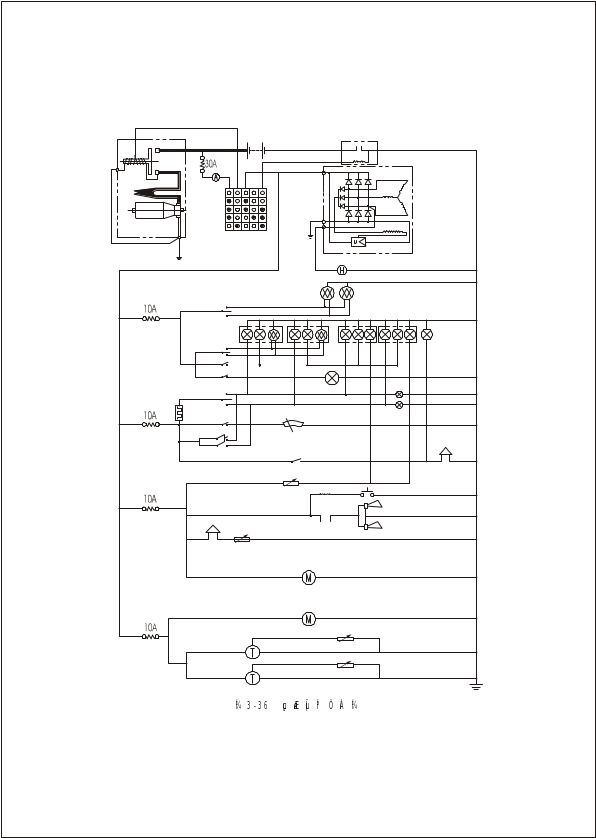
Figure 3-33 Electrical diagram