


Getting Started and Creating Applications |
57 |
|
|
Chapter 4. Creating Applications
To make it easy for you to evaluate and become familiar with our product line, we provide an evaluation version with sample programs and limited versions of our tools. The sample programs are also included with our standard product kits.
NOTE
The Keil C51 evaluation tools are limited in functionality and the code size of the application you can create. Refer to the “Release Notes” for more information on the limitations of the evaluation tools. For larger applications, you need to purchase one of our development kits. Refer to “Product Overview” on page 16 for a description of the kits that are available.
This chapter describes the Build Mode of µVision2 and shows you how to use the user interface to create a sample program. Also discussed are options for generating and maintaining projects. This includes output file options, the
configuration of the C51 Compiler for optimum code quality, and the features of 4 the µVision2 project manager.
Creating Projects
µVision2 includes a project manager that makes it easy to design applications for the 8051 family. You need to perform the following steps to create a new project:
Start µVision2, create a project file and select a CPU from the device database.
Create a new source file and add this source file to the project.
Add and configure the startup code for the 8051 device
Set tool options for target hardware.
Build project and create a HEX file for PROM programming.
The description is a step-by-step tutorial that shows you how to create a simple µVision2 project.
58 |
Chapter 4. Creating Applications |
|
|
 Starting µVision2 and Creating a Project
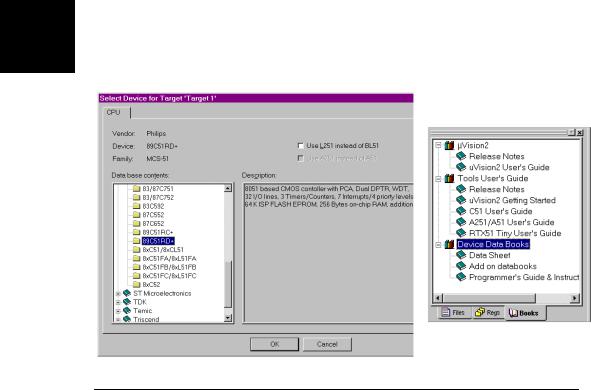
µVision2 is a standard Windows application and started by clicking on the program icon. To create a new project file select from the µVision2 menu Project – New Project…. This opens a standard Windows dialog that asks you for the new project file name.
We suggest that you use a separate folder for each project. You can simply use the icon Create New Folder in this dialog to get a new empty folder. Then select this folder and enter the file name for the new project, i.e. Project1. µVision2 creates a new project file with the name PROJECT1.UV2 which contains a default target and file group name. You can see these names in the Project Window – Files.
Now use from the menu Project – Select Device for Target and select a CPU for your project. The Select Device dialog box shows the µVision2 device database. Just select the microcontroller you use. We are using for our
4 examples the Philips 80C51RD+ CPU. This selection sets necessary tool options for the 80C51RD+ device and simplifies in this way the tool configuration.
NOTE
On some devices, the µVision2 environment needs additional parameters that you have to enter manually. Carefully read the information provided under
Getting Started and Creating Applications |
59 |
|
|
Description in this dialog, since it might have additional instructions for the device configuration.
Once you have selected a CPU from the device database you can open the user manuals for that device in the Project Window – Books page. These user manuals are part of the Keil Development Tools CD-ROM that should be present in your CD drive.
 Creating New Source Files
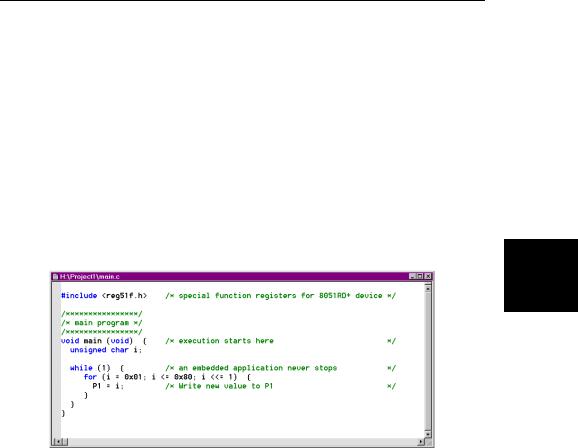
You may create a new source file with the menu option File – New. This opens an empty editor window where you can enter your source code. µVision2 enables the C color syntax highlighting when you save your file with the dialog File – Save As… under a filename with the extension *.C. We are saving our
example file under the name MAIN.C.
4
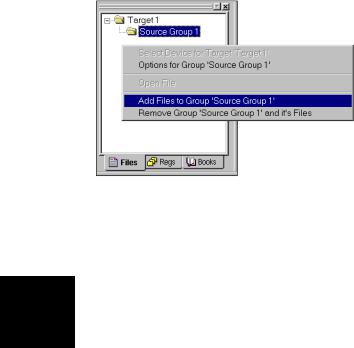
Once you have created your source file you can add this file to your project. µVision2 offers several ways to add source files to a project. For example, you can select the file group in the Project Window – Files page and click with the right mouse key to open a local menu. The option Add Files opens the standard files dialog. Select the file MAIN.C you have just created.
60 |
Chapter 4. Creating Applications |
|
|
Adding and Configuring the Startup Code
The STARTUP.A51 file is the startup code for the most 8051 CPU variants. The startup code clears the data memory and initializes hardware and reentrant stack
4 pointers. In addition, some 8051 derivatives require a CPU initialization code that needs to match the configuration of your hardware design. For example, the Philips 8051RD+ offers you on-chip xdata RAM that should be enabled in the startup code. Since you need to modify that file to match your target hardware, you should copy the STARTUP.A51 file from the folder C:\KEIL\C51\LIB to your project folder.
It is a good practice to create a new file group for the CPU configuration files. With Project – Targets, Groups, Files… you can open a dialog box where you add a group named System Files to your target. In the same dialog box you can use the Add Files to Group… button to add the STARTUP.A51 file to your project.
Getting Started and Creating Applications |
61 |
|
|
The Project Window – Files lists all items of your project.
The µVision2 Project Window – Files should now show the above file |
4 |
structure. Open STARTUP.A51 in the editor with a double click on the file name |
|
in the project window. Then you configure the startup code as described in |
“Chapter 10. CPU and C Startup Code” on page 197. If you are using on-chip RAM of your device the settings in the startup code should match the settings of the Options – Target dialog. This dialog is discussed in the following.

62 |
Chapter 4. Creating Applications |
|
|
 Setting Tool Options for Target
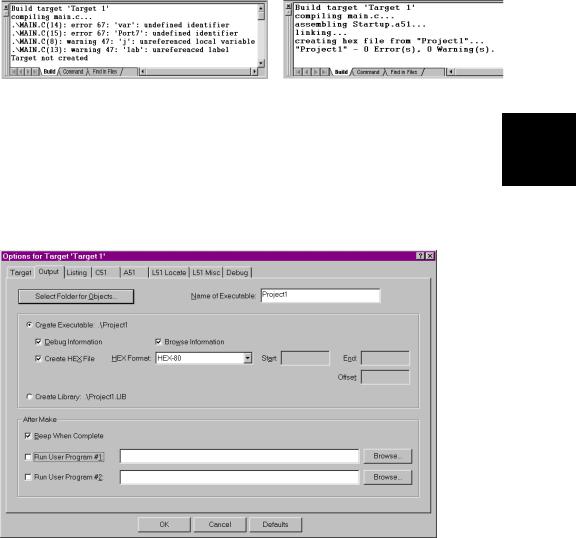
µVision2 lets you set options for your target hardware. The dialog Options for Target opens via the toolbar icon. In the Target tab you specify all relevant parameters of your target hardware and the on-chip components of the device you have selected. The following the settings for our example are shown.
4
The following table describes the options of the Target dialog:
|
Dialog Item |
Description |
|
Xtal |
Specifies the CPU clock of your device. In most cases this value is |
|
|
identical with the XTAL frequency. |
|
Memory Model |
Specifies the C51 Compiler memory model. For starting new applications |
|
|
the default SMALL is a good choice. Refer to “Memory Models and |
|
|
Memory Types” on page 78 for a discussion of the various memory models. |
|
Allocate On-chip … |
Specifies the usage of the on-chip components that are typically enabled in |
|
Use multiple DPTR |
the CPU startup code. If you are using on-chip xdata RAM (XRAM) you |
|
registers |
should also enable the XRAM access in the STARTUP.A51 file. |
|
Off-chip … Memory |
Here you specify all external memory areas of the target hardware. |
|
Code Banking |
Specifies the parameters for code and xdata banking. Refer to “Code |
|
Xdata Banking |
Banking” on page 67 for more information. |
|
|
|
NOTE
Several Options in the Target dialog are only available if you are using the LX51 Linker/Locater. The LX51 Linker/Locater is only available in the PK51 package.
Getting Started and Creating Applications |
63 |
|
|
 Building Projects and Creating a HEX Files
Typical, the tool settings under Options – Target are all you need to start a new application. You may translate all source files and line the application with a click on the Build Target toolbar icon. When you build an application with syntax errors, µVision2 will display errors and warning messages in the Output Window – Build page. A double click on a message line opens the source file on the correct location in a µVision2 editor window.
Once you have successfully generated your application you can start debugging. Refer to “Chapter 5. Testing Programs” on page 93 for a discussion of the
µVision2 debugging features. After you have tested your application, it is 4 required to create an Intel HEX file to download the software into an EPROM programmer or simulator. µVision2 creates HEX files with each build process
when Create HEX file under Options for Target – Output is enabled. You may start your PROM programming utility after the make process when you specify the program under the option Run User Program #1.