

Getting Started and Creating Applications |
69 |
|
|
µVision2 Utilities
µVision2 contains many powerful functions that help you during your software project. These utilities are discussed in the following section.
 Find in Files
The Edit – Find in Files dialog performs a global text search in all specified files. The search results are displayed in the Find in Files page of the Output window. A double click in the Find in Files page positions the editor to the text line with matching string.
Source Browser |
4 |
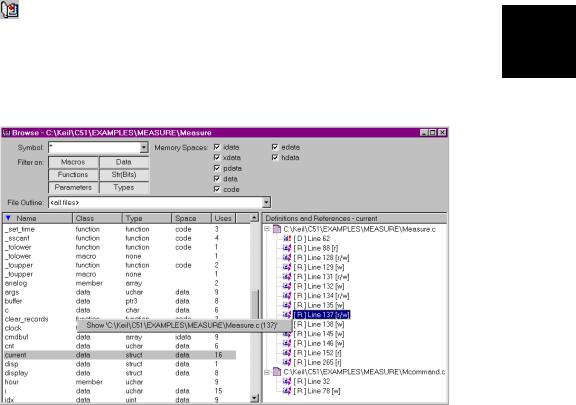
The Source Browser displays information about program symbols in your |
program. If Options for Target – Output – Browser Information is enabled when you build the target program, the compiler includes browser information into the object files. Use View – Source Browser to open the Browse window.
The Browse window lists the symbol name, class, type, memory space and the number of uses. Click on the list item to sort the information. You can filter the browse information using the options described in the following table:

70 |
|
|
Chapter 4. Creating Applications |
|
|
|
|
|
|
|
|
|
|
|
|
Browse Options |
Description |
|
|
|
Symbol |
Specify a mask that is used to match symbol names. The mask may consist |
|
|
|
|
of alphanumeric characters plus mask characters: |
|
|
|
|
# |
matches a digit (0 – 9) |
|
|
|
$ |
matches any character |
|
|
|
* |
matches zero or more characters. |
|
|
Filter on |
Select the definition type of the symbol |
|
|
|
File Outline |
Select the file for which information should be listed. |
|
|
|
Memory Spaces |
Specify the memory type for data and function symbols. |
|
|
The following table provides a few examples of symbol name masks.
|
|
Mask |
Matches symbol names … |
|
|
* |
Matches any symbol. This is the default mask in the Symbol Browser. |
|
|
*#* |
Matches any symbol that contains one digit in any position. |
|
|
_a$#* |
Matches any symbol with an underline followed by the letter a followed by any |
4 |
|
|
character followed by a digit ending with zero or more characters. For example, |
|
|
_ab1 or _a10value. |
|
|
_*ABC |
Matches any symbol with an underline followed by zero or more characters followed |
|
|
|
by ABC. |
|
|
|
|
|
The local menu in the Browse window opens with a right mouse Click and allows you to open the editor on the selected reference. For functions you can also view the Call and Callers graph. The Definitions and References view gives you additional information as shown below:
Symbol Description
[D]Definition
[R]Reference
[r]read access
[w]write access
[r/w] |
read/write access |
[&]address reference
Getting Started and Creating Applications |
71 |
|
|
You may use the browser information within an editor window. Select the item that you want to search for and open the local menu with a right mouse click or use the following keyboard shortcuts:
Shortcut |
Description |
|
|
F12 |
Goto Definition; place cursor to the symbol definition |
|
|
Shift+F12 |
Goto Reference; place cursor to a symbol reference |
|
|
Ctrl+Num+ |
Goto Next Reference or Definition |
|
|
Ctrl+Num– |
Goto Previous Reference or Definition |
Key Sequence for Tool Parameters
A key sequence may be used to pass arguments from the µVision2 environment to external user programs. Key sequences can be applied in the Tools menu,
SVCS menu, and the Run User Program arguments in the Options for Target 4
– Output dialog. A key sequence is a combination of a Key Code and a File Code. The available Key Codes and File Codes are listed in the tables below:
Key Code |
Specifies the path selected with the File Code |
% |
Filename with extension, but without path specification (PROJECT1.UV2) |
# |
Filename with complete path specification (C:\MYPROJECT\PROJECT1.UV2) |
% |
Filename with extension, but without path specification (PROJECT1.UV2) |
@ |
Filename without extension and path specification (PROJECT1) |
$ |
Folder name of the file specified in the file code (C:\MYPROJECT) |
~ † |
Line number of current cursor position (only valid for file code F) |
^ † |
Column number of current cursor position (only valid for file code F) |
† |
The key code ~ and ^ can be used only in combination with the file code F |
To use $, #, %, @, ~ or ^ in the user program command line, use $$, ##, %%, @@, ~~ or ^^. |
|
|
For example, @@ gives a single @ in the user program command line. |
|
|
File Code |
Specifies the file name or argument inserted in the user program line |
F |
Selected file in the Project Window - Files page (MEASURE.C). Returns the |
|
project file if the target name is selected or the current active editor file if a group |
|
name is selected. |
P |
Name of the current project file (PROJECT1.UV2) |
L |
Linker output file, typical the executable file for debugging (PROJECT1) |
H |
Application HEX file (PROJECT1.H86) |
X |
µVision2 executable program file (C:\KEIL\UV2\UV2.EXE) |

72 |
|
Chapter 4. Creating Applications |
|
|
|
|
|
|
|
|
|
|
|
The following file codes are used for SVCS systems. |
|
|
|
For more information refer to “Using the SVCS Menu” on page 76. |
|
|
Q † |
File name that holds comments for the SVCS system. |
|
|
R † |
String that holds a revision number for the SVCS system. |
|
|
C † |
String that holds a check point string for the SVCS system. |
|
|
U † |
User name specified under SVCS – Configure Version Control – User Name |
|
|
V † |
File name specified under SVCS – Configure Version Control – Database |
|
† The file codes Q, R, C, U and V can be used only in combination with the key code %
Using the Tools Menu
Via the Tools menu, you run external programs. You may add custom programs to the Tools
4 menu with the dialog
Tools – Customize Tools Menu…. This dialog configures the parameters for external user applications. The dialog right shows a sample tool setup. The dialog options are explained below.
The above entries extend the Tools menu as shown right.
Dialog Item |
Description |
Menu Content |
Text shown in the Tools menu. This line may contain key codes and file |
|
codes. Shortcuts are defined with an ampersand (‘&’) character. The |
|
current selected menu line allows you to specify the options listed below. |
Prompt for |
If enabled, a dialog box opens at the time you invoke the menu item that |
Arguments |
allows you to specify the command line arguments for the user program. |
Run Minimized |
Enable this option to execute the application with minimized window. |
Command |
Program file that is executed with the selected menu item. |
Initial Folder |
Current working folder for the application program. If this entry is empty, |
|
µVision2 uses the base folder of the project file. |
Arguments |
Command line arguments that are passed to the application program. |
|
|

Getting Started and Creating Applications |
73 |
|
|
The output of command line based application programs is copied to a temporary file. When the application execution completes the content of this temporary file is listed in the Output Window – Build page.
4
74 |
Chapter 4. Creating Applications |
|
|
Running PC-Lint
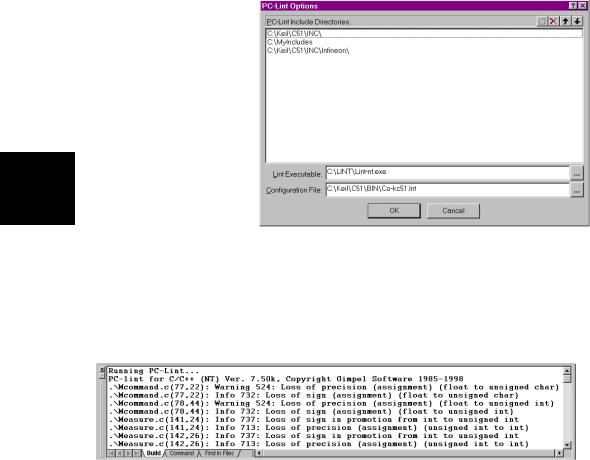
PC-Lint from Gimpel Software checks the syntax and semantics of C programs across all modules of your application. PC-Lint flags possible bugs and inconsistencies and locates unclear, erroneous, or non-sense C code. PC-Lint may considerably reduce the debugging effort of your target application.
Install PC-Lint on your PC and enter parameters in the dialog Tools – Setup PC Lint. The example shows a typical PC-Lint configuration.
To get correct output in the Build page, you should use the
4 configuration file that is located in the folder
KEIL\C51\BIN.
After the setup of PC-Lint you may Lint your source code. Tools – Lint … runs PC-Lint on the current in focus editor file. Tools – Lint All C Source Files runs PC-Lint across all C source files of your project. The PC-Lint messages are redirected to the Build – Output Window. A double click on a Lint message line locates the editor to the source file position.
To get correct results in the Build – Output Window, PC-Lint needs the following option lines in the configuration file:
-hsb_3 |
// 3 lines output, column below |
-format="*** LINT: %(%f(%l) %)%t %n: %m" |
// Change message output format |
-width(0,10) |
// Don't break lines |

Getting Started and Creating Applications |
75 |
|
|
The configuration file C:\KEIL\C51\BIN\CO-KC51.LNT contains already these |
|
lines. It is strongly recommended to use this configuration file, since it contains |
|
also other PC-Lint options required for the Keil C51 Compiler. |
|
Siemens Easy-Case |
|
||
µVision2 provides a direct interface to Siemens Easy-Case. Easy-Case is a |
|
||
graphic editor as well as a program documentation utility. You may use Easy- |
|
||
Case to edit source code. Also some µVision2 debugger commands are available |
|
||
within the Easy-Case environment. |
|
||
Install Easy-Case: to use µVision2 debugger commands within Siemens Easy-- |
|
||
Case the configuration settings from the file C:\KEIL\UV2\UV2EASY-CPP.INI |
|
||
should be added to the file EASY-CPP.INI that is stored in the WINDOWS system |
|
||
directory. This may be done with any text editor or the DOS copy command: |
|
||
|
4 |
||
C:\>CD C:\WINNT |
|
||
C:\WINNT>COPY EASY-CPP.INI+C:\KEIL\UV2\UV2EASY-CPP.INI EASY-CPP.INI |
|
||
In the µVision2 dialog |
|||
|
|||
Tools – Setup Easy-Case |
|
||
enter the path for EASY- |
|
||
CPP.EXE. This completes |
|
||
the configuration for |
|
||
Siemens Easy-Case. |
|
||
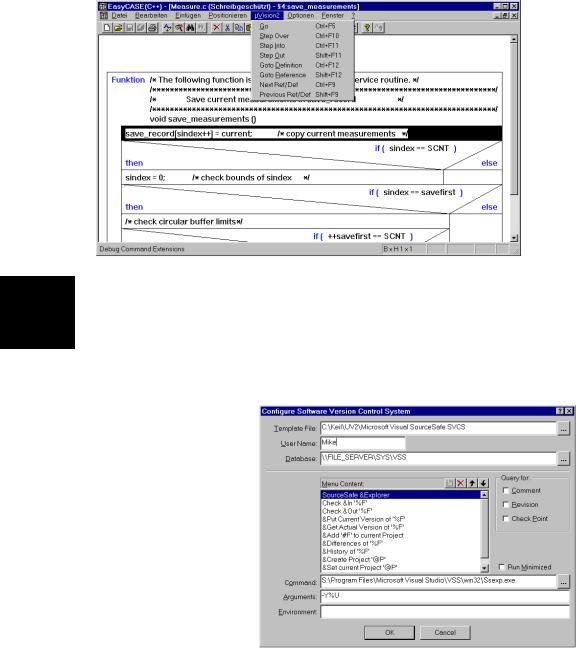
View Source Code with Easy-Case: with Tools – Start/Stop Easy-Case you start Easy-Case. The menu item Tools – Show … opens the active µVison2 editor file at the current position. The Easy-Case menu µVision2 offers several debug commands that allow program execution in the µVision2 debugger.
76 |
Chapter 4. Creating Applications |
|
|
4 Using the SVCS Menu
µVision2 provides a configurable interface to Software Version Control Systems (SVCS). Pre-configured template files are provided for: Intersolv PVCS, Microsoft SourceSafe, and MKS Source Integrity.
Via the SVCS Menu you call the command line tools of your Version Control System. The configuration of the SVCS menu is stored in a Template File. This menu is configured with the dialog SVCS –
Customize SVCS Menu…. The dialog options are explained below.
Dialog Item |
Description |
Template File |
Name of the SVCS menu configuration file. It is recommended that all |
|
members of the software team are using the same template file. Therefore |
|
the template file should be copied to the file server. |
|
|
Getting Started and Creating Applications |
77 |
|
|||
|
|
|
|
|
|
|
|
|
|
|
|
|
User Name |
User name that should be used to log into the SVCS system. The user |
|
|
|
|
|
name is passed with the %U file code in the argument line. |
|
|
|
|
Database |
File name or path for the database used by the SVCS system. The |
|
|
|
|
|
database string is passed with the %V file code in the argument line. |
|
|
|
|
Menu Content |
Text shown in the SVCS menu. This line may contain key codes and file |
|
|
|
|
|
codes. Shortcuts are defined with an ampersand (‘&’) character. The |
|
|
|
|
|
selected menu line allows you to specify the options listed below. |
|
|
|
|
Query for … |
Allows you to ask for additional information when using the SVCS |
|
|
|
|
Comment |
command. A comment is copied into a temporary file that can be passed |
|
|
|
|
Revision |
with the file code %Q as argument to the SVCS command. Revision and |
|
|
|
|
CheckPoint |
CheckPoint are passed as a string with %R and %C file code. |
|
|
|
|
Run Minimized |
Enable this option to execute the application with minimized window. |
|
|
|
|
Command |
Program file that is invoked when you click on the SVCS menu item. |
|
|
|
|
Arguments |
Command line arguments that are passed to the SVCS program file. |
|
|
|
|
Environment |
Environment variables that are set before execution of the SVCS program. |
|
|
|
|
The output of command line SVCS application programs is copied to a |
|
|
|
|
|
temporary file. When the SVCS command completes the content of this |
|
|
|
|
|
temporary file is listed in the Output Window – Build page. |
4 |
|||
|
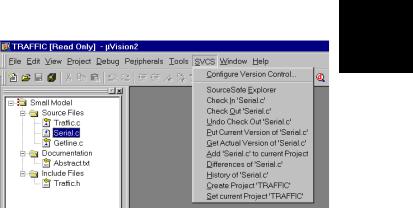
A sample SVCS menu is |
||||
shown on the right. A selected file in the page
Project Window – Files is the SVCS argument. The target name selects the *.UV2 project file. The local copy of a looked file is read-only and gets a key symbol.
µVision2 projects are saved in two separate files. Project settings in *.UV2: this file should be looked with the SVCS and is sufficient to re-build an application. The local µVision2 configuration in *.OPT contains window positions and debugger settings.
The following table lists typical SVCS menu items. Depending on your configuration, additional or different items might be available. Include files may be added to the project as document file to access them quickly with the SVCS.
SVCS Menu Item |
Description |
Explorer |
Start the interactive SVCS explorer. |
Check In |
Save the file in the SVCS database and make the local copy read-only. |
Check Out |
Get the actual file version from the SVCS and allows modifications. |
|
|