

lafore_robert_objectoriented_programming_in_c
.pdfLoops and Decisions |
CHAPT E R |
3
IN THIS CHAPTER
• |
Relational Operators |
76 |
• Loops 78 |
|
|
• |
Decisions 93 |
|
• |
Logical Operators 114 |
|
• Precedence Summary |
118 |
|
• |
Other Control Statements 118 |
|

Chapter 3
76
Not many programs execute all their statements in strict order from beginning to end. Most programs (like many humans) decide what to do in response to changing circumstances. The flow of control jumps from one part of the program to another, depending on calculations performed in the program. Program statements that cause such jumps are called control statements. There are two major categories: loops and decisions.
How many times a loop is executed, or whether a decision results in the execution of a section of code, depends on whether certain expressions are true or false. These expressions typically involve a kind of operator called a relational operator, which compares two values. Since the operation of loops and decisions is so closely involved with these operators, we’ll examine them first.
Relational Operators
A relational operator compares two values. The values can be any built-in C++ data type, such as char, int, and float, or—as we’ll see later—they can be user-defined classes. The comparison involves such relationships as equal to, less than, and greater than. The result of the comparison is true or false; for example, either two values are equal (true), or they’re not (false).
Our first program, RELAT, demonstrates relational operators in a comparison of integer variables and constants.
//relat.cpp
//demonstrates relational operators #include <iostream>
using namespace std;
int main()
{
int numb;
cout << “Enter a number: “; cin >> numb;
cout << “numb<10 is “ << (numb < 10) << endl; cout << “numb>10 is “ << (numb > 10) << endl; cout << “numb==10 is “ << (numb == 10) << endl; return 0;
}
This program performs three kinds of comparisons between 10 and a number entered by the user. Here’s the output when the user enters 20:
Enter a number: 20 numb<10 is 0 numb>10 is 1 numb==10 is 0
Loops and Decisions
77
The first expression is true if numb is less than 10. The second expression is true if numb is greater than 10, and the third is true if numb is equal to 10. As you can see from the output, the C++ compiler considers that a true expression has the value 1, while a false expression has the value 0.
As we mentioned in the last chapter, Standard C++ includes a type bool, which can hold one of two constant values, true or false. You might think that results of relational expressions like numb<10 would be of type bool, and that the program would print false instead of 0 and true instead of 1. In fact, C++ is rather schizophrenic on this point. Displaying the results of relational operations, or even the values of type bool variables, with cout<< yields 0 or 1, not false or true. Historically this is because C++ started out with no bool type. Before the advent of Standard C++, the only way to express false and true was with 0 and 1. Now false can be represented by either a bool value of false, or by an integer value of 0; and true can be represented by either a bool value of true or an integer value of 1.
In most simple situations the difference isn’t apparent because we don’t need to display true/false values; we just use them in loops and decisions to influence what the program will do next.
Here’s the complete list of C++ relational operators:
Operator |
Meaning |
> |
Greater than (greater than) |
< |
Less than |
== |
Equal to |
!= |
Not equal to |
>= |
Greater than or equal to |
<= |
Less than or equal to |
Now let’s look at some expressions that use relational operators, and also look at the value of each expression. The first two lines are assignment statements that set the values of the variables harry and jane. You might want to hide the comments with your old Jose Canseco baseball card and see whether you can predict which expressions evaluate to true and which to false.
jane = 44; |
//assignment statement |
harry = 12; |
//assignment statement |
(jane == harry) |
//false |
(harry <= 12) |
//true |
(jane > harry) |
//true |
(jane >= 44) |
//true |
(harry != 12) |
// false |
(7 < harry) |
//true |
(0) |
//false (by definition) |
(44) |
//true (since it’s not 0) |
3
DECISIONS LOOPS
AND

Chapter 3
78
Note that the equal operator, ==, uses two equal signs. A common mistake is to use a single equal sign—the assignment operator—as a relational operator. This is a nasty bug, since the compiler may not notice anything wrong. However, your program won’t do what you want (unless you’re very lucky).
Although C++ generates a 1 to indicate true, it assumes that any value other than 0 (such as –7 or 44) is true; only 0 is false. Thus, the last expression in the list is true.
Now let’s see how these operators are used in typical situations. We’ll examine loops first, then decisions.
Loops
Loops cause a section of your program to be repeated a certain number of times. The repetition continues while a condition is true. When the condition becomes false, the loop ends and control passes to the statements following the loop.
There are three kinds of loops in C++: the for loop, the while loop, and the do loop.
The for Loop
The for loop is (for many people, anyway) the easiest C++ loop to understand. All its loopcontrol elements are gathered in one place, while in the other loop constructions they are scattered about the program, which can make it harder to unravel how these loops work.
The for loop executes a section of code a fixed number of times. It’s usually (although not always) used when you know, before entering the loop, how many times you want to execute the code.
Here’s an example, FORDEMO, that displays the squares of the numbers from 0 to 14:
//fordemo.cpp
//demonstrates simple FOR loop #include <iostream>
using namespace std;
int main() |
|
|
{ |
|
|
int j; |
|
//define a loop variable |
for(j=0; j<15; j++) |
//loop from 0 to 14, |
|
cout |
<< j * j << “ |
“; //displaying the square of j |
cout << |
endl; |
|
return 0;
}
Loops and Decisions
79
Here’s the output:
0 |
1 |
4 |
9 |
16 |
25 |
36 |
49 |
64 |
81 |
100 |
121 |
144 |
169 |
196 |
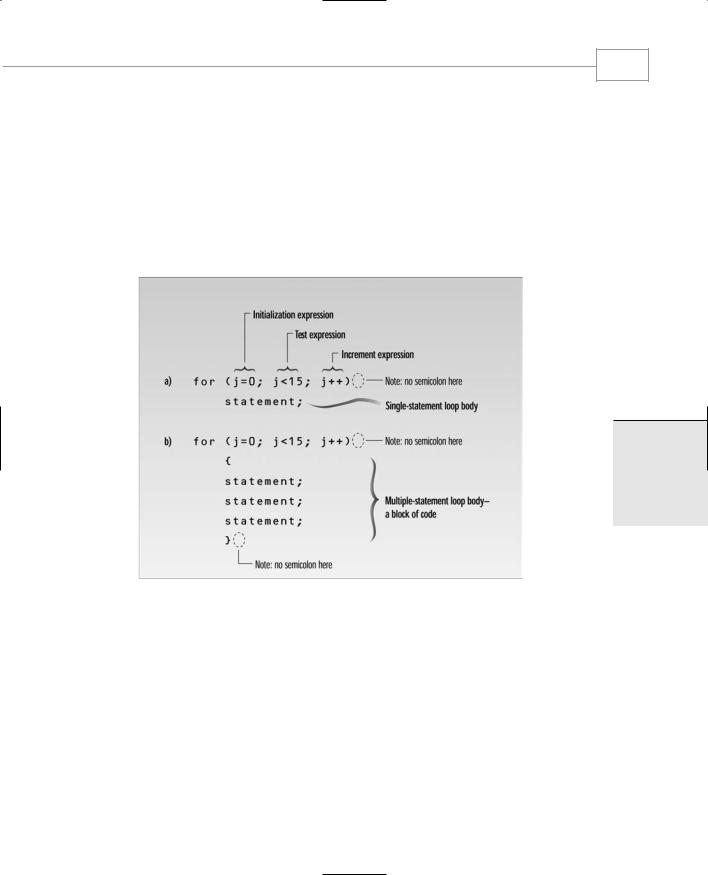
How does this work? The for statement controls the loop. It consists of the keyword for, followed by parentheses that contain three expressions separated by semicolons:
for(j=0; j<15; j++)
These three expressions are the initialization expression, the test expression, and the increment expression, as shown in Figure 3.1.
3
DECISIONS
LOOPS
AND
FIGURE 3.1
Syntax of the for loop.
These three expressions usually (but not always) involve the same variable, which we call the loop variable. In the FORDEMO example the loop variable is j. It’s defined before the statements within the loop body start to execute.
The body of the loop is the code to be executed each time through the loop. Repeating this code is the raison d’être for the loop. In this example the loop body consists of a single statement:
cout << j * j << “ “;

Chapter 3
80
This statement prints out the square of j, followed by two spaces. The square is found by multiplying j by itself. As the loop executes, j goes through the sequence 0, 1, 2, 3, and so on up to 14; so the squares of these numbers are displayed—0, 1, 4, 9, up to 196.
Note that the for statement is not followed by a semicolon. That’s because the for statement and the loop body are together considered to be a program statement. This is an important detail. If you put a semicolon after the for statement, the compiler will think there is no loop body, and the program will do things you probably don’t expect.
Let’s see how the three expressions in the for statement control the loop.
The Initialization Expression
The initialization expression is executed only once, when the loop first starts. It gives the loop variable an initial value. In the FORDEMO example it sets j to 0.
The Test Expression
The test expression usually involves a relational operator. It is evaluated each time through the loop, just before the body of the loop is executed. It determines whether the loop will be executed again. If the test expression is true, the loop is executed one more time. If it’s false, the loop ends, and control passes to the statements following the loop. In the FORDEMO example the statement
cout << endl;
is executed following the completion of the loop.
The Increment Expression
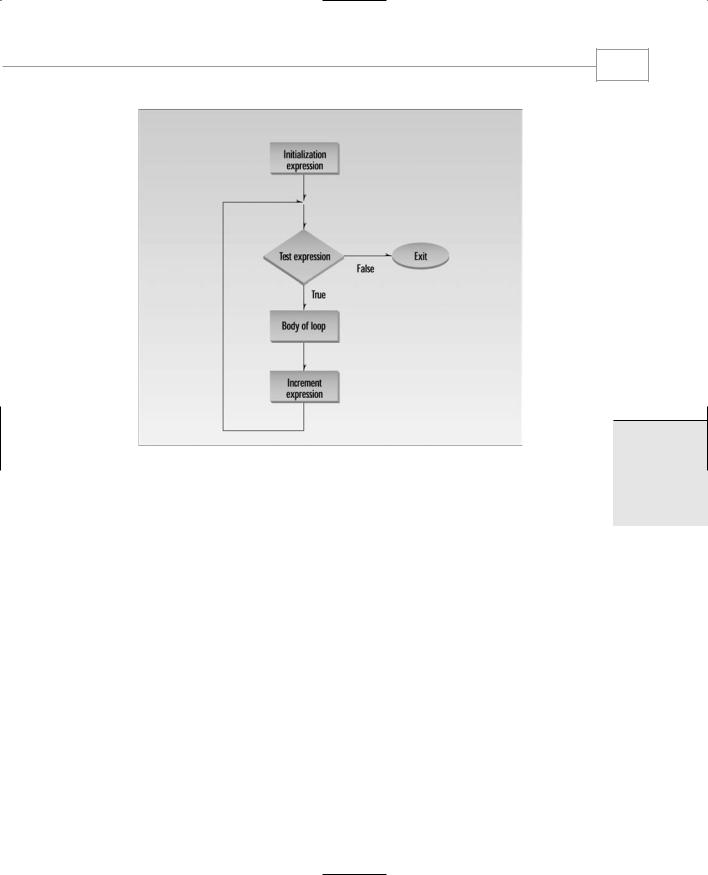
The increment expression changes the value of the loop variable, often by incrementing it. It is always executed at the end of the loop, after the loop body has been executed. Here the increment operator ++ adds 1 to j each time through the loop. Figure 3.2 shows a flowchart of a for loop’s operation.
How Many Times?
The loop in the FORDEMO example executes exactly 15 times. The first time, j is 0. This is ensured in the initialization expression. The last time through the loop, j is 14. This is determined by the test expression j<15. When j becomes 15, the loop terminates; the loop body is not executed when j has this value. The arrangement shown is commonly used to do something a fixed number of times: start at 0, use a test expression with the less-than operator and a value equal to the desired number of iterations, and increment the loop variable after each iteration.
Loops and Decisions
81
FIGURE 3.2
Operation of the for loop.
Here’s another for loop example:
for(count=0; count<100; count++) // loop body
How many times will the loop body be repeated here? Exactly 100 times, with count going from 0 to 99.
Multiple Statements in the Loop Body
Of course you may want to execute more than one statement in the loop body. Multiple statements are delimited by braces, just as functions are. Note that there is no semicolon following the final brace of the loop body, although there are semicolons following the individual statements in the loop body.
The next example, CUBELIST, uses three statements in the loop body. It prints out the cubes of the numbers from 1 to 10, using a two-column format.
//cubelist.cpp
//lists cubes from 1 to 10 #include <iostream>
3
DECISIONS LOOPS
AND

82 |
Chapter 3 |
|
#include <iomanip> |
//for setw |
using namespace std; |
|
int main() |
|
{ |
|
int numb; |
//define loop variable |
for(numb=1; numb<=10; numb++) |
//loop from 1 to 10 |
{ |
|
cout << setw(4) << numb; |
//display 1st column |
int cube = numb*numb*numb; |
//calculate cube |
cout << setw(6) << cube << endl; |
//display 2nd column |
} |
|
return 0; |
|
} |
|
Here’s the output from the program: |
|
11
28
327
464
5125
6216
7343
8512
9 |
729 |
10 |
1000 |
We’ve made another change in the program to show there’s nothing immutable about the format used in the last example. The loop variable is initialized to 1, not to 0, and it ends at 10, not at 9, by virtue of <=, the less-than-or-equal-to operator. The effect is that the loop body is executed 10 times, with the loop variable running from 1 to 10 (not from 0 to 9).
We should note that you can also put braces around the single statement loop body shown previously. They’re not necessary, but many programmers feel it improves clarity to use them whether the loop body consists of a single statement or not.
Blocks and Variable Visibility
The loop body, which consists of braces delimiting several statements, is called a block of code. One important aspect of a block is that a variable defined inside the block is not visible outside it. Visible means that program statements can access or “see” the variable. (We’ll discuss visibility further in Chapter 5, “Functions.”) In CUBELIST we define the variable cube inside the block, in the statement
int cube = numb*numb*numb;

Loops and Decisions
You can’t access this variable outside the block; it’s only visible within the braces. Thus if you placed the statement
cube = 10;
after the loop body, the compiler would signal an error because the variable cube would be undefined outside the loop.
One advantage of restricting the visibility of variables is that the same variable name can be used within different blocks in the same program. (Defining variables inside a block, as we did in CUBELIST, is common in C++ but is not popular in C.)
Indentation and Loop Style
Good programming style dictates that the loop body be indented—that is, shifted right, relative to the loop statement (and to the rest of the program). In the FORDEMO example one line is indented, and in CUBELIST the entire block, including the braces, is indented. This indentation is an important visual aid to the programmer: It makes it easy to see where the loop body begins and ends. The compiler doesn’t care whether you indent or not (at least there’s no way to tell if it cares).
There is a common variation on the style we use for loops in this book. We show the braces aligned vertically, but some programmers prefer to place the opening brace just after the loop statement, like this:
for(numb=1; numb<=10; numb++) { cout << setw(4) << numb;
int cube = numb*numb*numb;
cout << setw(6) << cube << endl;
}
This saves a line in the listing but makes it more difficult to read, since the opening brace is harder to see and harder to match with the corresponding closing brace. Another style is to indent the body but not the braces:
for(numb=1; numb<=10; numb++)
{
cout << setw(4) << numb; int cube = numb*numb*numb;
cout << setw(6) << cube << endl;
}
83
3
DECISIONS LOOPS
AND
This is a common approach, but at least for some people it makes it harder for the eye to connect the braces to the loop body. However, you can get used to almost anything. Whatever style you choose, use it consistently.

Chapter 3
84
Debugging Animation
You can use the debugging features built into your compiler to create a dramatic animated display of loop operation. The key feature is single-stepping. Your compiler makes this easy. Start by opening a project for the program to be debugged, and a window containing the source file. The exact instructions necessary to launch the debugger vary with different compilers, so consult Appendix C, “Microsoft Visual C++,” or Appendix D, “Borland C++Builder,” as appropriate. By pressing a certain function key you can cause one line of your program to be executed at a time. This will show you the sequence of statements executed as the program proceeds. In a loop you’ll see the statements within the loop executed; then control will jump back to the start of the loop and the cycle will be repeated.
You can also use the debugger to watch what happens to the values of different variables as you single-step through the program. This is a powerful tool when you’re debugging your program. You can experiment with this technique with the CUBELIST program by putting the numb and cube variables in a Watch window in your debugger and seeing how they change as the program proceeds. Again, consult the appropriate appendix for instructions on how to use Watch windows.
Single-stepping and the Watch window are powerful debugging tools. If your program doesn’t behave as you think it should, you can use these features to monitor the values of key variables as you step through the program. Usually the source of the problem will become clear.
for Loop Variations
The increment expression doesn’t need to increment the loop variable; it can perform any operation it likes. In the next example it decrements the loop variable. This program, FACTOR, asks the user to type in a number, and then calculates the factorial of this number. (The factorial is calculated by multiplying the original number by all the positive integers smaller than itself. Thus the factorial of 5 is 5*4*3*2*1, or 120.)
//factor.cpp
//calculates factorials, demonstrates FOR loop #include <iostream>
using namespace std;
int main() |
|
{ |
|
unsigned int numb; |
|
unsigned long fact=1; |
//long for larger numbers |
cout << “Enter a number: “; |
|
cin >> numb; |
//get number |