

Real - World ASP .NET—Building a Content Management System - StephenR. G. Fraser
.pdfYou now have a piece of content that you can view from your Web site—congratulations! Okay, log onto the Web site and take a peek.
Oops, the "I'm changing" Web page is still there. Not a big deal. Let's fix that.
Starting and Stopping the Web Site
I ramble on about my pet peeve, page-not-found errors, in Chapter 13, so I'll save you from it here. All you need to know now is how to start up the site. This procedure, incidentally, is also how you shut down the Web site.
First, click the Utilities and Site Start/Stop menu items on the NavBar and then simply click the Bring Site Up? button (see Figure 9-35). The button will then change to Bring Site Down?, which you click to shut the Web site down. Pretty easy, don't you think?
Figure 9-35: Starting and stopping the Web site
Okay, now log in and see your story. You will find it in the zone into which you deployed it. Here it is in Figure 9-36. Not too bad, if you ask me.
Figure 9-36: Your first CMS.NET story
Summary
This chapter provided an overview of CMS.NET. It started with a brief description of CMS.NET and then covered how to install it. The chapter ended with a quick tutorial. The next chapter will start the long road of building CMS.NET, which in turn will be the start of building your own CMS (I hope).
Chapter 10: Initializing CMS.NET
Overview
Now you get to the good stuff: building CMS.NET. Well, maybe not just yet. First, you have to build the setup procedure for CMS.NET so that you don't have to worry about hard-coding the system configuration. This enables you to move CMS.NET to different
hardware configurations while developing, testing, and deploying it to production— without having to change any code within the system. It also enables you to give CMS.NET to someone else without worrying how his system is configured.
The first thing this setup procedure will do is allow the system installer to specify the correct link to the Microsoft SQL Server that CMS.NET will be using. All computer systems are different. Each has its own IP addresses, server names, directory structure, and administrator names and passwords. With a setup procedure, you don't have to worry about any of these things.
The second thing this setup procedure will do is set up an administrator account so you can limit access to that account for now. Chapter 12 covers authentication, authorization, and encryption, so for now, don't worry about the complete lack of security in CMS.NET. A system will be of little use if the same administrator username and password are used for all implementations. This setup procedure enables you to provide a unique administration account and password.
Along the way, this chapter looks at web.config and how to programmatically update it.
You will start building CMSNET—CMS.NET's database. You also will learn how to navigate from page to page in ASP.NET. This is all fun stuff, so let's get started.
Note Unlike in previous chapters, from here on, the code presented in this book will only be the directly relevant parts. For a complete listing, you need to see the source code, which you can find by going to the Apress Web site (www.apress.com) and clicking the Downloads link.
The code presented on the Apress Web site is continually being extended from previous chapters. In other words, it contains all the code to execute CMS.NET, up to and including that chapter. Thus, there is a lot of recurring code from previous chapters, not just code from the current chapter.
It should also be noted that as the code progresses, portions of code from previous chapters may be updated, replaced, or even deleted as they are improved, enhanced, or expanded upon.
All code for CMS.NET is located in one project called CMSNET. Most of the code is in directories of the main CMSNET project. When I cover a code snippet from CMS.NET, I will note its name as directory/codename.ext. When you are looking for the code on the Apress site, make sure you look in the specified directory because code names may repeat themselves.
To Set Up or Not to Set Up?
To ensure that the setup procedure is run, CMS.NET checks every time. This approach is overkill, but the cost is so minimal and easy to implement that I thought it an acceptable solution. In your implementation, you might want to have a separate admin and setup Web page.
The Admin.aspx Web Page
Admin.aspx (see Listing 10-1) is one of the few Web pages in CMS.NET that is not found in a subdirectory off of CMSNET. In fact, it is not much of a Web page at all. It is actually

a blank jump page that merely makes a simple check to see whether the system has been set up and then routes to the appropriate Web page.
Listing 10-1: Admin.aspx
<%@ Page language="c#" Codebehind="Admin.cs" AutoEventWireup="false"
Inherits="CMSNET.Admin" %>
<html>
<head>
<meta name="GENERATOR" Content="Microsoft Visual Studio 7.0">
<meta name="CODE_LANGUAGE" Content="C#">
</head>
<body >
<form method="post" runat="server" >
</form>
</body>
</html>
The Admin.cs Codebehind
Pretty barren, don't you think? Something that people who are used to HTML navigation might find weird is that the form has no action attribute. This Web page, when submitted, will return back to itself. So, you might be wondering, how does it jump to the correct Web page? The magic happens in the Codebehind.
The Admin Page_Load() method (see Listing 10-2) is extremely simple. The AppEnv class, which is covered a little later in this chapter, checks the web.config to see whether the setup value is set to true. This will mean more as you get further into the chapter.
Listing 10-2: The Admin.Page_Load Method
private void Page_Load(object sender, System.EventArgs e)
{
string setup = new AppEnv(Context).GetAppSetting("setup");
if(setup.Equals("true"))
{
Response.Redirect("Administration/admin.aspx");
}
else
{
Response.Redirect("Setup/setup.aspx");
}
}
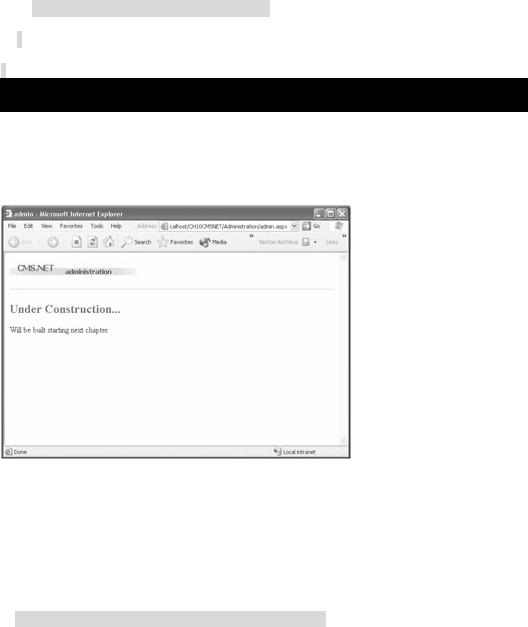
If the setup variable is equal to true, the Web page jumps happily to the administration system and, for now, will jump to a Web page stub that looks like the one shown in Figure 10-1. If the setup variable has some other value or is empty, it jumps to the setup system, which is what I cover in the rest of this chapter.
Figure 10-1: The administration Web page stub
For those of you coming from the old ASP world, you should be familiar with using Response.Redirect(URL) to cause a page to jump to another URL. During Beta1, a
new option was introduced—the cleaner Navigate() method—that was inherited from System.Web.UI.Page to handle navigation. Unfortunately, the Navigate() method disappeared in Beta2 for some reason.
All navigation is relative to the current Web page. If you are navigating to an external URL, you must prefix the URL with http://. For example, to jump to Microsoft's .NET development home page, you would use the following:
Response.Redirect("http://msdn.microsoft.com/net");
First, Describe the Process
It is always a good idea to give the user some idea of where she is and what she is about to do, especially if you are about to do something as important as setting up the system. Providing information such as whom to contact if something goes wrong and how to restart the process if you make a mistake are nice touches and can help increase the user's comfort level.
The Setup/setup.aspx Web Page
The first Web page that is actually displayed during the setup process is Setup/setup.aspx. This page is simply an informational page that looks like Figure 10-2. It indicates what is about to happen, whom to contact if something goes wrong, and how to repeat the process if you want to change something. It also includes a button to continue to the next Web page, where the real work of the setup process begins.
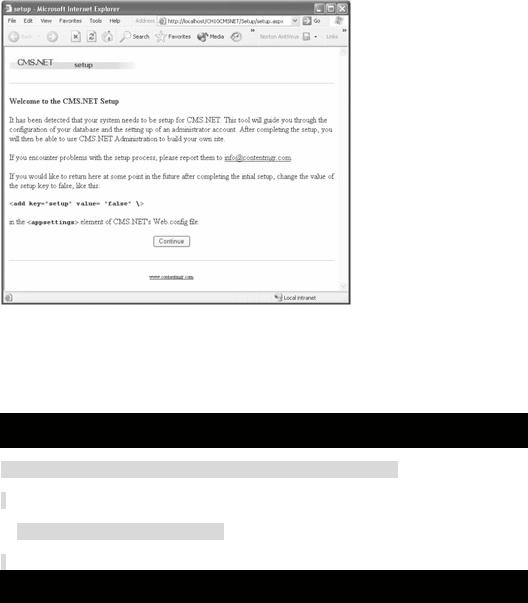
Figure 10-2: Setup/setup.aspx
The Setup/setup.cs Codebehind
There really isn't anything special about the code for setup. In fact, everything is the default except the bnContinue_Click() method (see Listing 10-3), which does a simple jump to setup2.aspx.
Listing 10-3: The setup.bnContinue_Click Method
private void bnContinue_Click (object sender, System.EventArgs e)
{
Response.Redirect("setup2.aspx");
}
Using web.config to Save the Database Connection String
You have several options when it comes to storing the database connection string. Before ASP.NET, a file with a hard-coded location, the INI file, the Registry, and the IIS metabase were some of the most frequently used locations for storing the database connection string. These solutions are no longer needed because ASP.NET provides a more elegant solution: web.config.
Basically, the web.config file is an XML file that stores all the configuration information for an ASP.NET Web application. It's only appropriate to add the database connection string here because it is a piece of configuration information. In fact, the web.config file has an
optional predefined element, <appSettings>, to address such user-defined configuration information.
<appSettings> is made up of one or more <add> elements containing key/value attribute pairs. These elements are perfect for CMS.NET to store database connection information, and they look like Listing 10-4 when finally implemented by the setup procedure.
Listing 10-4: CMS.NET's web.config <appSettings>
<!--APPSETTINGS
This section sets all the custom application settings
-->
<appSettings>
<add key="setup" value="true"/>
<add key="database" value="CMSNET"/>
<add key="datasource" value="localhost"/>
<add key="userid" value="sa"/>
<add key="password" value=""/>
<add key="timeout" value=""/>
</appSettings>
Adding the <appSettings> element to the web.config XML file is the purpose of Setup/setup2.aspx.
The Setup/setup2.aspx Web Page
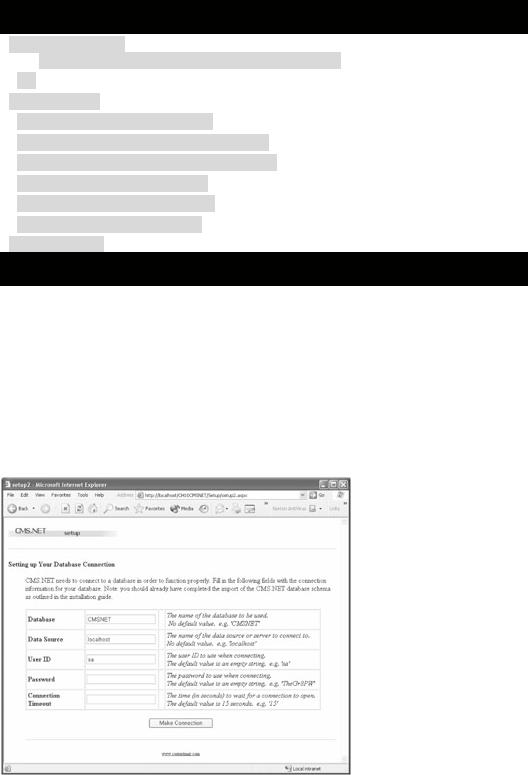
Setup/setup2.aspx is a Web form designed to capture all the information needed to determine where CMS.NET's database is located as well as the username and password needed to get access. It is a very simple form that looks like Figure 10-3. As you can see, there is not much to the form except that it validates that Database and Data Source both have values and that the optional Connection Timeout is numeric if entered.
Figure 10-3: Setup/setup2.aspx
Processing a Web Form—Setup/setup2.cs
What is really interesting about this Web page is what happens behind the scenes in the Codebehind.

The first thing the Codebehind for setup2 does is repopulate the values in the edit fields of the form (if this is a return visit to the setup procedure) or, more likely, set the edit fields to their default value.
private void Page_Load(object sender, System.EventArgs e)
{
if (!IsPostBack)
{
AppEnv appEnv = new AppEnv(Context);
txtDatabase.Text = appEnv.GetAppSetting("database");
if (txtDatabase.Text.Length <= 0)
{
txtDatabase.Text = "CMSNET";
}
txtDataSource.Text = appEnv.GetAppSetting("datasource");
txtUserID.Text |
= appEnv.GetAppSetting("userid"); |
txtPassword.Text = appEnv.GetAppSetting("password");
txtTimeout.Text |
= appEnv.GetAppSetting("timeout"); |
}
The user first enters the appropriate values into the edit fields and clicks the Make Connection button. The Codebehind then does a page validation checking to see whether the information is valid for connecting to the database by actually attempting to connect using the entered values. By using exception handling, the code is able to catch any errors that occur and present them back to the user for correction.
If all is well, the values are added to the web.config XML file, and you then navigate to the next step in the setup process.
else
{
Page.Validate();
lblConnectError.Text = "";
if (Page.IsValid)
{
try
{
SqlConnection myConnection = new SqlConnection();
myConnection.ConnectionString =
"server=" + txtDataSource.Text +
";database=" + txtDatabase.Text +
";uid=" + txtUserID.Text +
";pwd=" + txtPassword.Text +

((txtTimeout.Text.Length > 0) ? ";Connection Timeout=" + txtTimeout.Text : "");
SqlDataAdapter myCommand =
new SqlDataAdapter("select * from Account", myConnection); // Can we get to the database?
DataSet ds = new DataSet(); myCommand.Fill(ds, "Account");
UpdateConfigWeb(txtDatabase.Text, txtDataSource.Text, txtUserID.Text, txtPassword.Text, txtTimeout.Text);
Response.Redirect("setup3.aspx");
return;
}
catch (Exception err)
{
lblConnectError.Text = err.Message;
}
}
lblErrorHeader.Text =
"Sorry, cannot connect to your database the following errors occurred:";
}
Programmatically Updating a web.config File—Setup/setup2.cs
The UpdateConfigWeb() method handles all the gory details of updating the web.config file. It takes as parameters all the values that will be placed in the web.config file.
public void UpdateConfigWeb(String database, String datasource, String userid, String password, String timeout)
{
It then opens the web.config file, loads it into an XmlDocument for processing, and closes it so that it may be opened later for writing.
XmlReader xtr = new XmlTextReader(File.OpenRead(Server.MapPath("..\\web.config")));
XmlDocument doc = new XmlDocument(); doc.Load(xtr);
xtr.Close();
The first thing it does is look for the <appSettings> tag. If it doesn't find it, the method dumps the key/values into the web.config file wholesale.
XmlElement root = doc.DocumentElement;

XmlNodeList nodes = root.GetElementsByTagName("appSettings");
if (nodes.Count <= 0)
{
// place in complete appSettings section
XmlDocumentFragment newAppSettings = doc.CreateDocumentFragment();
newAppSettings.InnerXml=
("<!-- APPSETTINGS\n "+
"This section sets all the custom application settings\n -->" +
"<appSettings>\n" +
"<add key=\"setup\" value=\"false\" />\n" +
"<add key=\" database\" value=\"" + database + "\" />\n" +
"<add key=\" datasource\" value=\"" + datasource + "\" />\n" +
"<add key=\" userid\" value=\"" + userid + "\" />\n" +
"<add key=\" password\" value=\"" + password + "\" />\n" +
"<add key=\" timeout\" value=\"" + timeout + "\" />\n" +
"</appSettings>");
//add the new appSettings to the doc
root.AppendChild(newAppSettings);
}
On the other hand, if there is an <appSettings> tag, the method has the arduous task of going through all the key/value pairs one by one, looking for the values it needs to update while noting the ones that are missing.
You might note that this code shows how to update attributes in an element. The process is simple because each element gets all its attributes in a collection using the Attributes property. Get the specific attributes you want by name using the GetNamedItem() method, in this case the key and value attributes. Finally, check which key you have and update its value appropriately.
else
{
bool issetup |
= false; |
bool isdatabase = false;
bool isdatasource = false;
bool isuserid |
= false; |
bool ispassword = false;
bool istimeout = false;
for (int i=0; i < nodes.Count; i++)
{
XmlNodeList appnodes =
((XmlElement)(nodes.Item(i))).GetElementsByTagName("add");

for (int j=0; j < appnodes.Count; j++)
{
//replace with new values
//record to make sure none are missing XmlAttributeCollection attrColl = appnodes.Item(j).Attributes; XmlAttribute tmpNode =
(XmlAttribute)attrColl.GetNamedItem("key"); XmlAttribute tmpNodeValue =
(XmlAttribute)attrColl.GetNamedItem("value"); if (tmpNode.Value.Equals("setup"))
{
//will be set to true later
tmpNodeValue.Value = false"; issetup = true;
}
else if (tmpNode.Value.Equals("database"))
{
tmpNodeValue.Value = database; isdatabase = true;
}
else if (tmpNode.Value.Equals("datasource"))
{
tmpNodeValue.Value = datasource; isdatasource = true;
}
else if (tmpNode.Value.Equals("userid"))
{
tmpNodeValue.Value = userid; isuserid = true;
}
else if (tmpNode.Value.Equals("password"))
{
tmpNodeValue.Value = password; ispassword = true;
}
else if (tmpNode.Value.Equals("timeout"))
{
tmpNodeValue.Value = timeout; istimeout = true;
}
}