

Real - World ASP .NET—Building a Content Management System - StephenR. G. Fraser
.pdfThe Simple Dynamic Content Viewer
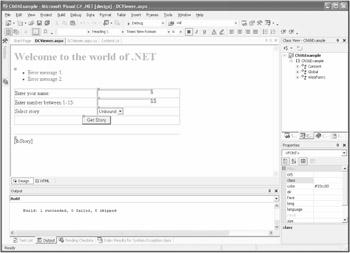
We will start with a simple ASP.NET Web page to view dynamic content. The final Web page should end up looking like Figure 6-1.
Figure 6-1: The simple Dynamic Content Viewer
The Web page contains a simple, dynamically loaded, drop-down list of stories available for reading. After a user selects a story, he clicks the Get Story button, at which point a transaction is sent to the Web server to retrieve the story. Then, once the story is loaded on the user's machine, it is displayed below the story selector area.
I thought the program was a little boring, so I livened it up with a little personalization. I added two additional boxes: one to get the user's name and the other to get a magical number. Both of these input text fields are validated on the client using JavaScript and are verified on the server. Each field is mandatory, and the number must be between 1 and 15.
Now when the user clicks the Get Story button, he is the subject of the story.
A Summary of the Steps
In this chapter, you will follow these steps to build the simple Dynamic Content Viewer:
1.Create a new project using Visual Studio .NET.
2.Rename WebForm1.aspx.
3.Design the Dynamic Content Viewer.
a.Create a title.
b.Create a table to lay out the Web page design. c.Add Web controls to the table.
d.Add validation to the Web controls. e.Add a label to display the selected story.
4.Create a Content class.
5.Add properties and a constructor to the Content class.
6.Declare and load the content repository.
7.Fill the drop-down list from the content repository.
8.Manipulate and load the story for viewing.
Creating a New Project Using Visual Studio .NET
To get the ball rolling, you have to create a new project to store all the files that make up the Web page. You will be creating a C#-based Web page, but you just as easily could generate a Visual Basic-based Web page instead. The process is very straightforward. You just need to start the process and select the appropriate template. If the template needs any additional information, it will ask you for it.
1.Click the New Project button from the Start Page. (This should open the New Project dialog box, as shown in Figure 6-2.)
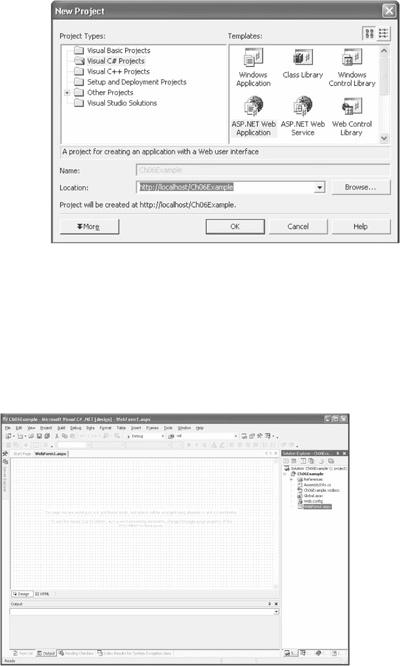
Figure 6-2: The New Project dialog box
2.Click the Visual C# Projects folder in the Project Types window. This will display all available C# project templates in the Templates window.
3.Click the ASP.NET Web Application icon in the Templates window.
4.Replace WebApplication1 with Ch06Example in the Location field. Notice that the grayed-out Name field is automatically updated with Ch06Example.
5.Click OK.
After 30 seconds or so, depending on the speed of your computer, you should have a project to start developing. When Visual Studio is finished doing its stuff, you should be presented with a screen similar to the one shown in Figure 6-3.
Figure 6-3: An empty project
Renaming WebForm1.aspx
The first thing you may notice is that the default name for the Web page, to put it nicely, stinks. The first thing you should do is rename it. Follow these steps:
1.Right -click the WebForm1.aspx file in the Solution Explorer.
2.Select Rename from the menu presented.
3.Enter DCViewer.aspx in the edit field that appears in the Solution Explorer.
4.Press the Enter key. Now you are ready to design your Web page.
Designing the Dynamic Content Viewer
You have the option to place all your components at exact x and y coordinates. I've never had to use this option because what is provided by standard HTML is quite sufficient. Using standard HTML tables should be good enough for laying out a Web page. Web pages should be simple and easy to use.
Changing to FlowLayout
The default layout mode is GridLayout, so now that the newly named Web page is available, let's change the layout to FlowLayout.
1.Select PageLayout in the Properties dialog box. If the Properties dialog box is not visible, select Properties Window from the View menu.
2.Select FlowLayout from the drop-down list box. The grid should disappear from the Web design editor.
Note |
This book uses FlowLayout exclusively, and it is assumed that you will |
|
do the preceding two steps for every page designed with this book. |
||
|
Now design your Web page so that it looks like Figure 6-4. You will be amazed at the amount of functionality your Web page will have after you complete these simple steps.
Figure 6-4: The Dynamic Content Viewer design window
Creating a Title
Let's add a cheery title to the Web page. It is usually a good idea to add a title or company logo near the top of your Web page so that a user will know where she is. To do this, you should follow these steps:
1. In the main edit window, type Welcome to the world of .NET. Notice that an asterisk has been added to the filename in the edit window tabs. This is a simple reminder that the file is "dirty" and needs saving.
2.Highlight the text you entered with the mouse.
3.Click the Block Format drop-down list box on the main toolbar.
4.Select Heading 1.
5.Click the Foreground Color button on the main toolbar.
6.On the presented dialog box, select a color of your liking. I selected green (#33cc00).
Creating a Table to Lay Out the Web Page Design
As I mentioned previously, you could have selected the X and Y layout option, but using a table is just as good in this case. Once you have a table, you will be able to fill it in with all the edit fields of the entry portion of the Web page. Follow these steps:
1.Select Insert Table from the Table menu.
2.In the Insert Table dialog box, set the following:
§Rows: 4
§Columns: 2
§Width: 65 percent
§Border Size: 0
3.Click OK.
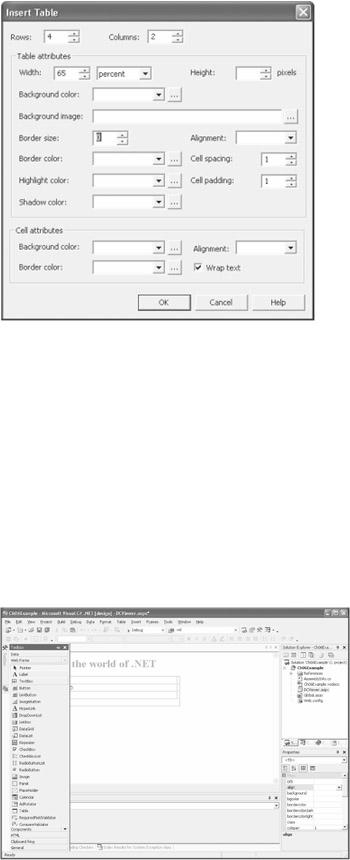
Figure 6-5: The Insert Table dialog box
4.Select the bottom row of the created table.
5.Select Merge Cells from the Table menu.
Adding Web Controls to the Table
Now you are ready to design the data entry part of the Web page, or what is better known as a Web form. The Web form is the part of a Web page used to communicate with the Web server. Information entered into it is packaged up in an HTTP request and sent to the server when the Submit button is clicked. The server then sends back an HTTP response. Chapters 10 and 11 cover Web forms in great detail.
1.In the first column of the first three rows, type the following:
§Enter your name:
§Enter number between 1–15:
§Select story:
Note Don't worry that the second column collapsed to nothing; this will correct itself with the next step.
2. Click and drag a TextBox from the Toolbox on the left border (see Figure 6-6) into the second column of the first and second rows.
Figure 6-6: The Visual Studio .NET Toolbox
3. Select TextBox1 and enter tbUserName in the (ID) field of the Properties dialog box on the right side of the screen.

4.Select TextBox2 and enter tbNumber in the (ID) field of the Properties dialog box.
5.Click and drag a DropDownList from the Toolbox into the second column of the third row.
6.Select the DropDownList and enter ddlStories in the (ID) field of the
Properties dialog box.
7. Place the cursor in the fourth row and click the Center button in the main toolbar. This will cause all things added to the row to be centered.
8.Click and drag a Button from the Toolbox into the fourth row.
9.Select the Button and enter bnGetStory in the (ID) field of the
Properties dialog box.
10. Enter Get Story in the Text field of the Properties dialog box.
Okay, I'm sure you're dying to give the Web page a try. So, let's give it a go. Save DCViewer.aspx and then select Build from the Build menu. You now have two options for viewing your Web page. You can use the slow-to-start Debug button on the main toolbar, or to start quickly you can right-click the DCViewer.aspx file in the Solution Explorer and then select View in Browser.
Now, play around a bit. Notice that the button you added has defaulted to a Submit button. Also notice this very important fact: The session state of the form is retained after it returns from the Web server without any special coding of your own. In other words, the name and number fields retain their values after the round-trip from the server. Pretty spiffy, no?
Okay, let's get back to work.
Adding Validation to the Web Controls
As you were playing with the Web page, I'm sure you noticed that it didn't matter what you typed into the text boxes. Fixing this is almost too easy. All you have to do is add four more Web controls, adjust some properties, and you're done.
I didn't tell you the best part. ASP.NET provides both client-side and server-side validation without any effort on your side. The default is to provide both, but if you don't want client-side validation, just turn it off. You can do this by adding to the top of your Web page file the following directive:
<%@ Page ClientTarget="DownLevel" %>
By the way, you can force client-side validation even if the browser doesn't support it. Use the following directive:
<%@ Page ClientTarget="UpLevel" %>
Why you would want to do the UpLevel attribute, though, escapes me.
There are two types of validation: static and dynamic. When an error occurs, static validation places the error message exactly at the place where the validation control is located in the HTML. Dynamic validation, on the other hand, lets you group all the errors at one place on the page, plus you can place some type of marker next to the edit field to flag it in the case of an error. Follow these steps:
1.Click and drag a RequiredFieldValidator control from the Toolbox into the first and second rows right after each TextBox.
2.Select the RequiredFieldValidator control for the tbUserName control and, in the Properties dialog box, set the following:
§Display: Dynamic
§Error Message: You must enter a user name
§Text: *
§Control To Validate: tbUserName
§(ID): rfvUserName

3. Select the RequiredFieldValidator control for the tbNumber control and, in the Properties dialog box, set the following:
§Display: Dynamic
§Error Message: You must enter a number
§Text: *
§Control To Validate: tbNumber
§(ID): rfvNumber
4.Click and drag a RangeValidator control from the Toolbox into the second row right after the RequiredFieldValidator control.
5.Select the RangeValidator control for the tbNumber control and, in the Properties dialog box, set the following:
§Display: Dynamic
§Error Message: Enter a number between 1–15
§Text: *
§Control To Validate: tbNumber
§Maximum Value: 15
§Minimum Value: 1
§Type: Integer
§(ID): rvNumber
6.Click and drag a ValidationSummary control from the Toolbox onto a
line of its own just after the title and before the table.
Now, if you compile and run the Web page, you will find that the Web page will only complete successfully if there is a name and a number between 1 and 15.
Adding a Label to Display the Selected Story
You need to include only two more pieces, and then your Web page design is complete: first, a horizontal line to separate the two parts of the page; second, a label to display the story. Believe it or not, you are not going to need to embed any code or create any special tags or what have you. Just a Label will do. By the way, the Label supports full HTML formatting as well. Follow these steps:
1.Click and drag a Label control from the Toolbox and place it after the table.
2.Select the Label control and enter lbStory in the (ID) field of the Properties dialog box.
3. Delet e everything from the Text field of the Properties dialog box.
4.Select the Toolbox on the left side of the screen.
5.Select the HTML button near the bottom of the Toolbox.
6.Click and drag a HorizontalRule control from the Toolbox and place it
after the table and before the Label control.
7. Select the HorizontalRule control and, in the Properties dialog box, set the following:
§Align: Left
§Size: 4
§Width: 65%
Okay, you are done with the design of the Web page and with the file DCViewer.aspx. Save, compile, and run the Web page. Still doesn't do much, does it? That is what the C# code is for. So, let's take a quick look at Listing 6-1, which shows the entire DCViewer.aspx file generated by the visual design tool provided by Visual Studio .NET. Then we'll move on to the world of C#.
Listing 6-1: DCViewer.aspx
<%@ Page language="c#" Codebehind="DCViewer.aspx.cs" AutoEventWireup="false"
Inherits="Ch06Example.WebForm1" %>
<!DOCTYPE HTML PUBLIC "-//W3C//DTD HTML 4.0 Transitional//EN" >
<HTML> <HEAD>
<meta name="GENERATOR" Content="Microsoft Visual Studio 7.0"> <meta name="CODE_LANGUAGE" Content="C#">
<meta name="vs_defaultClientScript" content="JavaScript"> <meta name="vs_targetSchema"
content="http://schemas.microsoft.com/intellisense/ie5"> </HEAD>
<body >
<form id="Form1" method="post" runat="server" > <H1>
<FONT color=#33cc00>Welcome to the world of .NET</FONT>
</H1> <P>
<asp:ValidationSummary id=ValidationSummary1 runat="server"> </asp:ValidationSummary>
</P> <P>
<TABLE id="Table1" cellSpacing="1" cellPadding="1" width="65%" border="0">
<TR>
<TD>Enter your name:</TD> <TD>
<asp:TextBox id=tbUserName runat="server"> </asp:TextBox>
<asp:RequiredFieldValidator id=rfvUserName runat="server"
ErrorMessage="You must enter a user name" Display="Dynamic"
ControlToValidate="tbUserName">*
</asp:RequiredFieldValidator> </TD>
</TR > <TR>
<TD>Enter number between 1–15</TD > <TD>
<asp:TextBox id=tbNumber runat="server"></asp:TextBox>
<asp:RequiredFieldValidator id=rfvNumber runat="server"
ErrorMessage="You must enter a number" Display="Dynamic"
ControlToValidate="tbNumber">*
</asp:RequiredFieldValidator>
<asp:RangeValidator id=rvNumber runat="server"
ErrorMessage="Enter a number between 1 and 15" Display="Dynamic"

ControlToValidate="tbNumber"
MaximumValue="15"
MinimumValue="1"
Type="Integer" >*
</asp:RangeValidator>
</TD>
</TR >
<TR>
<TD>Select Story</TD >
<TD>
<asp:DropDownList id=ddlStories runat="server" >
</asp:DropDownList>
</TD>
</TR >
<TR>
<TD colSpan=2>
<P align=center>
<asp:Button id=bnGetStory runat="server" Text="Get Story">
</asp:Button>
</P>
</TD>
</TR >
</TABLE>
</P>
<P>
<HR align=left width="65%" SIZE="4">
<P></P>
<P>
<asp:Label id=lbStory runat="server" ></asp:Label>
</P>
</form>
</body>
</HTML>
Wait a minute. This isn't HTML. What are all these <asp:xxx runat="server"> things? The first thing you should know is that you can still use plain old HTML, but then you lose the capability to completely separate HTML and code logic. This will be covered in more detail shortly.
Starting backward, the runat="server" is an attribute to tell the ASP.NET compiler that it is a server control, thus allowing the compiler to process it. Without runat="server", the compiler will ignore it because it will believe it is a client-only
control. You see this happening with the <table></table>, <tr></tr>, and
<td></td> controls.
ASP.NET has taken every HTML form element and replaced it with an intrinsic control. Table 6-1 is a list of all the intrinsic controls used in Listing 6-1. If you want, you can put them in Listing 6-1 to give you a better understanding of what the code is doing.

|
Table 6-1: Intrinsic Controls in Listing 6-1 |
|
|
|
|
|
|
|
|
|
Intrinsic Control |
|
HTML Form Element |
|
|
|
|
|
|
|
<asp:TextBox> |
|
<input type="text" |
|
|
|
|
value="..."> |
|
|
|
|
|
|
|
<asp:DropDownList> |
|
<select>...</select> |
|
|
|
|
|
|
|
<asp:Button> |
|
<input |
|
|
|
|
type="submit"> |
|
|
|
|
|
|
|
<asp:Label> |
|
<span>...</span> |
|
|
|
|
|
|
Intrinsic controls are more consistent because they provide a common set of properties to work with. Because they are written using C#, they have been implemented using the common language runtime (CLR) and thus can be used with any language that supports the .NET Framework. You will find out shortly that, if you provide a name=xxx attribute in the controls, you can access the control using that name like any other object.
You may have noticed that there is not a single line of C# code in the DCViewer.aspx file. Believe it or not, because of intrinsic controls, you don't need C# here.
What? Didn't I just say earlier that you need C# to make this Web page do its stuff? Yes, you need C# code, but it isn't going to go into the ASPX file.
ASP.NET has gone the extra mile and provided the capability to completely separate the HTML from code logic. You will see that you can create almost any Web page without mixing HTML and code. Unfortunately, many examples on the Internet don't have this separation, probably for one of three reasons:
§The developer is used to doing it the old way and is unwilling to do it— or figure out how to do it—the new proper way.
§The developer is too lazy to make the effort to separate them.
§The developer doesn't know that he can.
Let's see how you achieve this separation of HTML and code. How observant are you? Notice at the top of DCViewer.aspx the following directive:
<%@ Page language="c#" Codebehind="DCViewer.cs"
AutoEventWireup="false"
Inherits="Ch06Example.WebForm1" %>
The Codebehind and Inherits attributes in this directive allow the ASPX Web page to link itself with C# code. The Codebehind attribute tells the ASPX Web page where its code logic is, and the Inherits attribute tells from which class in the Codebehind to inherit logic.
Now, if you use intrinsic controls with their capability to become objects, you can access the controls inside the C# code and change their properties at will, thus giving you complete control to change what you want about the control and not actually have to be in the HTML to do it. You will see that this is exactly what you are going to do to load the drop-down list ddlStories, which you may have noticed is empty. You will also display the story using the label lbStory.
You've spent enough time with HTML for now. Let's move on to some C# coding. Listing 6-2 shows what the DCViewer.cs file has in it now before you make any changes.
Listing 6-2: The Default DCViewer.cs
using System;
using System.Collections;
using System.ComponentModel;
using System.Data;
using System.Drawing;
using System.Web;
using System.Web.SessionState;
using System.Web.UI;
using System.Web.UI.WebControls;
using System.Web.UI.HtmlControls;
namespace Ch06Example
{
///<summary>
///Summary description for WebForm1.
///</summary>
public class WebForm1 : System.Web.UI.Page
{
protected System.Web.UI.WebControls.Label lbStory; protected System.Web.UI.WebControls.Button bnGetStory;
protected System.Web.UI.WebControls.DropDownList ddlStories; protected System.Web.UI.WebControls.RangeValidator rvNumber; protected System.Web.UI.WebControls.RequiredFieldValidator
rfvNumber;
protected System.Web.UI.WebControls.TextBox tbNumber; protected System.Web.UI.WebControls.RequiredFieldValidator
rfvUserName;
protected System.Web.UI.WebControls.TextBox tbUserName; protected System.Web.UI.WebControls.ValidationSummary
ValidationSummary1;
protected System.Web.UI.WebControls.TextBox tbName;
protected System.Web.UI.WebControls.RequiredFieldValidator rfvName;
private void Page_Load(object sender, System.EventArgs e)
{
// Put user code to initialize the page here
}
#region Web Form Designer generated code override protected void OnInit(EventArgs e)
{
//
// CODEGEN: This call is required by the ASP.NET Web Form Designer.
//
InitializeComponent();
base.OnInit(e);
}
///<summary>
///Required method for Designer support - do not modify
///the contents of this method with the code editor.