

Real - World ASP .NET—Building a Content Management System - StephenR. G. Fraser
.pdf<Link>EditUser.aspx </Link> </MenuItem>
<MenuItem>
<Name>Remove User</Name> <Link>RemoveUser.aspx</Link>
</MenuItem> </Menu> <Menu>
<MenuName>Groups</MenuName> <MenuItem>
<Name>Group Summary</Name> <Link>Groups.aspx</Link>
</MenuItem> <MenuItem>
<Name>Create Group</Name> <Link>CreateGroup.aspx </Link>
</MenuItem> <MenuItem>
<Name>Edit Group</Name> <Link>EditGroup.aspx</Link>
</MenuItem> <MenuItem>
<Name>Group Members</Name> <Link>MemberGroup.aspx</Link>
</MenuItem> <MenuItem>
<Name>Remove Group</Name> <Link>RemoveGroup.aspx</Link>
</MenuItem>
</Menu>
<Menu>
<MenuName>Test Items</MenuName>
<MenuItem>
<Name>Read XML</Name> <Link>ReadXML.aspx </Link >
</MenuItem> <MenuItem>
<Name>Write XML</Name> <Link>WriteXML.aspx</Link >
</MenuItem>
<MenuItem>
<Name>Update XML</Name> <Link>UpdateXML.aspx</Link >
</MenuItem>
</Menu>

</MainMenu>
To pretty up the NavBar, I decided to add three images:
§Minus.gif: Showing that the menu is expanded
§Plus.gif: Showing that the menu is contracted
§Blank.gif: Showing that the menu item doesn't expand or contract
For this example, all the images were put into their own directory called Images, oddly enough, which we created in the Solution Explorer. You can find a copy of the images I used on the Apress Web site in the Downloads section (www.apress.com/downloads/downloadPrompt.html). Alternatively, you can use almost any small image you like.
The design of the NavBar Web page, which I call Menu.aspx, is easy enough. All it contains is one intrinsic Table control from the Toolbox, with an (ID) of tblMenu. It is livened up a bit by changing the background color to tan and the font to bold.
The first thing you do in the code is the same as always: You add the namespaces needed. In this case, you need to add both the XML and IO namespaces, as shown in the following code:
using System.Web.UI.HtmlControls;
using System.IO;
using System.Xml;
...
Loading the XML file into an XMLDocument was covered in the third example. The only thing worth noting is that this code is run every time the page is loaded. This is because session state is not preserved between calls. It is easier to simply rebuild the menu from scratch and expand on the clicked menu item. Instead of remembering what was expanded, contract it and then expand the clicked menu item.
private void Page_Load(object sender, System.EventArgs e)
{
XmlReader reader = new XmlTextReader(
File.OpenRead(Server.MapPath("XMLFiles\\MainMenu.xml")));
XmlDocument doc = new XmlDocument();
doc.Load(reader);
reader.Close();
...
Next, you use a little trick by having prior knowledge of the possible return values of Request.QueryString. Whenever you click an expanding menu item, Menu.aspx is recalled with the number of the menu selected as an Expand=n parameter. You will later take that number and expand all its menu items. The trick is that the Request.QueryString property, if accessed with an unknown or missing parameter, returns null. Because this is the case, you can check the return value for null and, if found, initialize the number of the menu to expand to a nonvalid menu value: -1. If you have a valid Expand=n parameter, use it. The code snippet showing this follows:
string expand = Request.QueryString["Expand"];
int ExpandWhich;

if (expand == null)
ExpandWhich = -1;
else
ExpandWhich = Convert.ToInt16(expand);
The code that builds the menu, at first glance, seems quite complex, but actually it is fairly simple. First, you declare a couple of variables that you will use repeatedly, so you just declare them here once. Then you create an array of all the menu XmlNodes.
TableCell cell;
HyperLink link;
XmlNodeList Menus = doc.GetElementsByTagName("Menu");
Next, you cycle through all the menus found in the XML file.
for (int i = 0; i < Menus.Count; i++)
{
For each menu, you are going to need to add a new row in your Table control. You do this by creating a new empty row and then adding it to the tblMenu.
TableRow row = new TableRow();
tblMenu.Rows.Add(row);
When you come to the menu item that needs to be expanded, which can be easily determined by comparing the current row number with the value passed in the Expand=n parameter, you branch to the code to handle it.
if (ExpandWhich == i)
{
Because you know that this menu item is to be expanded, you can put the minus.gif into the first column of the row. You do this by creating an empty cell and then creating an image control. You then place the image in the cell, which is in turn placed in the row.
Because the creation of images is done three times in the code, you probably want to make it a method of its own.
cell = new TableCell();
cell.Width = Unit.Percentage(1.0);
System.Web.UI.WebControls.Image image =
new System.Web.UI.WebControls.Image();
image.ImageUrl = "Images/minus.gif";
image.Width = Unit.Pixel(11);
image.Height = Unit.Pixel(11);
image.BorderWidth = Unit.Pixel(0);
cell.Controls.Add(image);
row.Cells.Add(cell);
Next, you create a literal control with the name of the menu that has been expanded. This is pretty simple. Create the literal control, place it in a new cell, and place the cell in the row.

LiteralControl lit =
new LiteralControl(Menus[i].FirstChild.InnerText);
cell = new TableCell();
cell.Width = Unit.Percentage(99.0);
cell.Controls.Add(lit);
row.Cells.Add(cell);
Because this is the expanded row, you now fetch all the menu items out of the MainMenu.xml. Then for each menu item, you create a row and place a blank.gif image in the first cell.
XmlNodeList MenuNodes = Menus[i].ChildNodes;
// start at 1 since 0 is the Menu Name
for (int j = 1; j < MenuNodes.Count; j++)
{
row = new TableRow();
tblMenu.Rows.Add(row);
cell = new TableCell();
cell.Width = Unit.Percentage(1.0);
image = new System.Web.UI.WebControls.Image();
image.ImageUrl = "Images/blank.gif";
image.Width = Unit.Pixel(11);
image.Height = Unit.Pixel(11);
image.BorderWidth = Unit.Pixel(0);
cell.Controls.Add(image);
row.Cells.Add(cell);
Each menu item needs to be associated with a hyperlink to the page to which it will be jumping. Simply build a new HyperLink and place in it the name you assigned to it and its hyperlink as specified in the MainMenu.xml. Then create a new cell, place the hyperlink in the cell, and place the cell in the row.
link = new HyperLink();
link.Text = MenuNodes[j].ChildNodes[0].InnerText;
link.NavigateUrl = MenuNodes[j].ChildNodes[1].InnerText;
cell = new TableCell();
cell.Width = Unit.Percentage(99.0);
cell.Controls.Add(link);
row.Cells.Add(cell);

}
}
If this menu is not expanded, you execute this branch. First, you create a new row and then place a plus.gif in the first column.
else
{
cell = new TableCell();
cell.Width = Unit.Percentage(1.0);
System.Web.UI.WebControls.Image image =
new System.Web.UI.WebControls.Image();
image.ImageUrl = "Images/plus.gif";
image.Width = Unit.Pixel(11);
image.Height = Unit.Pixel(11);
image.BorderWidth = Unit.Pixel(0);
cell.Controls.Add(image);
row.Cells.Add(cell);
Finally, you come to the magic of this NavBar. You create a hyperlink back to itself (Menu.aspx) with an Expand=n parameter, assigning the value of the current menu to n
. What this does, when selected, is cause the Expand=n parameter to be passed to the next execution of the Menu.aspx so that it can be expanded.
link = new HyperLink();
link.Text = Menus[i].FirstChild.InnerText;
link.NavigateUrl = "Menu.aspx?Expand=" + i;
cell = new TableCell();
cell.Width = Unit.Percentage(99.0);
cell.Controls.Add(link);
row.Cells.Add(cell);
}
}
So you can check to make sure you didn't miss anything, Listing 8-8 shows the entire code for Menu.cs.
Listing 8-8: Menu.cs
using System;
using System.Collections;
using System.ComponentModel;
using System.Data;
using System.Drawing;

using System.IO; using System.Web;
using System.Web.SessionState; using System.Web.UI;
using System.Web.UI.WebControls; using System.Web.UI.HtmlControls; using System.Xml;
namespace Ch08Examples
{
public class Menu : System.Web.UI.Page
{
protected System.Web.UI.WebControls.Table tblMenu;
private void Page_Load(object sender, System.EventArgs e)
{
XmlReader reader = new XmlTextReader( File.OpenRead(Server.MapPath("XMLFiles\\MainMenu.xml")));
XmlDocument doc = new XmlDocument(); doc.Load(reader);
reader.Close();
int ExpandWhich;
try
{
ExpandWhich = Convert.ToInt16(Request.QueryString["Expand"]);
}
catch (Exception)

{
// First time there is no "Expand" parameter
ExpandWhich = -1;
}
TableCell cell;
HyperLink link;
XmlNodeList Menus = doc.GetElementsByTagName("Menu");
for (int i = 0; i < Menus.Count; i++)
{
TableRow row = new TableRow(); tblMenu.Rows.Add(row);
if (ExpandWhich == i)
{
cell = new TableCell();
cell.Width = Unit.Percentage(1.0);
System.Web.UI.WebControls.Image image = new System.Web.UI.WebControls.Image();
image.ImageUrl = "Images/minus.gif"; image.Width = Unit.Pixel(11); image.Height = Unit.Pixel(11); image.BorderWidth = Unit.Pixel(0); cell.Controls.Add(image);
row.Cells.Add(cell);
LiteralControl lit =
new LiteralControl(Menus[i].FirstChild.InnerText);
cell = new TableCell();
cell.Width = Unit.Percentage(99.0); cell.Controls.Add(lit);
row.Cells.Add(cell);
XmlNodeList MenuNodes = Menus[i].ChildNodes;
// start at 1 since 0 is the Menu Name
for (int j = 1; j < MenuNodes.Count; j++)
{
row = new TableRow(); tblMenu.Rows.Add(row);
cell = new TableCell();
cell.Width = Unit.Percentage(1.0);

image = new System.Web.UI.WebControls.Image(); image.ImageUrl = "Images/blank.gif";
image.Width = Unit.Pixel(11); image.Height = Unit.Pixel(11); image.BorderWidth = Unit.Pixel(0); cell.Controls.Add(image); row.Cells.Add(cell);
link = new HyperLink();
link.Text = MenuNodes[j].ChildNodes[0].InnerText; link.NavigateUrl =
MenuNodes[j].ChildNodes[1].InnerText;
cell = new TableCell();
cell.Width = Unit.Percentage(99.0); cell.Controls.Add(link);
row.Cells.Add(cell);
}
}
else
{
cell = new TableCell();
cell.Width = Unit.Percentage(1.0);
System.Web.UI.WebControls.Image image = new System.Web.UI.WebControls.Image();
image.ImageUrl = "Images/plus.gif"; image.Width = Unit.Pixel(11); image.Height = Unit.Pixel(11); image.BorderWidth = Unit.Pixel(0); cell.Controls.Add(image);
row.Cells.Add(cell);
link = new HyperLink();
link.Text = Menus[i].FirstChild.InnerText; link.NavigateUrl = "Menu.aspx?Expand=" + i;
cell = new TableCell();
cell.Width = Unit.Percentage(99.0); cell.Controls.Add(link);
row.Cells.Add(cell);
}
}
}
#region Web Form Designer generated code override protected void OnInit(EventArgs e)
{
InitializeComponent();
base.OnInit(e);
}
private void InitializeComponent()
{
this.Load += new System.EventHandler (this.Page_Load);
}
#endregion
}
}
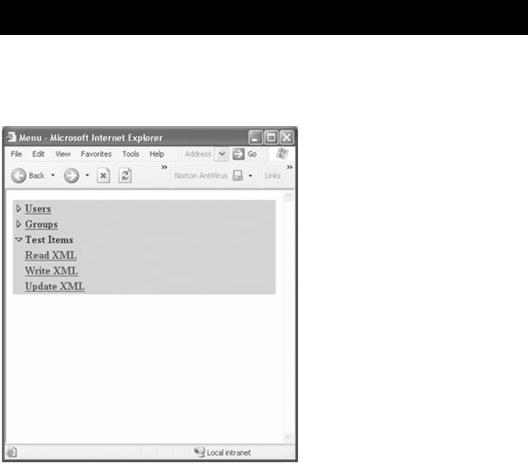
Enter, compile, and execute Menu.aspx. You should get a Web page similar to the one shown in Figure 8-7. Try clicking some of the links in the third menu. They should call up the three examples you created earlier in the chapter. The hyperlinks in the first two menus will generate errors. You haven't created those pages yet.
Figure 8-7: The Menu Web page
Summary
This chapter covered XML coding in a .NET architecture in detail.
First, it explained the basics of XML and showed an example. Then it explored where XML is used in a .NET Web architecture and examined some of its more common classes. It finished with four sample programs:
§Reading from an XML file
§Writing to an XML file
§Inserting and updating an XML file
§Creating a NavBar using XML
Enough background, don't you think? The next chapter provides a brief overview of
CMS.NET—the real reason you are reading this book. Then, in the chapter after that, you will start to build your own CMS, which you will call CMS.NET.
Chapter 9: A Quick Overview of CMS.NET
Overview
Are you ready for some fun? I know that I am. All this background information can start to get pretty dull unless you finally get to play with it. That's why I developed CMS.NET,
a fully functional content management system, although it's a little thin when it comes to the fancy functionality you'd find on (much) more expensive commercial CMS software.
So, what are you getting with CMS.NET? Here is a high-level list of CMS.NET's features, which the remainder of this book covers:
§Initialization system
§Fully remote administration system
§Role-based, workflow-controlled content management application
§Full authentication and role-based authorization using encrypted passwords
§Fully ASP.NET-controlled metacontent management application
§Three-level dynamic content delivery application
§User profile collection system
§Restricted content
Also hidden in the code are many coding hints and tips that will save you hours of research and experimentation when it comes to your own endeavors in building a CMS (or any other ASP.NET application, for that matter).
What Is CMS.NET?
Simply put, CMS.NET is a content management system written from scratch in ASP.NET, ADO.NET, and C#, and it uses Microsoft SQL Server to store its content.
It was designed from the ground up to support remote Internet maintainability. It uses the power of Microsoft's .NET to handle most of its dirty work. CMS.NET uses many of the most common ASP.NET features used by Web developers and should provide a leg up for new ASP.NET developers, even if they have no interest in developing a content management system.
CMS.NET is a complete content management system, but more than likely, you will want to add a few features. Thus, it will most likely be the starting point for a CMS more suited to your needs. With some customization, CMS.NET can provide much of the functionality needed to maintain and display content on the average Web site.
Installing CMS.NET
Normally, when installing software, you use a setup program of some type. This book is not going to make it that easy for you. I will show you how to install CMS.NET manually, just to show you how easy it is to install a .NET Web application.
As you will see shortly, all the difficult parts of installing CMS.NET are in creating and loading the database. Because there are many ways to do this, I will show you a couple of different ways.
Installing CMS.NET Application Code
Now (insert drum roll) here is how you install all the code of CMS.NET:
Go to the Apress Web site (www.apress.com), click the Downloads link, select this book's title and click the Submit button, and then copy the entire CMSNET directory structure in the Final directory to C:\Inetpub\wwwroot.
Yep, that's it! No registering DLLs and no copying code to special locations. Heck, you don't even have to copy the code to the directory stated here. You can copy it almost anywhere because next you will be creating a virtual directory to it in Internet Information Services (IIS).